1976 Starcraft Chieftain 18' OB - restomod

classiccat

"Captain" + Starmada Splash Of The Year 2020
Joined
Dec 20, 2010
Messages
3,409
We managed to get out to the garage early this morning, like before 0730! 🤪 🌅
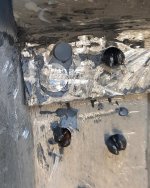
And we actually started installing rivets. Rib #3 has 74 rivet holes. We got 31 installed. We learned more as we went along too. Thanks again to @classiccat for the heads up about using 1/4" rivets for the oblong holes. We'll definitely do that wherever possible on the next 2 rib installations.

When we were first dealing with the oblong holes, I didn't have any 1/4" rivets and didn't realize that they could compensate so well for most of those bad holes. Lesson learned. (y)

In order to install the remaining rivets on rib #3, we have to lift the boat up and then relocate it on the trailer. The bunks and trailer frame are in the way and we can't get the rivet gun under the right spots. So, we'll work on ribs #1 and #2 first.
View attachment 365407
View attachment 365408

View attachment 365409

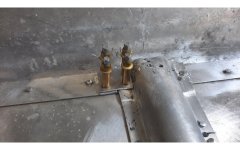
This one's the troublemaker. Other than welding or a big glob of JB Weld, is there another way to patch that hole?
View attachment 365410
first, stop using a rifle to remove rivets :ROFLMAO:

Avoid welding...esp so close to the double rivet seam. The seam sealer will run out, contaminate the weld and you'll be left with a very leaky part of the boat.

One idea i have looking at it, to at least fill the hole with solid aluminum is chamfer the inside and outside holes, then buck a 1/4" pure aluminum rivet (soft) then grind off the head & bucktail. the chamfered edges will hold the aluminum in place. IT Isn't structural nor leakproof but it will plug the gap. Then put an external patch buttered with 5200 held in place with a few normal rivets.
 

BWR1953

Admiral
Joined
Jan 23, 2009
Messages
6,011
first, stop using a rifle to remove rivets :ROFLMAO:

Avoid welding...esp so close to the double rivet seam. The seam sealer will run out, contaminate the weld and you'll be left with a very leaky part of the boat.

One idea i have looking at it, to at least fill the hole with solid aluminum is chamfer the inside and outside holes, then buck a 1/4" pure aluminum rivet (soft) then grind off the head & bucktail. the chamfered edges will hold the aluminum in place. IT Isn't structural nor leakproof but it will plug the gap. Then put an external patch buttered with 5200 held in place with a few normal rivets.
Does that mean I have to take it off full-auto? 🔫 :ROFLMAO:

Yeah, I was concerned about welding next to the edge. I wasn't positive if there was a sealant under the joint. I'm pretty sure that if I took it to a welder that they'd just say "Hey, it's no problem, we can weld that closed and whatever gunk that's under there won't come out." I betcha! 🤪

That nasty, irregular hole is 1/4" plus 3/16" combined. Ugh!

I got sidetracked by KF engine issues and then this morning my TV suddenly has a dark area all across the screen and about halfway up. :rolleyes:

Troubleshooting three major issues at once is onerous. Double-ugh. o_O
 

BWR1953

Admiral
Joined
Jan 23, 2009
Messages
6,011
No work again today. I was gone all morning and the temps were less than attractive this afternoon. 🥵 o_O

Temps.jpg
 

BWR1953

Admiral
Joined
Jan 23, 2009
Messages
6,011
Well, I'm back and trying to get this project going again. No new health issues since we stopped work, but other life stuff just refused to get out of the way. Over a year lost. :cry:

There are only 11 months left before the boy leaves home and I lose my most valuable helper. :(

The only thing to do is to hurry up and get going again! :LOL:


At this point, I've decided to take a completely different approach on making summertime progress. Instead of resuming the hull construction and its attendant issues, I'm going to begin work on the engines. One at a time.

Crawling around under the boat, beating on things with a rivet gun in the hot Florida summer just isn't worth it for us. "Tinkering" with the engines during the cooler times of day not only makes progress faster, it provides solid motivation. Plus, it's something I can do alone for the most part. :sneaky:

And, as always, I'll be learning still more new things. 🙃

- - - - - - - - - - - - - - - - - -
Getting started this morning on 70HP Mercury #1, the port engine. :cool:

I purchased this engine 7 years ago and it's been sitting the whole time. But the good news is that it was a running engine when I got it and had been serviced by a very capable Previous Owner, so it should easily come back to life. (The starboard engine is a different story altogether! 😆

We ran the carbs dry in March 2016 when I bought the engine, but I'll completely rebuild them anyway. Plus a new impeller and the usual lower unit drain and refill stuff.

I pulled the plugs and they all looked very clean. Then I squirted some SeaFoam Deep Creep into the cylinders and will let them soak overnight. Tomorrow morning I'll gently rotate the flywheel back and forth until it rotates 180 degrees, then I'll squirt more of the good juice in there. Another 24 hour soak and I should be able to rotate the flywheel all the way around without problems.

Later, I'll spin the engine over with the starter. Got to find (🤪) and hook up the switch controls first.

The orange color around the plugs is not rust, it's sealant that the PO used for the water jacket gasket.
1.jpg

Clean plugs.2.jpg

SeaFoam Deep Creep
3.jpg

Pulled the airbox cover off, then had to help the boy with his truck, so that ended my boat work for today. 😐
4.jpg
 
Last edited by a moderator:

Moserkr

Chief Officer + Starmada Splash Of The Year 2021
Joined
Nov 23, 2020
Messages
849
Good plan BWR! Glad to see you working on her again, and no new health issues.
 

racerone

Supreme Mariner
Joined
Dec 28, 2013
Messages
36,670
Are you saying that this motor could not be turned all the way round a few days ago ?----Was the flywheel stuck ?
 

Watermann

Starmada Splash of the Year 2014
Joined
Jan 12, 2013
Messages
13,753
Oh boy, he's back in the saddle again :)

Hope all the wiring is in good shape, it sucks on the old Mercs to replace working electronics because the wires are rotten,
 

BWR1953

Admiral
Joined
Jan 23, 2009
Messages
6,011
Nothing done for a couple days on the Chief. But, we did make a 200 mile round trip journey yesterday to buy a nice accessory for the KF! :cool:

This morning I went out and worked on removing the carbs from the port side 70HP Merc. Took me 90 minutes, but I got the airbox and carb plate off! 🤪

Working out there for me is sort of like the scene in the Music Man song of Pick a little, talk a little, cheep cheep cheep... Only in my case it's Read a little, Work a little, sweat sweat sweat... Read a little more, etc.! 🤣


Airbox and carb plate removed.
12.jpg

Did somebody mention cracked wires? :sneaky:
5.jpg


And this screw that holds the manual choke in place is a major PITA to remove. Ugh. :rolleyes:
7.jpg

This evening I ordered gasket kits and floats with seats. It'll be about a week before they get here though.

I'm wondering... is it safe to use Engine Degreaser on these old motors? :unsure:
 

BWR1953

Admiral
Joined
Jan 23, 2009
Messages
6,011
Just a quick update. This project is still alive... in my mind! 🤪

The carb stuff and impeller arrived a couple weeks ago, but we didn't get any boat work done because we were cramming for the boy's driving test. Got that done 5 days ago and he passed. Yay! (y)

But his new license made our car insurance go up $500/month and that's a big dent in our budget! Yes, he'll be looking for a job soon to cover the cost, but that means he'll be less available for boat work. :sneaky:

Once Hurricane Idalia passes, I'll get back to work on the carbs. I really do want to make the engines talk! :D
 

Gibbles

Commander
Joined
Nov 14, 2009
Messages
2,002
Nothing done for a couple days on the Chief. But, we did make a 200 mile round trip journey yesterday to buy a nice accessory for the KF! :cool:

This morning I went out and worked on removing the carbs from the port side 70HP Merc. Took me 90 minutes, but I got the airbox and carb plate off! 🤪

Working out there for me is sort of like the scene in the Music Man song of Pick a little, talk a little, cheep cheep cheep... Only in my case it's Read a little, Work a little, sweat sweat sweat... Read a little more, etc.! 🤣


Airbox and carb plate removed.
View attachment 386677

Did somebody mention cracked wires? :sneaky:
View attachment 386675


And this screw that holds the manual choke in place is a major PITA to remove. Ugh. :rolleyes:
View attachment 386676

This evening I ordered gasket kits and floats with seats. It'll be about a week before they get here though.

I'm wondering... is it safe to use Engine Degreaser on these old motors? :unsure:

I always do, engine degreaser all things!
Looks like a merc 650?
Ah nm, I see the 70hp note!

I have two of those 3 cylinder 65hp/ merc 650's, one is pretty much brand new, I have been saving it for my nova project that I have put off for the past several years.
 

BWR1953

Admiral
Joined
Jan 23, 2009
Messages
6,011
I always do, engine degreaser all things!
Looks like a merc 650?
Ah nm, I see the 70hp note!

I have two of those 3 cylinder 65hp/ merc 650's, one is pretty much brand new, I have been saving it for my nova project that I have put off for the past several years.
Thanks for the info!

I'm still not back at work on the Chief, but I do have hopes that I will be pretty soon. :sneaky:
 

BWR1953

Admiral
Joined
Jan 23, 2009
Messages
6,011
Hi guys! Looks like I'll be getting back to work on the Chief tomorrow morning. :D

This evening I started reviewing my prior work and where we were when I left off and realized that I'd not kept everything up to date here, so I'll give a brief update now.
 

BWR1953

Admiral
Joined
Jan 23, 2009
Messages
6,011
From 7-12-22

This was the mess:
5.jpg


We designed a patch to cover everything, inside and out, for this particular setup.
5a.jpg

At this point, we took a major break from work.
 

BWR1953

Admiral
Joined
Jan 23, 2009
Messages
6,011
From 8-8-22

The "hole" mess. 🤪

2.jpg

External patch designed and test fit with clecos.
3.jpg

The patch.
4.jpg

We filled the big ugly hole with a 1/4" solid rivet, plus some JBMW.
5.jpg


The I slathered the hole completely with JBMW.
6.jpg

Underneath.
7.jpg

Grinding the large rivet head down.
8.jpg
 

BWR1953

Admiral
Joined
Jan 23, 2009
Messages
6,011
From 8-9-22

Grinding things down.
1.jpg


Progress.
2.jpg

Covered and filled everything on the inside with JBMW.

3.jpg

4.jpg


Ground the excess off.
5.jpg


External patch test fit with everything in place. The internal and external patches will cover the "hole" mess and completely clamp everything together. Should be solid enough.
6.jpg

Clecos holding the external patch in place for testing.
7.jpg


Spacer designed to fill the void. All of this will be smothered in either JBMW or 3M 5200 upon final installation. Thoughts on which might be better? Strength from the JBMW, or flexibility of the 3M 5200?
8.jpg

Another view.
10.jpg
And that's where we stopped. Now that the weather has changed, I'll do a little work on the hull after I get the first (Port) engine running. Maybe. Nothing in concrete at the moment, but I only have 8 months until the boy leaves, so I have to make hay while the sun shines. 😎
 

Attachments

  • 7a.jpg
    7a.jpg
    486.5 KB · Views: 2
  • 9.jpg
    9.jpg
    235.2 KB · Views: 2
Top