1976 Montego 16- The "Free" Puppy

ratdude747

Petty Officer 1st Class
Joined
Sep 30, 2023
Messages
221
No expert but appears to work. Your sensors are 240-33 ohms and spec shows

Unit switching: Press the button first, then power on, and then enter the parameter selection mode. You can select the 0-190ohm(European) or 240-33ohm(American) level sensor. switch the units of speed (MPH,km/h or knot), water temperature (℉ or ℃) and pressure (psi or bar) with the unit button.

Ah. Noted.

Tracking down a decent (enough) tachometer is proving to be a pain. Most of the stuff that isn't $$$ is all reviews as "leaks water and died" in the reviews. I'd like to have discreet gauges for everything else as I don't know what else worth adding would fit there.
 

ratdude747

Petty Officer 1st Class
Joined
Sep 30, 2023
Messages
221
For the other gauges, it seems that Faria-Beede makes some nice gauges for a respectable price:


... they also make Tach's too:


... but $100... oof. FWIW I don't need an hour meter as the boat already has one under the throttle (but all the cheap tachs that are advertised for marine use have them built in).

On another note, the Faria gauges use standard 161 bulbs... LED swap?

I can get cheap Chinese gauges for less, but the trim is the hangup, as they're all non-Mercruiser (90 ohm instead of 160, and reverse direction). Not to mention it was a royal pain getting the console off, and I really don't want to pull the console again.
 

ratdude747

Petty Officer 1st Class
Joined
Sep 30, 2023
Messages
221
With a bit of persistence, I was able to uncrimp the old voltmeter, glue the needle back to the spindle, and re-crimp the housing.
So, as a lower-cost option, I could just replace the speedometer and (for now, at least) replace the oil buzzer/light. And maybe LED swap the cluster lights (currently has incandescent bulbs with red covers)

For the buzzer/light, this looks like a drop-in replacement:

Terminals are different but I could re-crimp (current unit has spade connectors, but is obsolete). Edit- the terminals actually look like they might accept spades with the screws removed. Either way it's good electrically. Edit- Ordered.

For the speedometer, I'd like a needle-based GPS unit... I wish someone made one that had the needle but also a compass too (so far, only finding ones with just the needle and an odometer). But a numeric one might also work too. My main worry is sun glare as on the LCD-only units that was a common complaint. Edit- Nah, What am I thinking. Probably will go with the first option... cheap and effective enough, plus looks different enough not clash with old gauges. Redundant voltage data isn't a big deal... old gauge gives "pulse" data (fast changes), new meter gives precise but slow data (easier to see a weak alternator/low battery). My ignition switch has an unused accessory terminal... I might elect to use it here, so I can use that position to see current voltage and speed (drift)/bearing.
 
Last edited:

ratdude747

Petty Officer 1st Class
Joined
Sep 30, 2023
Messages
221
Back to square one on the gauges.

Discoveries made:

  • The old voltmeter has failed miserably. Didn't like the glue repair (it had been working, at least the "nub" on the hub moved). Now it doesn't move more than a twitch. Likely a mechanical issue, but I'm done with this faded cracked and terrible looking :poop:

  • The tach is acting up... stuck on 800RPM with the engine not running. Likely another mechanical issue, but due to being faded/cracked and sealed, I really don't feel like messing with it.

  • Pulled the main engine harness plug. Confirmed pin 8 (orange: Analog oil pressure) is non-existent on the boat side of the harness.

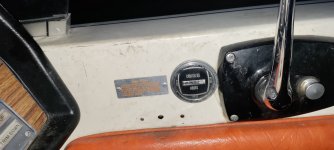
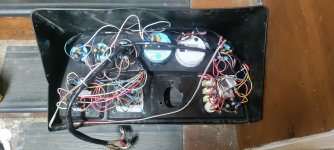
  • Discovered harness plugs for the console... which I was able to disconnect. But, I was still a bit tied... discovered a bunch of hack wiring (scotchlock into the main ground wire, wire with 3 splices badly routed to ignition switch) which ultimately went to the hour meter. Apparently that was dealer/user installed:
IMG_20240311_200906.jpg

(210 Hours supposedly).
The extra holes are from a busted cheapo bike horn switch that I removed... was what powering a heater (or what looks like one) under the console. I will eventually fill the holes with JB Waterweld before it sees the water.

I removed and taped over the scotch lock. If this meter stays, It'll have a dedicated harness added with spade connectors.​

Due to these issues, I may be in the market for new gauges after all. And a tach with an hour meter may be of value since the existing hour meter isn't stock (and honestly, may not even still work.

The other question that leaves is do I put an analog voltmeter back in, or do swap in an oil pressure gauge and swap the wires/replace the switch for a fresh sending unit?

Choices, choices, choices..
 

ratdude747

Petty Officer 1st Class
Joined
Sep 30, 2023
Messages
221
Buzzer/light came in. Other than needing ring/fork terminals (not spades), is a direct replacement for the old unit. Heck, if I glue it back together, the old square "oil" lens will fit. Sounds about right too.

If I even keep it... Still mulling over what to do with gauges.
 

Gibbles

Commander
Joined
Nov 14, 2009
Messages
2,027
for the tach and other gauges.
I have to ask how handy are you, good with little screws and springs?
good hand eye coordination when using tweezers (if it's needed)?

get a little rem or clock oil, open the gauge up and give it a few select drops of oil to try and free things up.
I have had a gauge need some adjustment via the little spring that's screwed to the gauge shaft, it might be a little trial and error but it's possible.

If your lucky, a little oil will do the trick.

I like these little bottles from amazon,
Nice fine point, fill with whatever.

I used these while rebuilding a transmission, one bottle filled full of atf.
exp handy while installing valve body components.

With my jeep project, I started playing around with mopar's ATF, I found it had very good cleaning properties.
Superior to the GM synthetic stuff I had been using before.


And if you happen to have a clock repairman near you, they might be willing to go through the gauge for you.

I do, and he told me he would be more than happy to clean one up for me if I needed it.
 

ratdude747

Petty Officer 1st Class
Joined
Sep 30, 2023
Messages
221
for the tach and other gauges.
I have to ask how handy are you, good with little screws and springs?
good hand eye coordination when using tweezers (if it's needed)?

get a little rem or clock oil, open the gauge up and give it a few select drops of oil to try and free things up.
I have had a gauge need some adjustment via the little spring that's screwed to the gauge shaft, it might be a little trial and error but it's possible.

If your lucky, a little oil will do the trick.

I like these little bottles from amazon,
Nice fine point, fill with whatever.

I used these while rebuilding a transmission, one bottle filled full of atf.
exp handy while installing valve body components.

With my jeep project, I started playing around with mopar's ATF, I found it had very good cleaning properties.
Superior to the GM synthetic stuff I had been using before.


And if you happen to have a clock repairman near you, they might be willing to go through the gauge for you.

I do, and he told me he would be more than happy to clean one up for me if I needed it.
The issue isn't just the gauge mechnicals... the face paint is in terrible shape (lots of cracks and fading) and while I was able to uncrimp and recrimp the housing on the voltmeter, the process wasn't pretty and honestly this is reeking of "not worth the trouble". If this was a concours restoration, the it'd be worth painstakingly repainting everything to save the original Starcraft branded gauges. But this isn't, so I will likely be buying new gauges.
 

ratdude747

Petty Officer 1st Class
Joined
Sep 30, 2023
Messages
221
Doing some eBay sluething... found the black coral Faria Bede gauges I'm wanting to go with for a good price (all BIN exept the tach which is pending an offer). Minus the voltage gauge, which I'm amazon'ing (my wife has prime through her parents 😁). I found a deal on an oil pressure gauge, but I've decided to stick with the light/horn as I don't have to chop a ton of wiring doing such.
 

ratdude747

Petty Officer 1st Class
Joined
Sep 30, 2023
Messages
221
Got the tach ordered.

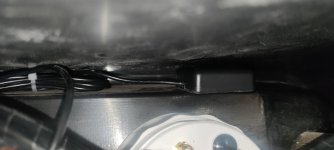
GPS speedometer came in along with an adhesive antenna. Found a way to hide it in the console for a clean install:

IMG_20240313_224026.jpg

Rigged up a 9v battery for a quick outdoor reception test. Works great:

IMG_20240313_230231.jpg


(Also, why I'm electing to replace everything else... These gauges are very tired!)
Also got all of the prep work done so the new gauges plug and play. I'm busy this weekend but hopefully by Monday evening I'll have the console ready to reinstall on the boat.
 

ratdude747

Petty Officer 1st Class
Joined
Sep 30, 2023
Messages
221
Voltmeter came in.

Run into a slight snag... the new gauge is a hair smaller and no matter what I do I get a bit of daylight shining between the gauge's outer ring and the console hole. Does anybody make washers/gaskets I could put between the gauge and the console to fill the gap and ensure adequate support?

Edit- holes are 2.125" (roughly, there is a notched area), gauges are 2.015" minor OD and 2.25" major OD. It should work... but only with 1/32" of radial overlap. Hmm... may just be fussy. Or the hole is notched more than I think. There are square-cut washers on McMaster-Carr that are about right that I may get to fill the gap (2.379" OD). Or am I overthinking this and a hair of daylight is OK?
 
Last edited:

ratdude747

Petty Officer 1st Class
Joined
Sep 30, 2023
Messages
221
Don't know about a washer but what about a O-ring
O-ring is right... it was late after a long day.

Here's an example:


Nice hard 90 Durometer too. My only worry is the rubber not tolerating the elements long term... but again, maybe I'm overthinking it.

Edit: If needed, here's something for the tachometer:


But I'm cautiously optimimistic that'll fit OK, no O-ring needed.
 
Last edited:

ratdude747

Petty Officer 1st Class
Joined
Sep 30, 2023
Messages
221
Ordered the 2" o rings. Didn't bother on the other ones... as I don't know if I'll need them.
 

ratdude747

Petty Officer 1st Class
Joined
Sep 30, 2023
Messages
221
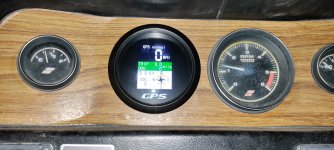
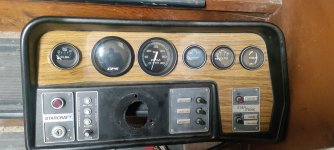
All gauges and the rubber backing rings came in. Also took apart, de-corroded, and rebuilt the dimmer switch.

Still waiting on LED bulbs for the gauges. Otherwise, it's done. Rubber rings worked perfectly and the tach fit like a glove.

Pics:

IMG_20240320_010905.jpg


IMG_20240320_011011.jpg

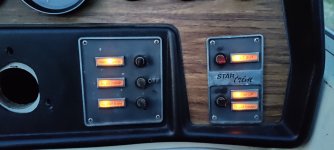
The only other issues are a crack in the plastic shell (not sure if this is ABS/PVC which can be glued, or polypropylene which cannot) and one of the 1/4" x 1" lights (the Navigation Lights light) is burnt out. I'm considering trying to solder in LEDs and resistors on the latter (all of such lights) but I'm undecided.

Progress?
 

alldodge

Moderator
Staff member
Joined
Mar 8, 2009
Messages
42,212
Looks good
Understand the LED part, but Nav lights don't get used much with most boaters, you could be different. They still make incandescent bulbs, should be able to find them at auto parts store
 

ratdude747

Petty Officer 1st Class
Joined
Sep 30, 2023
Messages
221
Looks good
Understand the LED part, but Nav lights don't get used much with most boaters, you could be different. They still make incandescent bulbs, should be able to find them at auto parts store
Leaving the nav lights on the bow incandescent (replaced the bulb which was burnt out)... I'm only referring to the console panel indicator light (the light/label by the side of the nav light switch).
 

ratdude747

Petty Officer 1st Class
Joined
Sep 30, 2023
Messages
221
LEDs for the gauges came in today. In addition, per some in-boat testing yesterday, I've found that ignition switch was toast (which per a teardown is only good for 10A?). Luckily, the local O'Reilly's had a dorman 30A switch stocked, which fit like a glove.

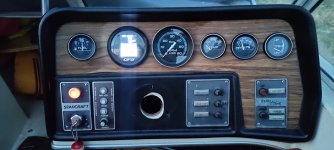
This evening I went ahead and fully installed the console in the boat:

IMG_20240321_201433.jpg

Battery voltage is low under load, likely due to not tightening the battery cables like a moron :rolleyes:. On accessory (GPS speedometer/compass only), the speedometer reports 12.5V (not the 11.8V on RUN). May also be that I don't have the harness connectors fully seated... I'll have to c-clamp them or something as they are very stiff (was a real pain unplugging!).

Apparently, despite my testing, the nav light bulb is in fact good:

IMG_20240321_201515.jpg

Apparently, the issue was that it was merely unplugged... Why my meter showed it as open I can say. Explains why it didn't look visibly burnt.

The trim gauge works great. No jumping like the old one. I shot a video but the super loud oil buzzer necessitates editing that I haven't gotten to yet. If the hour meter wasn't wired to the rest of the gauges (my bad decision), I would have moved the gauge and dimmer power eyelet to accessory power like the GPS speedometer/compass to get around getting honked every time I want to see gauges with the engine off. That said, in reality it's probably not a big deal?

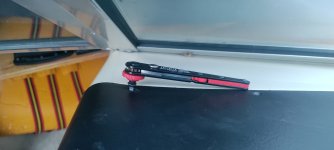
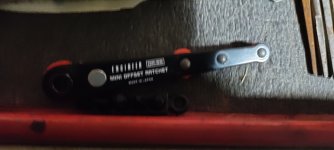
A particular tool I bought and deserves special recognition is a Japanese low profile ratcheting screwdriver (Engineer DR-55) for getting to the console screws:

IMG_20240321_195518.jpg


Despite a coarse tooth count it has a very light backdrive and it worked way better than expected. The thumbwheel is also more useful than expected, especially for starting screws. Would recommend for anybody else wanting to pull a console without removing glass.

Getting the wheel back on will be a later project... Removal was really FUN 😬🤬...
 

Attachments

  • IMG_20240321_202657.jpg
    IMG_20240321_202657.jpg
    2.3 MB · Views: 3
Last edited:

ratdude747

Petty Officer 1st Class
Joined
Sep 30, 2023
Messages
221
FYI, per another thread, I got the gas tank pumped down finally. While doing so, I periodically checked the Gas gauge... totally works and is accurate enough.
 

ratdude747

Petty Officer 1st Class
Joined
Sep 30, 2023
Messages
221
Last week, I got in contact with my best friend's dad who did a lot of the prior work on the boat (good, bad, and ugly). Per a long chat, I did find out exactly what happened regarding the deck/ski locker rot.

Apparently, the previous owner had it at a boat shop for 3 weeks around 14 years ago... and the shop negligently left it outside the entire time uncovered with the bilge plug not removed. Apparently it was a very rainy 3 weeks, as during this time the engine bay flooded several inches. Not long after, the original starter failed due to rust (hence the very new looking PMGR-type marine starter that said dad had installed himself).

Tangent: The shop also replaced the fuel filter due to the flooding... which is of note due said filter turning into a nasty mess when I replaced it awhile back. It was very badly rusted internally- I had to remove the housing from the boat and use a vice and pipe wrench to separate the filter from the housing. I also had to helicoil the manifold as one of the housing bolt locations was already completely stripped smooth- the bolt slid out by hand 😲. Thankfully the housing was intact (no damage) and the manifold repair was successful (so far, at least).

Anyway, the season after this event is when the rotten floor showed up... if enough water made it into the the bilge to flood the engine bay, such would explain what happened to the ski locker: locked flooded, water seeped through the "sloppy" ski locker floor glass and into the bilge underneath and sat there for 14 years.

This more or less confirms my prior assessment... and things finally add up a bit better.
 
Top