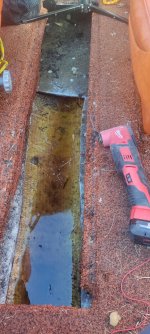
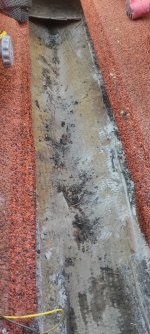
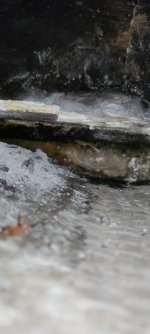
1976 Montego 16- The "Free" Puppy

ratdude747

Petty Officer 2nd Class
Joined
Sep 30, 2023
Messages
107
Having no luck drilling it.

JB waterweld ok for filling holes? I have some and that was my plan.

Never mind. Pulled the carpet and the locker floor is soft and failed the test. Ugh. Guess this is a bigger project or a sunk cost ...
Drilling the sides, there seems to be no wood, rot, or moisture behind the glass at all. Fiberglass over foam?
 

ratdude747

Petty Officer 2nd Class
Joined
Sep 30, 2023
Messages
107
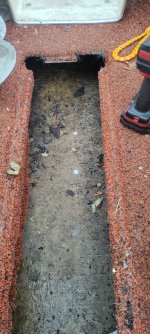
Made some discoveries. First, the rot in the locker floor runs up to the front of the seats. Beyond that, dry wood.

1707516143129802894972576392899.jpg

(Upper hole dry, lower hole moist)

Plugged the dry holes with water weld:

1707517284707341443517208558974.jpg

Second, it looks like the locker floor was glassed separate from the rest of the locker. Look at the front:
17075162728421850578054968844402.jpg

The sides of the board are exposed.

May just need the bottom board and part of the deck done?
 
Last edited:

ratdude747

Petty Officer 2nd Class
Joined
Sep 30, 2023
Messages
107
Different subject while it's on my mind: screws.

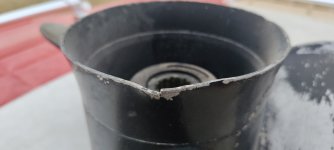
The outdrive currently has a 4-blade composite on it. Here's the remains of the box:

IMG_20240209_173140__01.jpg

Also included was an aluminum screw. Has a ding in it:

17075184302628372397218292456716.jpg

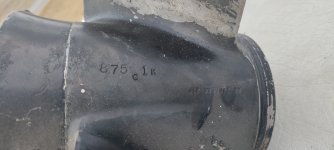
The damping rubber is cracked too... Probably junk? FWIW it's part number 48-74888-21, also marked with other things:

1707518626222116966315589326314.jpg

Might be original; the PO was very fond of the plastic screws (based on how many bladeless (crashed) cores were in the garage).

Thoughts?
 

ratdude747

Petty Officer 2nd Class
Joined
Sep 30, 2023
Messages
107
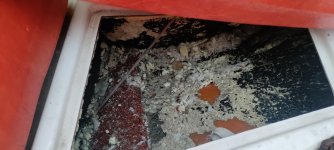
Not to spam post, but made yet another discovery while getting the cover on the boat. Apparently whatever built the nest in the ski locker got it by shredding the insulation under the bow seats:

IMG_20240209_180313.jpg

As dense as it is/was, it isn't part of the flotation foam, right? Or do I need to replace it to be safe? I'll need to shop vac it either way.
 

redneck joe

Supreme Mariner
Joined
Mar 18, 2009
Messages
10,364
If you are on the edge of continuing this project or trashing , talk with us, reread the replies and take a deep breath. This will be one of the best th ings you have ever done, or the worst. Best is better of course and could be a 40 year love.
 

ratdude747

Petty Officer 2nd Class
Joined
Sep 30, 2023
Messages
107
If you are on the edge of continuing this project or trashing , talk with us, reread the replies and take a deep breath. This will be one of the best th ings you have ever done, or the worst. Best is better of course and could be a 40 year love.
Understood. A bit of a gut punch at first.

---

Need to get an oscillating saw and cut the glass from the locker floor and see what's under the rotten wood. Given that it looks like they just tossed the board in there and threw some loose long hair glass on it, there is hope that the damage is limited to that board. My thinking is that the rain incident caused water to collect in the ski locker and the carpet kept it from airing out. As for what messed up the deck, the edge of the deck board is exposed back there and since the water pools in the back of the locker, the high humidity from said ski locker water did it in.
 

ratdude747

Petty Officer 2nd Class
Joined
Sep 30, 2023
Messages
107
Well... Under the locker apparently is the keel... And an icy lake:

17083792118743957570468875263732.jpg

Darn it. Not sure how far back it goes. Going to bail out what I can. The back area is still a chunk of ice.
 

ratdude747

Petty Officer 2nd Class
Joined
Sep 30, 2023
Messages
107
Going to give it time to thaw and dry up a bit. I need to see what's at the back of the cavity under the locker. No stringers in the suspect area towards the front of the locker (based on how much ice slid out). Looks like they glassed the hull first, then threw the board down and glassed the top of such to form the base of the locker.

Unless there's a good reason not to, would there be harm in not putting a floor back in and leaving the locker down to the keel as extra storage? Or is this an intentional bilge cavity?
 

alldodge

Moderator
Staff member
Joined
Mar 8, 2009
Messages
40,856
No reason to not leave it open.
Do see if there is a drain and if should not be clogged
 

ratdude747

Petty Officer 2nd Class
Joined
Sep 30, 2023
Messages
107
No reason to not leave it open.
Do see if there is a drain and if should not be clogged
No drain after cutting more of the locker out.

IMG_20240226_170700.jpg IMG_20240226_170811.jpg

There maybe is a 2mm gap or so at the keel. But I wasn't able to pass anything I had handy through to see if it makes it to the engine bay.

I took some measurements... About 17" from the back of the locker to the front of the engine bay.

It's virtually dry. A couple of lightly damp spots where debris was piled but that'll be dry in the next 20 or so (mopped it out with paper towels).

Well... Mystery solved? I don't know what's between the locker and the bay but the glass under the former locker floor looks nice a d rot-free in the picture. A case of poor locker design and nearly 50 years of floor drippings and the like?
 
Last edited:

ratdude747

Petty Officer 2nd Class
Joined
Sep 30, 2023
Messages
107
Updates and new projects:

First, I swapped out batteries and put in a new battery hold down today:


Second, I'm trying to get the gauge issues resolved. Pulled the console, only to find that the voltmeter with a broken needle isn't fixable as the gauges are crimped closed. Other issues that exist:

-The oil pressure warning light/sender is broken and sounds like death
-The speedometer hose needs patched in the back if it is to be used again
-All gauges look like junk due to paint fade and cracking. And are stuck in the 70's with incandescent bulbs (which I think may be dead).
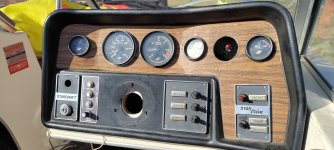
IMG_20240310_171235.jpg

Here's an idea that I'd like to bounce off some wiser minds: Why not replace all the gauges with modern replacments:

-Tachometer is a standard V8 tach. Common size from the looks of it, so nothing hard there
-Replace the pitot tube speedometer with a GPS unit. Some units include a compass and volt meter too, which I'd want.
-Dunno on the fuel gauge... but I could probably use a generic unit with a matching generic sending unit. But I may need to pull the rear seat wood to remove the existing sender. The gauge reads 1/2 tank (dunno actual level) and the existing gauge works based on some testing I previously did (disconnect and short cable to make sure needle moves).
-Replace the temp gauge with a generic unit. May need to replace the sender too, but nothing too hard there
-With the volt meter replaced by the new speedo, I'm thinking an oil pressure gauge makes sense. The Mercruiser 888 has both an analog sender and a switch installed and wired, so either by repinning the connector or swapping wires on the engine side, such could be done
-Trim gauge is a standard Mercruiser-compatible gauge. Also seems to be common. Other than a twitchy spot (probably an issue with the refurbished sending unit), existing gauge works fine.
-Plug over the removed oil pressure light/buzzer, since the added gauge replaced it.

Thoughts? I'm going to try to put a parts list together and post.
 

alldodge

Moderator
Staff member
Joined
Mar 8, 2009
Messages
40,856
Can replace some stuff but going full modern is mostly out of the realm without some major investments to go to something like NEMA 2000. The helm also doesn't have much space available

Could go with miniature gauges or quad type. Maybe install a smaller chart plotter with combo fish finder
 

ratdude747

Petty Officer 2nd Class
Joined
Sep 30, 2023
Messages
107
Can replace some stuff but going full modern is mostly out of the realm without some major investments to go to something like NEMA 2000. The helm also doesn't have much space available

Could go with miniature gauges or quad type. Maybe install a smaller chart plotter with combo fish finder
My plan above reused the existing gauge holes. Small holes are standard 2" gauges. Tach and Speedo appear to be standard 3 3/8" holes.

Speedo example I found:


alldodge

Moderator
Staff member
Joined
Mar 8, 2009
Messages
40,856
Should work good, and be way more accurate then original
 

ratdude747

Petty Officer 2nd Class
Joined
Sep 30, 2023
Messages
107
Didn't see anything on the gauge specifying CAN Buss
Exactly.

---

That same company also makes this wonder:


The only boon to this would be if I wanted to knock out everything but the trim gauge to add something else completely different or add a digital readout (talk about false precision!). Not the planned direction. Still digging... and will need to take resistance measurements on the fuel sending unit.
 

alldodge

Moderator
Staff member
Joined
Mar 8, 2009
Messages
40,856
No expert but appears to work. Your sensors are 240-33 ohms and spec shows

Unit switching: Press the button first, then power on, and then enter the parameter selection mode. You can select the 0-190ohm(European) or 240-33ohm(American) level sensor. switch the units of speed (MPH,km/h or knot), water temperature (℉ or ℃) and pressure (psi or bar) with the unit button.
 
Top