1976 22' SUS O/B "Hydration Break"

DWbaseball

Petty Officer 2nd Class
Joined
Aug 25, 2020
Messages
119
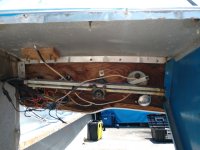
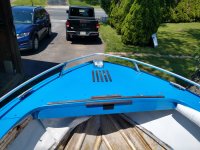
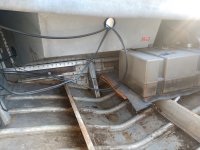
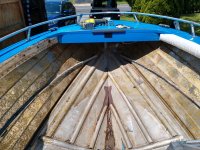
It's cold and raining this weekend so I won't be able to get much progress in. I got the passenger console drilled out last night. Didn't remove the windshield from console. Not sure if I'll keep it that way when I replace it or not.
IMG_20210528_180418959.jpg

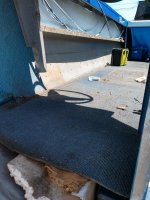
No pics but I also tore off that rotten elbow cushion on port side. Starboard seemed more solid so will have to cut.

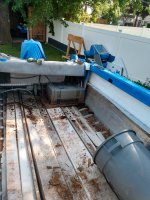
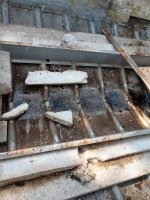
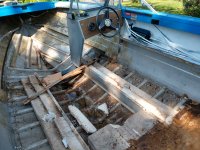
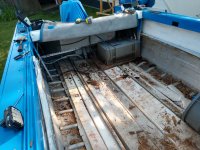
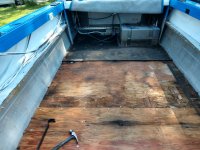
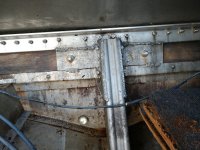
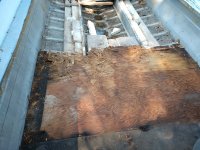
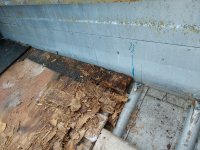
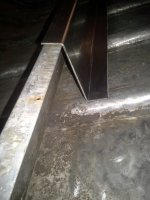
Lastly, with the rain and the cover off I am realizing with all the crud in the bottom of the boat that water doesn't flow past the ribs from front to back. I did give it a little more tilt yesterday. Wondering if there is a trick to raise the ribs in the middle a little bit so it flows better?
 

DWbaseball

Petty Officer 2nd Class
Joined
Aug 25, 2020
Messages
119
Also looking at the pic I realized I cut off some of that vinyl from the sides. Not sure if I'm going to keep some spots of that around the boat or tear it out every where. That angled piece to hold the bow seat sides is solid riveted in with the vinyl between it and hull. Don't love that.

Going to need to go back and look at threads for the best advice for stripping the inside of the hull. I was thinking I would use the nylox cup brushes as mentioned on here so I don't have metal flying off a cup brush. Also, need to get the right balance of stripping vs brushing, and when to do which. Probably needs to start with a power washing.

So far I haven't done any actual mechanical teardown of the electrical, steering, or motor rigging. But I'm getting close to needing to do that. A friend of my uncle that lives nearby is a boater and said he used to have an old Chrysler, and he offered to come by and see if he can help me get the motor started. I think I might take him up on that next week. That said, if we get it started up right away my wife might kill me for tearing apart the boat after we were both excited for boating all winter haha. But, I keep thinking about how good it will be once rebuilt, so just need to keep getting a little bit done at a time. Will try to take more pics next time.
 
Last edited:

SHSU

Lieutenant Junior+Starmada Splash Of The Year 2019
Joined
Mar 8, 2017
Messages
1,697
I removed all the vinyl on out boat. Didn't make sense and trying to match the original would have been impossible.

As for stripping the interior, I am guessing you are not going to cover the interior of the hull wall in carpet. As such, I liked @Moserkr 's approach to only wire brushing the areas that will be seen. Otherwise, no need in my opinion (Unless you are looking for corrosion)

SHSU
 

mattsteg

Petty Officer 2nd Class
Joined
Mar 25, 2019
Messages
177
Twin Towers, at 150 powerhead each, and about 280 ish lbs each.
"or realistic twin engine combo) from the 70s?"
There were not 120hp TOPs that I am aware of. My comment was regarding a period power option that tallied exactly 240 hp.
 

DLNorth

Chief Petty Officer
Joined
May 26, 2016
Messages
432
There were not 120hp TOPs that I am aware of. My comment was regarding a period power option that tallied exactly 240 hp.

exactly 240??? why?? especially when your boat is rated for 150.
but they did have 115's and 125's (I think) for a while. But the 150's would be a lot more fun. if you're sticking with Tower's, the later 115's would be better, integral trim and no distributor.
 

mattsteg

Petty Officer 2nd Class
Joined
Mar 25, 2019
Messages
177
exactly 240??? why?? especially when your boat is rated for 150.
but they did have 115's and 125's (I think) for a while. But the 150's would be a lot more fun. if you're sticking with Tower's, the later 115's would be better, integral trim and no distributor.
Mine is rated for 240. @Watermann had hypothesized that the ratings listed in the brochure were powerplant options rather than ratings (which I disagree, based on that reasoning)
 

DLNorth

Chief Petty Officer
Joined
May 26, 2016
Messages
432
Sorry, I'm getting owners/boats mixed up, you must have a V5 to have the 240 rating. Then as much a twin towers would be fun, a single V6 makes lot more sense (to me). Though twin 115's would be great. (depending on year, that boat was probably(?) from the powerhead rating time, and the late 115's are prop rated, (they are somewhere in the 130 range powerhead).
 

mattsteg

Petty Officer 2nd Class
Joined
Mar 25, 2019
Messages
177
Sorry, I'm getting owners/boats mixed up, you must have a V5 to have the 240 rating. Then as much a twin towers would be fun, a single V6 makes lot more sense (to me). Though twin 115's would be great. (depending on year, that boat was probably(?) from the powerhead rating time, and the late 115's are prop rated, (they are somewhere in the 130 range powerhead).
Well strictly speaking mine's a sterndrive anyway.

I agree that a single later v6 makes more sense in most cases, even if twin towers would be a ton of fun on the right boat.
 

DWbaseball

Petty Officer 2nd Class
Joined
Aug 25, 2020
Messages
119
Thanks for the opinions everyone, now if I do head in the direction of a repower, I won't be afraid to throw on an extra few hundred pounds of outboard, keeping to the stated range of 150hp.

Went Striper fishing yesterday and while the trolling was slow, I managed to pull in this guy.
IMG_20210531_164007083_HDR.jpg
 

Attachments

  • IMG_20210531_132248772.jpg
    IMG_20210531_132248772.jpg
    3.9 MB · Views: 9

DWbaseball

Petty Officer 2nd Class
Joined
Aug 25, 2020
Messages
119
What are people's thoughts on having two twelve gallon fuel tanks mounted above deck. I would put one under either side of the splash well, which should still leave me access to the bilge opening. Still need to measure to see what it would fit like.

They are for sale on fb marketplace for two twelve gallon for $100.

Right now I have a 15-18 gallon tank that sits on one side but doesn't fit under the splash well as well as I'd like, plus, I'd like a bit more fuel capacity, and I think this might achieve both for me.

Thoughts?

Can just see a bit of the existing tank in this pic.IMG_20210521_191307369.jpg


Heres a pic of the tanks for saleScreenshot_20210603-112035.png

Thanks for any opinions
-DW
 

SHSU

Lieutenant Junior+Starmada Splash Of The Year 2019
Joined
Mar 8, 2017
Messages
1,697
Most of it would be personal preference. As fuel weighs a lot, its nice to have that further forward to help offset the weight of the motor in the back. More of an issue on shorter boats, but can be impactful on larger ones too.

SHSU
 

DWbaseball

Petty Officer 2nd Class
Joined
Aug 25, 2020
Messages
119
Got alot more teardown done today. Sidewalls off, Most of the floor is out except for a small spot for the gas tank to stay in for now. Still keeping my motor mechanically rigged up for now.
Everything in the hull looks pretty clean i need to get the tools and a plan for stripping the old glue. Then I'm going to wash and Coat-it. IMG_20210605_181221208_HDR.jpg
IMG_20210605_181320934_HDR.jpg


Best news of the day is it looks like I have full length chine bracing so I wont need to think about adding those. I was expecting not to have them and was think that job was going to be a big project to stall my progress. This should really help me out in terms of the amount of riveting and hull work I'll need do which should help me keep the project moving. Overall I expect it to be minimal.
IMG_20210605_154546752.jpg
 

Attachments

  • IMG_20210605_170410604_HDR.jpg
    IMG_20210605_170410604_HDR.jpg
    1.8 MB · Views: 19
  • IMG_20210605_152037300_HDR.jpg
    IMG_20210605_152037300_HDR.jpg
    4.2 MB · Views: 18
  • IMG_20210605_152042199_HDR.jpg
    IMG_20210605_152042199_HDR.jpg
    4.2 MB · Views: 16
  • IMG_20210605_144132205.jpg
    IMG_20210605_144132205.jpg
    3.2 MB · Views: 16
  • IMG_20210605_182330258_HDR.jpg
    IMG_20210605_182330258_HDR.jpg
    4.9 MB · Views: 18
  • IMG_20210605_144141659_HDR.jpg
    IMG_20210605_144141659_HDR.jpg
    1.9 MB · Views: 20
  • IMG_20210605_154923563_HDR.jpg
    IMG_20210605_154923563_HDR.jpg
    1.9 MB · Views: 20
  • IMG_20210605_182339747_HDR.jpg
    IMG_20210605_182339747_HDR.jpg
    2.3 MB · Views: 20
  • IMG_20210605_144152763_HDR.jpg
    IMG_20210605_144152763_HDR.jpg
    4.9 MB · Views: 21
  • IMG_20210605_154942065_HDR.jpg
    IMG_20210605_154942065_HDR.jpg
    4.6 MB · Views: 21
  • IMG_20210605_144335715_HDR.jpg
    IMG_20210605_144335715_HDR.jpg
    4.3 MB · Views: 22
  • IMG_20210605_170403406_HDR.jpg
    IMG_20210605_170403406_HDR.jpg
    4.3 MB · Views: 21
  • IMG_20210605_153329747_HDR.jpg
    IMG_20210605_153329747_HDR.jpg
    4 MB · Views: 21
  • IMG_20210605_181606710.jpg
    IMG_20210605_181606710.jpg
    3.8 MB · Views: 21
  • IMG_20210605_153337739_HDR.jpg
    IMG_20210605_153337739_HDR.jpg
    6.4 MB · Views: 24
  • IMG_20210605_181616306.jpg
    IMG_20210605_181616306.jpg
    4.2 MB · Views: 24
  • IMG_20210605_154259004.jpg
    IMG_20210605_154259004.jpg
    5 MB · Views: 22
  • IMG_20210605_143332580_HDR.jpg
    IMG_20210605_143332580_HDR.jpg
    5.7 MB · Views: 18
  • IMG_20210605_154536655.jpg
    IMG_20210605_154536655.jpg
    5 MB · Views: 17
  • IMG_20210605_182302020.jpg
    IMG_20210605_182302020.jpg
    4.3 MB · Views: 17
  • IMG_20210605_145658954_HDR.jpg
    IMG_20210605_145658954_HDR.jpg
    4.8 MB · Views: 18

MNhunter1

Lieutenant Junior Grade
Joined
May 12, 2014
Messages
1,047
The full length bracing is interesting, never seen one done like that before. The welding work on the knee brace and how clean the deck rivets/some of the deck appear would indicate someone has tackled this one before. Always a good feeling to have them gutted and the hull looks to be in good shape.
 

DWbaseball

Petty Officer 2nd Class
Joined
Aug 25, 2020
Messages
119
We have a winner! I was wondering who would be the first to comment on my welded up knee brace after I teased it in my original post.

A few thoughts:
Right now I am leaning towards leaving the bow of the boat untouched and making that a separate, later project. I have that dent up there that's a big job to bang out and I think I could do the rest of the restore leaving the whole bow as is. This would save me alot of time of having to not remove the bow plate as well. I could then circle back and do that work later, even once I have the bow seats installed I think I should be able to do that work with out having to tear out again.

I think it was Moseker ? On a recent build thread who used C channel aluminum as cross braces on top of the ribs and under the floor. I think this should also serve to stablize the stringers as well. I was thinking the same but maybe only doing every other rib or so though, to keep material cost down on my 22 foot. Any concerns with doing that but not on every rib?

Also, Im really thinking of cutting down on the size of my transom opening, and raising the transom height a few inches up from the waterline I would set it up for a 25" shaft and really close in the wide open transom sides so there is just enough room for the outboard. More like a V5 transom shape than what I have now. I'm thinking I would cut the transom wood shaped as such, and then I would 5200 butter on a new transom skin that mates to the old piece.

Any online recommendations for the above mentioned C channel aluminum and a sheet for the transom? Or should I start calling my local metal shops?

Thanks!
 

Moserkr

Chief Officer + Starmada Splash Of The Year 2021
Joined
Nov 23, 2020
Messages
867
I bent some sheet AL into C’s, but only a few to brace the stringers beneath the deck. I remember seeing another post with substantially more bracing that you may be referencing. One helpful tip - when reading threads, use the bookmark option. Mark it for later and you can access it in your profile so you dont forget!!

I wouldnt skip any ribs though. Each one adds significant structure thats needed for the hulls, especially on the big tin in big water. My little 16’r is mainly tied together with the wood floors along the ribs, and 4 braces between the stringers.

My stringer bracing:
9F378089-687A-44B7-85D7-7128E00E9865.jpeg
 

Watermann

Starmada Splash of the Year 2014
Joined
Jan 12, 2013
Messages
13,773
We all have our issues, here's mine, a 25" transom that some goof cut down to use a 20" shaft motor and cut a hole in the splashwell for me to repair.

y4mePhMG0VxE1dSaDQBWPGafxKPLuznISL-K677uc_GLlv4WzFFUgaAR0bnvHyfC8TAxj3Teyg7CGHGIWPVqYSd0X9a229ZjaL2Y9ODbqgbr5kVdJpLTA3x2EVNfANS3Yeb3xY63lLxF27vOxGQ7350MRDbDtIfIrQnHdI890RzptVFKJB9k1odV0KvddDcFOdD


The SW is around 18" deep.

y4mcx6yLvs0xrLt-GeRxKKGpwyD7wLqkT2i57isFOMRsDAwveAYKC7BTCU_PNjsOFUFEoa7YiSjz2sIaC-a4hlZnlUnzykADS5wqt1OlLUW9nnjIc2LdVryef7liiwZ8XkMQWeGiqo8UQaxmN0w5QDd56SAR2ia2yG8Z4mNya8ujJOp2betOJQBXIW2Bg-U8DOe
 

BOYS & TOYS

Petty Officer 2nd Class
Joined
Mar 1, 2008
Messages
142
Adding another stringer shaped piece of aluminum with blind rivets is an easy way to increase the strength of the stringers.
I wanted a 25" transom too with a small splashwell. I made a removable piece to use 20" motor if I had to.
 

Attachments

  • 20170417_192140.jpg
    20170417_192140.jpg
    637.7 KB · Views: 32
  • 20170722_204057.jpg
    20170722_204057.jpg
    1.2 MB · Views: 31

SHSU

Lieutenant Junior+Starmada Splash Of The Year 2019
Joined
Mar 8, 2017
Messages
1,697
That is a nice transom. Did you replace the entire back end and weld the splashwell in?

SHSU
 

BOYS & TOYS

Petty Officer 2nd Class
Joined
Mar 1, 2008
Messages
142
That is a nice transom. Did you replace the entire back end and weld the splashwell in?

SHSU
Thank you. I put a thread together on this site so folks can get other design ideas. The transom skin was trashed so I cut all but 1.250" off and riveted a sheet of 3/16" in place. I welded a flange to the aluminum transom "core" and riveted the splash well on. By drilling some 1/4" solid rivets out the splash well is removable.
 

SHSU

Lieutenant Junior+Starmada Splash Of The Year 2019
Joined
Mar 8, 2017
Messages
1,697
Thank you. I put a thread together on this site so folks can get other design ideas. The transom skin was trashed so I cut all but 1.250" off and riveted a sheet of 3/16" in place. I welded a flange to the aluminum transom "core" and riveted the splash well on. By drilling some 1/4" solid rivets out the splash well is removable.

That is a boat you will keep for life. Nice work sir

SHSU
 
Top