1976 22' Starcraft Islander Rebuild - Chapter 2

alipinski397

Seaman
Joined
Sep 3, 2013
Messages
63
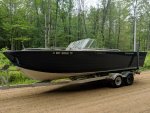
So anyone that followed Jason's most recent update on his thread for the 22 Islander build, you now know it found a new home with me.

Given the epic build thread and history on it I felt i needed to start a new thread continuing the legacy.

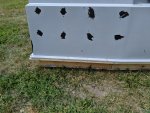
I think a little back story on how I ended up with it is in order. I had a Mariner 220V I had started a rebuild on this spring and a couple months ago had finished gutting it and got the old foam removed. That's when i found some pretty severe corrosion. Its past life was in a salt water area and i knew there could be some corrosion to fix but it was bad, really bad.

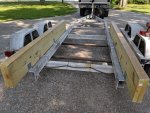
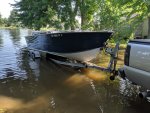
So i started searching for solutions or replacement hulls and stumbled on Jason's Islander thread. I had been considering islander hull for a replacement and cutting the top off to have the open bow center console setup of a Mariner. I realized he was local and only 25 min away, so I sent Jason a message to pick his brain on the process Not knowing if I would even get a reply as he hadn't been active on the forum for quite a while. A few days later he got back to me and low and behold he offered the islander for sale. He had back in the garage and somewhat tore back apart getting ready to convert it to an outboard. He had some other things on his plate and it had been sitting for a while collecting dust and he was ready to part with it. We made a deal and I drug it home.

My plans for the boat:
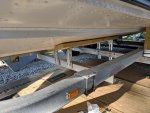
  • Finish the outboard conversion
  • Convert the dual console to center console
  • Plan to keep the bow storage and front seating structure as is
  • Add a T-top
  • Add a bow mount trolling motor
It will be a multipurpose boat for me. Duties will include fishing the great lakes, tender boat for our layout duck hunting rig in the fall and family fun boat in the summer.

Will post some photos in the replies as the thread progresses, need a few more posts in order to attach photos.
 

ben2go

Chief Petty Officer
Joined
Jul 29, 2008
Messages
411
Can't wait to see the center console. I think this is going to be a neat build. I thought about buying one of these $1500 bowriders or fish n ski type boats and doing something similar. Large tinnies are hard to find down here.
 

alipinski397

Seaman
Joined
Sep 3, 2013
Messages
63
Can't wait to see the center console. I think this is going to be a neat build. I thought about buying one of these $1500 bowriders or fish n ski type boats and doing something similar. Large tinnies are hard to find down here.


Its coming together pretty well. I love a center console setup.

I had one hesitation with this hull and that its pre "v5" so its a little narrower and the deadrise isn't as steep...but all else considered I couldn't pass it up.
 

alipinski397

Seaman
Joined
Sep 3, 2013
Messages
63
OK, heres a few photos the day i towed it home.

You can see Jason had the IO back out again, the console gutted, the bolsters removed from the consoles back and an outboard bracket built. It was pretty dirty as he had to leave it outside for a few months.

MVIMG_20190719_10171.jpgIMG_20190719_101731.jpgIMG_20190719_132601.jpgMVIMG_20190719_101726.jpg
 

Attachments

  • MVIMG_20190719_10171.jpg
    MVIMG_20190719_10171.jpg
    452.7 KB · Views: 8

alipinski397

Seaman
Joined
Sep 3, 2013
Messages
63
First up - remove the windshield and consoles.

Was able to sell the windshield and consoles to recoup some costs.

IMG_20190721_113453.jpgMVIMG_20190721_115136.jpg


The hull this one is replacing sitting back there on jacks in the yard.

IMG_20190721_113457.jpg
 

alipinski397

Seaman
Joined
Sep 3, 2013
Messages
63
Seat boxes had to come out for the center console.

wAAACH5BAEKAAAALAAAAAABAAEAAAICRAEAOw==

wAAACH5BAEKAAAALAAAAAABAAEAAAICRAEAOw==

Had to get a quick look and see how the fit will be.
​​​​​​​

wAAACH5BAEKAAAALAAAAAABAAEAAAICRAEAOw==
 

alipinski397

Seaman
Joined
Sep 3, 2013
Messages
63
We'll get the trailer work out of the way early...

Wont need both trailers now so I swapped the islander over to the trailer I already had. Made a couple modifications as the ribs weren't in the same place on this hull. This trailer has beefier axles, tires and trailer brakes. It will get a lot of miles so this was the better option.

I had already converted this trailer from rollers to bunks when the Mariner was on it and had chosen to put composite on the bunks instead of carpet.

Slapped a quick "patch" over the keyhole and went to the launch down the road and floated it on its new wheels.

Sold the other trailer and recouped a little more cash.


IMG_20190729_210452.jpg
MVIMG_20190731_084104.jpg
 

Attachments

  • IMG_20190729_210452.jpg
    IMG_20190729_210452.jpg
    186.5 KB · Views: 11
  • IMG_20190724_194020.jpg
    IMG_20190724_194020.jpg
    293.8 KB · Views: 11
  • MVIMG_20190731_084104.jpg
    MVIMG_20190731_084104.jpg
    308.3 KB · Views: 13
  • IMG_20190724_160130.jpg
    IMG_20190724_160130.jpg
    511.9 KB · Views: 14
  • IMG_20190724_160130.jpg
    IMG_20190724_160130.jpg
    511.9 KB · Views: 14
  • MVIMG_20190724_175907.jpg
    MVIMG_20190724_175907.jpg
    406.8 KB · Views: 14
  • MVIMG_20190724_175907.jpg
    MVIMG_20190724_175907.jpg
    406.8 KB · Views: 12
  • IMG_20190724_170713.jpg
    IMG_20190724_170713.jpg
    470.5 KB · Views: 11
  • IMG_20190724_170713.jpg
    IMG_20190724_170713.jpg
    470.5 KB · Views: 10

alipinski397

Seaman
Joined
Sep 3, 2013
Messages
63
So after digging into the project further and going back through Jasons thread I realized it wasn't going to be possible to get all the wiring and rigging under the current floor. No way was I going to rip all that out...so my solution was raising up 1.5 inches and plopping down a new floor on top.

Yes its a little extra weight but I dont see it being an issue;

I had some 2x6s already so I ripped them in half to use as the floor supports and cut some 5/8 ACX for the floor.

I did that before finishing the seat box removal so i could start getting them sealed up while i continue the demo job.

I also needed to keep access to the hatch in the floor that accesses the front gas tank lines and wires.


MVIMG_20190727_143200.jpgMVIMG_20190727_143117.jpgIMG_20190727_155620.jpgIMG_20190727_173004.jpgIMG_20190727_183323.jpg
 

ben2go

Chief Petty Officer
Joined
Jul 29, 2008
Messages
411
The old I/O notch is a good place for batteries and stuff. good deal on the floor.
 

alipinski397

Seaman
Joined
Sep 3, 2013
Messages
63
The old I/O notch is a good place for batteries and stuff. good deal on the floor.


My plan is for bilge pumps, livewell pump and hoses along with wiring and fuel lines to run down there. Batteries will go under the center console.
 

alipinski397

Seaman
Joined
Sep 3, 2013
Messages
63
4 coats of spar urethane on the 2by material and bottom side of the floor plywood. And 1 coat of oil based paint on the ply.

Double coats on the ends and edges.


IMG_20190728_121704.jpg

MVIMG_20190801_161229.jpgIMG_20190728_121710.jpgIMG_20190801_161239.jpg
 

Attachments

  • IMG_20190728_121704.jpg
    IMG_20190728_121704.jpg
    1.1 MB · Views: 2

alipinski397

Seaman
Joined
Sep 3, 2013
Messages
63
While the coats of spar were drying I finished getting the remaining part of the seat boxes off.

Sawzall and oscillating tool did the trick, but I will say Jason's original build was just about bullet proof. That was a tough job.


IMG_20190727_160100.jpgMVIMG_20190727_111855.jpgIMG_20190728_155434.jpgIMG_20190731_155058.jpgIMG_20190731_155642.jpgIMG_20190727_105321.jpg
 

alipinski397

Seaman
Joined
Sep 3, 2013
Messages
63
Also while the coats of spar were getting done on the floor I prepped and painted the Rude.

I'ts a 95 175HP V6 looper.


IMG_20190727_212824.jpgIMG_20190728_085536.jpgMVIMG_20190726_195959.jpgIMG_20190728_131431.jpgIMG_20190728_132918.jpgIMG_20190728_145318.jpgIMG_20190728_161804.jpgIMG_20190729_081447.jpg
 

alipinski397

Seaman
Joined
Sep 3, 2013
Messages
63
After sitting around staring at the transom and outboard pod I had decided to add a full width swim platform to it.

I drew up the design along with plans for the knee bracing and dropped it off to a buddy to weld it up.

3rd and 4th pics - the knee braces and C channel backer in orange are how I plan to tie it all in to the stringers. The green is where the bracket sits on the outside of the transom and the yellow is some 1/4 plate on the inside of the transom already used for backing from the IO and tie down straps.


Transom 1.pngTransom 2.pngTransom 4.pngTransom 3.pngTransom 5.png
 

alipinski397

Seaman
Joined
Sep 3, 2013
Messages
63
While the bracket and knee braces were getting welded I started putting the floor in, I wouldn't be able to put the last piece of floor in until i got the knee braces installed.

2by material was glued and screwed to the original floor and the plywood glued and screwed to it. Also painted the ends with oil based paint for good measure.

The top side of the floor will get epoxy and Behr Deckover to match the rest of the boat.

I also added in some mounting plates for when the T-top gets installed. That will give me almost 2-5/8" of solid floor material to screw into as I won't be able use bolt through backers with this setup.

I laid in a few pvc pipes for running wire to keep it as neat as possible under there.


IMG_20190731_183610.jpgIMG_20190731_184225.jpgIMG_20190731_190433.jpgIMG_20190801_162045.jpgIMG_20190802_175408.jpgIMG_20190801_194811.jpgIMG_20190802_190959.jpgIMG_20190802_192520.jpg
 

Attachments

  • IMG_20190802_090008.jpg
    IMG_20190802_090008.jpg
    1.1 MB · Views: 1

alipinski397

Seaman
Joined
Sep 3, 2013
Messages
63
Next up was some console work. I stripped everything off and used Marine Tex to patch all the holes, then prime and paint.

The top of the console had a lot of holes that i left as is, I planned on just cutting out a new top piece for it.


IMG_20190806_185630.jpgIMG_20190806_185655.jpg
 

Attachments

  • IMG_20190803_172057.jpg
    IMG_20190803_172057.jpg
    991 KB · Views: 0
  • IMG_20190803_174436.jpg
    IMG_20190803_174436.jpg
    1 MB · Views: 1
  • IMG_20190803_092032.jpg
    IMG_20190803_092032.jpg
    1.2 MB · Views: 0
  • MVIMG_20190803_092044.jpg
    MVIMG_20190803_092044.jpg
    1.2 MB · Views: 0
  • IMG_20190803_145624.jpg
    IMG_20190803_145624.jpg
    1.3 MB · Views: 0
Top