1975 Starcraft SS 16' Freshen Up

SHSU

Lieutenant Junior+Starmada Splash Of The Year 2019
Joined
Mar 8, 2017
Messages
1,712

So that is why the admiral wants me to keep extra paint cans around the house. lol

Progress of any kind is good progress. Also we all started somewhere and I would say I am still JV, but once I am like @Watermann with a couple rebuilds under my belt... maybe JV A team. lol

Can't help on the weather or thoughts on adjusting OTF. Hopefully @Woodonglass will see the post and add his thoughts on how to handle in cold temperatures.

SHSU
 

Woodonglass

Supreme Mariner
Joined
Dec 29, 2009
Messages
25,926
OTF has issues when applied in cold temps. If possible you should use heat lamps
 

Michigan Lakes

Petty Officer 3rd Class
Joined
Dec 20, 2018
Messages
86
OTF has issues when applied in cold temps. If possible you should use heat lamps
I applied the OTF on Saturday afternoon, taking @classiccat's advice and warming the wood and OTF to room temperature in the house before applying in the garage. I did manage to apply it during the 37(F) degree heat of the day :cool:.
I plan to wait 7-10 days before applying the Spar Urethane top coat. We're actually forecasted for sunshine and low-40s for the next two days before dropping back to normal (sub-30). Is placing the wood in direct sunlight during the curing process good practice considering the circumstances?
Thank you everyone for your advice and help.
 

SHSU

Lieutenant Junior+Starmada Splash Of The Year 2019
Joined
Mar 8, 2017
Messages
1,712
Is placing the wood in direct sunlight during the curing process good practice considering the circumstances?
I didn't do it in this specific circumstance or material, but anytime I seem to have left stuff direct in sunlight after applying a finish I get uneven drying and stuff bubbling on me. Sun drying things out quicker then it can gas off

Just my 2 cents

SHSU
 

Michigan Lakes

Petty Officer 3rd Class
Joined
Dec 20, 2018
Messages
86
The transom wood got three good coats of OTF just in time for the Midwest to drop into a deep freeze for most of February. Hopefully, 50-60 degree temps will allow for a coat or two or Spar in the not-so-distant future.
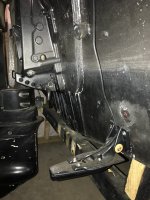
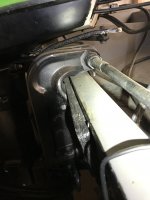
In the meantime, it's probably best for me to focus on the aluminum portions of the transom before coming back to the wood. Unlike automobiles, Michigan is actually rather kind to boat hulls. I'm thankful that I'm not dealing with any genuine corrosion to speak of (Lord knows I deal with plenty on my cars). I feel for @dizzyspots and others whose boat hull’s look like my Buick’s undercarriage.
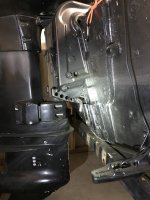
As for my boat, 40+ years of fishing equipment have pockmarked the transom with approximately 24 holes that have no future use (see red areas of photo). Most of these holes are below the waterline. I replaced the decking 2 years ago (using the factory pieces as templates) and very few of the holes have inside access.
Seeing as I’ll be using blind rivets either way, are any opinions out there regarding how many hole-fill rivets are too many? I know that builds with major holeage use a patch plate secured with rivets and sealed with 5200, Sikaflex etc. Is there any argument against using a fair number of 3/16” shallow grip rivets, dipped in 5200 or similar? The entire transom area will be resprayed (Rust-Oleum Safety Blue) before the motor is back on, thus preventing a rivet-acne sort of appearance.
Any and all thoughts on this are appreciated. I wish I had more to add to posts and questions I read on this forum every week but it’s hard with all the genuine expertise on here. Thanks everyone.
Transom Repair.jpg
 
Last edited:

SHSU

Lieutenant Junior+Starmada Splash Of The Year 2019
Joined
Mar 8, 2017
Messages
1,712
Is there any argument against using a fair number of 3/16” shallow grip rivets, dipped in 5200 or similar? The entire transom area will be resprayed (Rust-Oleum Safety Blue) before the motor is back on, thus preventing a rivet-acne sort of appearance.
Any and all thoughts on this are appreciated. I wish I had more to add to posts and questions I read on this forum every week but it’s hard with all the genuine expertise on here. Thanks everyone.

I have seen many repairs done by rivet and 5200. They do have the potential for head popping if hit, but so would bolt and nut. So if you can't weld closed, I don't see an issue with rivet/5200.

Just my 2 cents, for what little that is worth

SHSU
 

classiccat

"Captain" + Starmada Splash Of The Year 2020
Joined
Dec 20, 2010
Messages
3,411
Blinds with 5200 should be fine as long as the holes aren't hogged out too bad. Otherwise you may need to rivet on an external patch.

Another option is that you can trim some of your back deck...enough to fit a bucking bar allowing you to address those holes with solid rivets. Peel the carpet back and noone will ever know you were in there.

On the interior, you can add angle supports (bucktail side) to support a deck patch.
 

Michigan Lakes

Petty Officer 3rd Class
Joined
Dec 20, 2018
Messages
86
I ended up purchasing a bag of 100 1/4" closed end rivets with a .062-.25 grip range. It was about 96 more than I needed (all other holes were 3/16") but that's how it goes. Just glad that I managed to find them. Very few 1/4" rivets have that shallow of a grip range.
All the rivets/transom fasteners are in now in with excessive 5200. Thanks to @Watermann for the tip on keeping the 5200 refrigerated. Still using last year's $25 tube :)
I also took his suggestion (I don't remember in which thread I read this), to beef up the splashwell mount by putting SS thru bolts/washers to the exterior. I did every other hole in this manner w/ 5200. As I plan on mounting a swim ladder w/ a carpeted step-in platform on the splashwell, I wanted as much structural integrity as possible. The old seam sealant around the edges of the splashwell was ground out (grinded out?) and replaced with paintable automotive body panel adhesive. Although the Rust-Oleum Professional Paint I'll be spraying could probably have gone on with a just a 600 grit scuff, I wanted some self-etching primer over the bare spots (including fresh rivet heads) and and additional layer of filler primer to help with the numerous flaws in the 46-year-old paint.
Thank you again to everyone for your past work and postings. With enough reading and use of the search bar, I manage to find most any answer I need. Rivets-5200.jpgPrimered.jpg
 

Watermann

Starmada Splash of the Year 2014
Joined
Jan 12, 2013
Messages
13,775
I'm more than happy to help out anyway I can! :)

Nice to see you're progressing towards the finish line with some nice work (y)
 

SHSU

Lieutenant Junior+Starmada Splash Of The Year 2019
Joined
Mar 8, 2017
Messages
1,712
Love to see a good garage paint job!!!

SHSU
 

Michigan Lakes

Petty Officer 3rd Class
Joined
Dec 20, 2018
Messages
86
Both coats of paint are on. Turned out fairly well even with my all-Harbor Freight spray setup. If this holds up well throughout the Summer, I'll plan to shoot the entire exterior in this color between the seasons. The Rust-Oleum can surprisingly says it can be used down to 32 F.
On side note, I got a little too enthusiastic after the final wet sand and decided to buff and polish the paint. This was a mistake. The compound got in every blind rivet head, crevice, and corner. Ended up using a shop vac to get most of it out. Should have left well enough alone.
Paint Coat 1.jpg
Paint Coat 2.jpg
 

SHSU

Lieutenant Junior+Starmada Splash Of The Year 2019
Joined
Mar 8, 2017
Messages
1,712
On side note, I got a little too enthusiastic after the final wet sand and decided to buff and polish the paint. This was a mistake. The compound got in every blind rivet head, crevice, and corner. Ended up using a shop vac to get most of it out. Should have left well enough alone.

Leave it to us to try and improve on what we have already done and make it worse. lol

I like the idea of using paint vs the epoxy I used since it is easier to do touch ups, but at the same time the durability of the epoxy I have is what keeps me slightly leaning that way.

I bet you will be happy with how the rustoleum paint holds up and shoot the hull after the summer season.

SHSU
 
Joined
May 21, 2021
Messages
13
Looking good I enjoyed reading to this point. I just picked up a 76 Starcraft ss18 with a 85hp merc for $650 in Rockford today. Gonna start that build when the 87 trackers done next week. Looking forward to seeing your progress here man.
 

Michigan Lakes

Petty Officer 3rd Class
Joined
Dec 20, 2018
Messages
86
Outboard is back on. Not sure why, but for some reason I expected the upper portion of the mount to sit directly on the transom. This is clearly not the case, nor was was it ever that way. The upper mounts bolts are secured through the 2nd hole from the top.
I tried doing some searching through the iboats forums but keywords like "mounting holes" just have way too much scope to get anything specific.

Question for SS16/70hp 3cyl OMC owners: Which of the four upper mounting holes are you using?

Engine Mounted.jpg
Motor Mount Gap.jpg
 

Moserkr

Chief Officer + Starmada Splash Of The Year 2021
Joined
Nov 23, 2020
Messages
869
My mounting holes were the highest ones possible, and my gap was less than that. My cavitation plate? (fins) were perfectly set at the bottom of my hull too. Pics are poor but you can see it. You would need to drop your motor down and use the next hole up which would also lessen that gap on the SW trim - still wont touch though.
 

Attachments

  • 72EF8620-06A1-4AE6-AD3E-658AA27A1D43.jpeg
    72EF8620-06A1-4AE6-AD3E-658AA27A1D43.jpeg
    1.6 MB · Views: 12
  • 49D6DCC0-366B-4CDB-82FA-342C714F85C3.jpeg
    49D6DCC0-366B-4CDB-82FA-342C714F85C3.jpeg
    1.3 MB · Views: 12
  • 7487C97E-44C5-4F0C-9A0A-CE57C11A4065.jpeg
    7487C97E-44C5-4F0C-9A0A-CE57C11A4065.jpeg
    1.4 MB · Views: 12

SHSU

Lieutenant Junior+Starmada Splash Of The Year 2019
Joined
Mar 8, 2017
Messages
1,712
Cavitation plate needs to be even to/slightly above level with the bottom of the hull. So whatever bolt pattern that gives you correct placement.

SHSU
 

Michigan Lakes

Petty Officer 3rd Class
Joined
Dec 20, 2018
Messages
86
Cavitation plate needs to be even to/slightly above level with the bottom of the hull. So whatever bolt pattern that gives you correct placement.

SHSU
I put a straight edge across the cavitation plate. It sits about 1" above the keel. Based on that, the top hole appears be the better choice. Additionally, the original Evinrude owner manual (not specific to SC boats) also depicts the top hole being used and seems to refer to it as the "primary location".
Based on the condition/indentations of the wood I removed and the paint wear near the mounting holes, I'm relatively certain that the motor has been mounted using the 2nd hole from the top for the past 45 years. While I do plan to remount in the top holes, I also don't expect a huge change. Currently getting relatively good performance and achieving low-30s in calm conditions.
Cavitation Height.jpg
Install Instructions.jpg
 

Moserkr

Chief Officer + Starmada Splash Of The Year 2021
Joined
Nov 23, 2020
Messages
869
Good intel. Glad mine is mounted right! I get exactly 30 mph on the gps loaded or unloaded. Wondering if you improve dropping it down. Ive read other guys with our setup get 35 mph. Believe Im slower due to my motor’s internal issues.
 
Top