1975 Starcraft SS 16' Freshen Up

Michigan Lakes

Petty Officer 3rd Class
Joined
Dec 20, 2018
Messages
86
My bunks sit 56 inches apart from edge to edge.

SHSU

After reviewing the trailer portions of your build, that seems like a better configuration than the setup I envisioned with the bunks sitting inside of the strakes. The design of some of these Escort brand trailers (see attached photo) led me to believe that the bunks would be inside of the strakes. From a stability standpoint, I'd much prefer to be outside of the strakes.
 

Attachments

  • Escort Trailer.jpg
    Escort Trailer.jpg
    40.1 KB · Views: 8
Last edited:

Watermann

Starmada Splash of the Year 2014
Joined
Jan 12, 2013
Messages
13,753
The reason many trailers for heavy glassers are set up with the bunks inset more than you and I like is because more of the boat will rest on the bunk whereas out further like I set mine up too the boat starts the bow curve leaving some of the bunk not even touching the hull.

Since this pic of my galvanized trailer I have added another keel roller forward of the center one. The V5 has the added issue of the steep deadrise and bow angle.

y4mSLlauHtfJuH9_9N3ocZziAhCWfl_NbwoXCqyco4lKYf1wVRnzx6bAK9ljfSQLmMbD1C_ezXSSutFo0-1z7iM4xuEbh6YBS8BtG_KCMX7V2YOHxH1SfRev07f7lCxQLiBWyio_F_pIIbEwjBYfRjjhBTBYHZQ0Z3oUxyiSG61mzFvkIuJz-4zTpNTg0xxB-cJGH0PGiUOnB5hEkLL7tXTbQ
 

SHSU

Lieutenant Junior+Starmada Splash Of The Year 2019
Joined
Mar 8, 2017
Messages
1,665
I like the wider set for stability, but when it comes to loading, it is a pain. They sit so far out that when you load you have to hit it dead center or you will miss the keel guides. So in the current/tides of Galveston bay it can make it interesting.

With that said, I added an additional two bunks up front to help guide the keel to the right place. Haven't had a chance yet to test out but plan to next week.

SHSU
 

Michigan Lakes

Petty Officer 3rd Class
Joined
Dec 20, 2018
Messages
86
I picked up this gem over the weekend for $361.70 (ebay Boat Angel donation auction). The hull is obviously trashed. The 85hp Force has a broken skeg and an "electrical issue" (PO quote). I've got the motor off and plan to get the hull to the dump later this week. Hoping that I might be able to recoup costs next Spring by selling the complete motor or perhaps part it out.

In the mean time, the new-to-me galvanized trailer needs the same work as my old trailer (tires, bearings, bunks) but is largely free of any corrosion (unlike my old trailer).

It's a bit of gamble since I'm not 100% percent sure if the strakes on my SS will fit well with the bunks. Either way, I don't think I did too bad for the cost.

Anyone need some Bayliner parts before this pig gets it's send-off?
 

Attachments

  • photo340596.jpg
    photo340596.jpg
    151.4 KB · Views: 16
  • photo340597.jpg
    photo340597.jpg
    175.2 KB · Views: 15
  • photo340598.jpg
    photo340598.jpg
    216.7 KB · Views: 16
  • photo340599.jpg
    photo340599.jpg
    284.2 KB · Views: 16

SHSU

Lieutenant Junior+Starmada Splash Of The Year 2019
Joined
Mar 8, 2017
Messages
1,665
Don't forget to grab the controller and wiring harness before you dump it.

SHSU
 

Michigan Lakes

Petty Officer 3rd Class
Joined
Dec 20, 2018
Messages
86
Don't forget to grab the controller and wiring harness before you dump it.

SHSU

The controller, wiring harness, fuel tank, "dashboard", bilge pump and few other salvagable/saleable items were removed. I made handy use of the Sawzall rather than crawl around the rotten, insect infested interior looking for hidden fasteners and the like.

I give credit to Bayliner for building a very practical boat with a lot of cool features for something it's size. In particular, reasonably comfortable seating for 8 and built-in 21 gallon aluminum fuel tank were nice touches on a 17'.

That being said, absolutely nothing about dismantling this boat has in any way warmed me to fiberglass hulls. Rot was everywhere. I can't imagine the time, cost and effort (horrible epoxy sanding effort I might add) that would be required to revive something like this. And while I wouldn't necessarily consider myself an environmentalist in the typical sense, the fact that 1400 lbs of similar material has no reasonable destination except a garbage dump bothers me greatly.
 

Attachments

  • photo340769.jpg
    photo340769.jpg
    131.6 KB · Views: 11

Michigan Lakes

Petty Officer 3rd Class
Joined
Dec 20, 2018
Messages
86
After dumping the boat, I set about removing the rotten bunks and preparing the trailer for a good powerwashing.

While measuring and comparing the SS and the "new" trailer, it was quite apparent that redoing the bunks in their original configuration would place the hull strakes directly on the bunks. This does not seem good on a number of levels.

After a bit of thought and measuring with some scrap wood, it appears I may have a workable solution in flipping the bunk mount brackets to sit outside the channels and use 4x4s instead of the original 2x4 lumber. Flipping brackets and using 2x4 would have led to the strakes sitting off the bunks but hanging too close to the trailer frame (approximately 1/4") for my comfort.

The attached photos:
1. Original bunk configuration with 2x4
2. Proposed bunk configuration with 4x4
3. Red line on hull where I plan for the bunks to be

Any thoughts or comments on this plan would be greatly appreciated as I am into unexplored territory.
 

Attachments

  • photo340770.jpg
    photo340770.jpg
    235.4 KB · Views: 16
  • photo340771.jpg
    photo340771.jpg
    317.6 KB · Views: 16
  • photo340772.jpg
    photo340772.jpg
    163.9 KB · Views: 16

SHSU

Lieutenant Junior+Starmada Splash Of The Year 2019
Joined
Mar 8, 2017
Messages
1,665
Not being familiar with the brackets you have I can't provide any advise from experience.

With that said, I would be concerned with using the method you show. It doesn't appear to offer much support of the bracket itself and would think a hard hit at speed causing the boat to "jump" might cause the bunk bracket to bend over time. So your hull may eventually be touching the frame where you didn't want it to.

Again, no experience with the brackets you have and just my 2 cents

SHSU
 

Michigan Lakes

Petty Officer 3rd Class
Joined
Dec 20, 2018
Messages
86
Seeing as the Midwest boating season is over, I opted to put the trailer project on hold until next Spring when the weather will be better suited to trial-and-error test fits at the boat ramp.
In the mean time, the motor and transom were removed for what appeared to be the first time since 1975. The transom wasn't terribly rotten but did have approximately 1/4" of bowing at the center as measured with a 48" straight edge parallel to the wood. The wood screws holding the splashwell to transom were nearly all hanging loose. Various attempts with silcone and tape had been made over the years to negate this. All failed.
As a side bonus, it was also a good opportunity to remove the last of the old speedometer setup and various fasteners that at-one-time-or-another held all manner of the PO's fishing devices. Nearly 20 holes will need attention.
I plan to have nothing aside from the motor, fish finder and a swim ladder (Admiral's request - she's not a fan of the outboard-as-a-ladder method of boat ingress) attached to the stern.
There was a very dry and very failed gasket between the splashwell and transom. I assume the 21st century replacement for this would be a thin bead of 5200 or perhaps automotive RTV or Polyurethane panel adhesive. 5200 seems extremely popular here on the forum but the paintability of panel adhesive along with it's holding strength seems like a good fit. Any thoughts?
 

Attachments

  • Original Stern.jpg
    Original Stern.jpg
    236.9 KB · Views: 19
  • Transom Rot.jpg
    Transom Rot.jpg
    181.4 KB · Views: 18
  • Motor Off.jpg
    Motor Off.jpg
    249.9 KB · Views: 18
  • Stern - No Motor.jpg
    Stern - No Motor.jpg
    224.3 KB · Views: 18
  • Transom Bowing.jpg
    Transom Bowing.jpg
    230.2 KB · Views: 18
  • Transom Wood.jpg
    Transom Wood.jpg
    328.1 KB · Views: 19

classiccat

"Captain" + Starmada Splash Of The Year 2020
Joined
Dec 20, 2010
Messages
3,405
Seeing as the Midwest boating season is over, I opted to put the trailer project on hold until next Spring when the weather will be better suited to trial-and-error test fits at the boat ramp.
In the mean time, the motor and transom were removed for what appeared to be the first time since 1975. The transom wasn't terribly rotten but did have approximately 1/4" of bowing at the center as measured with a 48" straight edge parallel to the wood. The wood screws holding the splashwell to transom were nearly all hanging loose. Various attempts with silcone and tape had been made over the years to negate this. All failed.
As a side bonus, it was also a good opportunity to remove the last of the old speedometer setup and various fasteners that at-one-time-or-another held all manner of the PO's fishing devices. Nearly 20 holes will need attention.
I plan to have nothing aside from the motor, fish finder and a swim ladder (Admiral's request - she's not a fan of the outboard-as-a-ladder method of boat ingress) attached to the stern.
There was a very dry and very failed gasket between the splashwell and transom. I assume the 21st century replacement for this would be a thin bead of 5200 or perhaps automotive RTV or Polyurethane panel adhesive. 5200 seems extremely popular here on the forum but the paintability of panel adhesive along with it's holding strength seems like a good fit. Any thoughts?

I used nbutyl tape and really like it.

5200 is not the best choice for the primary splashwell seal. It's not fuel resistant...and with an old 2 stroke, that could be a problem.
 

Moserkr

Chief Officer + Starmada Splash Of The Year 2021
Joined
Nov 23, 2020
Messages
834
Following along as I am a few steps behind your refresh. Keep up the good work so I can learn from it!
 

SHSU

Lieutenant Junior+Starmada Splash Of The Year 2019
Joined
Mar 8, 2017
Messages
1,665
In the mean time, the motor and transom were removed for what appeared to be the first time since 1975. The transom wasn't terribly rotten but did have approximately 1/4" of bowing at the center as measured with a 48" straight edge parallel to the wood. The wood screws holding the splashwell to transom were nearly all hanging loose. Various attempts with silcone and tape had been made over the years to negate this. All failed.
Nothing like seeing screws fall out and no holding power. Sounds like you are better off then a lot of guys. I have seen pictures where its just straight mulch.

There was a very dry and very failed gasket between the splashwell and transom. I assume the 21st century replacement for this would be a thin bead of 5200 or perhaps automotive RTV or Polyurethane panel adhesive. 5200 seems extremely popular here on the forum but the paintability of panel adhesive along with it's holding strength seems like a good fit. Any thoughts?
I used 5200 on my project and was very liberal with it. I am not so worried about gas getting into that area/sitting. If there is I think I got bigger problems, but that just me. Also the 5200 isn't the main holding force, the screws (which I liberally coated in 5200 to prevent water intrusion) are what holds it to the transom. Your new transom will be solid and have no bend, so the screws/5200 will seal the area just fine.

Just my 2 cents...

SHSU
 

classiccat

"Captain" + Starmada Splash Of The Year 2020
Joined
Dec 20, 2010
Messages
3,405
Nothing like seeing screws fall out and no holding power. Sounds like you are better off then a lot of guys. I have seen pictures where its just straight mulch.


I used 5200 on my project and was very liberal with it. I am not so worried about gas getting into that area/sitting. If there is I think I got bigger problems, but that just me. Also the 5200 isn't the main holding force, the screws (which I liberally coated in 5200 to prevent water intrusion) are what holds it to the transom. Your new transom will be solid and have no bend, so the screws/5200 will seal the area just fine.

Just my 2 cents...

SHSU
Not too long ago, I thought the same thing about 5200 (what do you think I sealed my fuel fill with 🤣 )

@g0nef1sshn 's recent come-back posts (starting page) with his rotten transom where he used 5200 to seal the splashwell and screws. It prompted me to read the 5200 technical data sheet and now I warn anyone wanting to use 5200 there.
 

SHSU

Lieutenant Junior+Starmada Splash Of The Year 2019
Joined
Mar 8, 2017
Messages
1,665
Not too long ago, I thought the same thing about 5200 (what do you think I sealed my fuel fill with 🤣 )

@g0nef1sshn 's recent come-back posts (starting page) with his rotten transom where he used 5200 to seal the splashwell and screws. It prompted me to read the 5200 technical data sheet and now I warn anyone wanting to use 5200 there.
Man now I am concerned. I am going to have to take a look at it too. I did the same and sealed my fuel fill as well with 5200. Will have to keep an eye on it.

Did you proactively change your 5200 or left it and will change later down the road?

SHSU
 

classiccat

"Captain" + Starmada Splash Of The Year 2020
Joined
Dec 20, 2010
Messages
3,405
Man now I am concerned. I am going to have to take a look at it too. I did the same and sealed my fuel fill as well with 5200. Will have to keep an eye on it.

Did you proactively change your 5200 or left it and will change later down the road?

SHSU
Nah I left it there...consider it a case study. I've spilled enough where it should be pretty easy to remove next season when I do seal it back up 🤣.
Where I also screwed up was wiping up access 5200 off of my motor mounts with denatured alcohol (camp stove gas). I had to redo those anyway (for fitment issues) and used acetone for work piece clean-up and reserve the denatured alcohol for tool clean-up...it vanishes like it wasn't even there!

Edit: It just highlights the value of this forum...and members like @g0nef1sshn staying active and bringing back their experiences.
 

SHSU

Lieutenant Junior+Starmada Splash Of The Year 2019
Joined
Mar 8, 2017
Messages
1,665
Nah I left it there...consider it a case study. I've spilled enough where it should be pretty easy to remove next season when I do seal it back up 🤣.
Took a look at 3M website and found the comment below
5200.PNG

My take from this is, as long as I don't let fuel sit I should be ok, but as you said I will "consider it a case study" too. :D

SHSU
 

dingbat

Supreme Mariner
Joined
Nov 20, 2001
Messages
15,498
Nah I left it there...consider it a case study. I've spilled enough where it should be pretty easy to remove next season when I do seal it back up 🤣.
Where I also screwed up was wiping up access 5200 off of my motor mounts with denatured alcohol (camp stove gas). I had to redo those anyway (for fitment issues) and used acetone for work piece clean-up and reserve the denatured alcohol for tool clean-up...it vanishes like it wasn't even there!

Edit: It just highlights the value of this forum...and members like @g0nef1sshn staying active and bringing back their experiences.
You have a bigger issue with UV
Man now I am concerned. I am going to have to take a look at it too. I did the same and sealed my fuel fill as well with 5200. Will have to keep an eye on it.

Did you proactively change your 5200 or left it and will change later down the road?

SHSU
The bigger problem is UV.
Turns 5200 into a crusty, rubbery mess over time.
 

Michigan Lakes

Petty Officer 3rd Class
Joined
Dec 20, 2018
Messages
86
That was a good bit of education on 5200. It's comforting to remember just how many advances have been made in sealants, gaskets, adhesives and lubricants since these boats were built. It'd be very hard, regardless of the substance used, to not make a significant improvement over the factory configuration. I'm leaning towards the Butyl or perhaps automotive RTV. That's probably a few weeks down the road though.
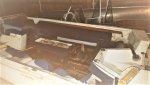
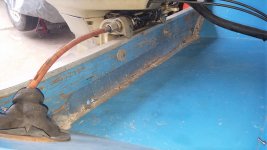
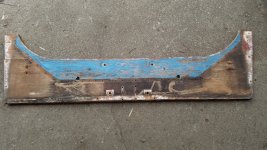
Since my last post, I've managed to get the Transom wood cut and glued. I had clear a space on the basement work bench in order for the glue to dry at recommended temps (i.e. not Michigan Wintertime). Went with several hundred pounds of the "whatever's handy" method of weighing down the two 3/4" pieces.
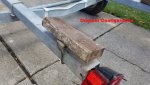
The joined transom was reinstalled in the boat and drilled out for mounting etc. I wanted as many holes as possible pre-drilled in order to get Old Timer's Formula into the plywood layers of these perforations.
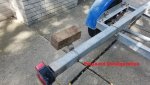
While wood glue is one thing, OTF is quite another. I'm not comfortable applying that chemical mix in the house. Any thoughts on using OTF at ambient air temps of 25-35 degrees Fahrenheit? Can I simply double the recommended cure times and hope for the best?
Four out of five questions I have concerning this project are answered with a quick search of past Starcraft forum posts. This one does not appear to have come up.
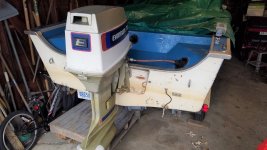
Thank you everyone for your help thus far. While my boat work is nowhere near as involved (or interesting) as SHSU, classicat, Moserkr, Watermann and many others, it's nice that the "JV Team" is still welcome here.
Transom Trace.jpgTransom Glue.jpg
 

Moserkr

Chief Officer + Starmada Splash Of The Year 2021
Joined
Nov 23, 2020
Messages
834
Hahaha Im definitely still JV team lol. Working on stepping up my game though. I did get a mr buddy heater for my garage from my in-laws for xmas so that certainly helps my winter project woes! Curious as to how your transom sealant works out. Blowing my budget on tools so I could skip the epoxy and use whats on hand to seal my transom like you are doing. Thats coming up soon in my project. Keep us posted! Cant help you on whether the cold temps will allow it to cure properly though - varsity team will know that answer im sure.
 

classiccat

"Captain" + Starmada Splash Of The Year 2020
Joined
Dec 20, 2010
Messages
3,405
@Michigan Lakes good progress & strategy with holes/OTF!

I'd get the transom & OTF to room temp in the house, maybe preheat the garage the best you can while you're setting up. Then drag everything out to the garage for application/cure/outgassing out in the garage with the door open...and maybe even add a draw fan.
 
Top