1975oday22
Chief Petty Officer
- Joined
- Sep 2, 2022
- Messages
- 601
old paint never dies. lol we just cover it up! more updates needed here lol.....


Haha that's right! That stuff was really on there but a good stainless wire wheel (sharper) and low amp angle grinder took it off nice and easy. Hopefully have some updates soon!old paint never dies. lol we just cover it up! more updates needed here lol.....
Luckily a bunch of the worst parts of this project that I was truly dreading weren't Half as bad as they were in my head. In a way, it's good to look at it as a mountain bc once you confront it head on- you're over the little hill in no time.Watching this almost gives me the motivation to go outside and start yanking my outdrive.
Almost!
Thanks! I am stripping the worst areas but bc of the age and unknown condition of the MC-1 I am not going to take it all apart to get to all of the inside surfaces.. I am just scuffing up the areas that have really solid paint on them still and they'll be painted over.Loving the transformation of the outdrive. You gonna clean up/grind the inside as well? love the pics!
Thanks and you know, it's funny you say that bc it was driving me crazy too..Looking good on the drive clean up although that chipped skeg stirs something in my brain. I used a saw and belt sander to smooth the OCD out of my broke skeg.

That is a sweet setup you made, very professional looking too! Is that a trailer tongue jack and an engine stand that you used to make this?? Very clever repurposing idea. I just might have to copy this if you don't mind.Not sure if I showed you the drive cart I welded up, makes my yearly drive pull job a breeze.

That is a sweet setup you made, very professional looking too! Is that a trailer tongue jack and an engine stand that you used to make this?? Very clever repurposing idea. I just might have to copy this if you don't mind.

Awesome, and thanks for the detailed directions! Cork guard is a nice touch. Thinking I'm going to have to make one of these. But maybe with fixed rubber hand truck tires at front bc of my damn moonscape yard and complete lack of smooth floors in the shop.Yeah and I still have the plans for it too.
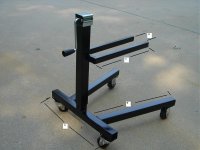
A = 24"
B = 24"
C = 21"
D = 4 1/4"
A & B are 2"x2" thin wall box tubing.
B should have a straight cut on one end and a slight angle cut on the other. I think that angle is somewhere in the 15-17 degree range. The exact location for the forward legs isn't critical. What I did, was, put the angle ends of the legs out far enough from the center so the far end is just a little wider than the back tube.
C is 1"x1 1/2" rectangle tube, thin wall. two pieces 21" long and one piece 4 1/4" long. Weld the 21" pieces to the short piece. These are the lift arms and are located no less than 19 1/2" from the flor. This measurement is to keep the skeg from hitting the ground when the jack is in it's lowest position.
D needs to be 4 1/4" apart so the drive will fit between.
I used 3" h-d casters. 275lb. capacity each. Put swivel casters on all 4 corners.
I also put cork gasket material on the lift arms to keep from scratching the drive.
The jack is a 3000lb weld on tongue jack (square body).
View attachment 392378
Nice, this is Exactly what I was going for!Through hosting sites you can still post pics.
