1973 starcraft ss restore in progress

Watermann

Starmada Splash of the Year 2014
Joined
Jan 12, 2013
Messages
13,818
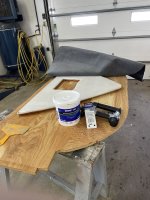
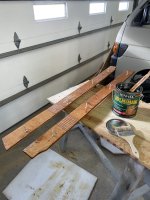
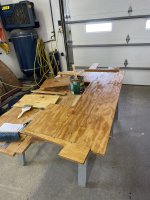
I believe when I run out of the clarkcraft 2 part epoxy I will switch to the helmsman spar.
( I will have a bit of the bow and the stern area left of wood work.

Helmsman is good stuff. I recommend the gloss as is has the most solids.

UQTdIVqyAiaEIID8bgwAAAAAAEhjovdR1jfvud8
 

crankbait cowboy

Chief Petty Officer
Joined
Mar 25, 2013
Messages
612
Got the bow frame done and dashes wired
Now to install dashes/install console fronts/ install bow frame, before cutting bow seating and laying out bow area
 

Attachments

  • IMG_6867.jpeg
    IMG_6867.jpeg
    3.8 MB · Views: 11
  • IMG_6884.jpeg
    IMG_6884.jpeg
    2.3 MB · Views: 9
  • IMG_6885.jpeg
    IMG_6885.jpeg
    1.8 MB · Views: 11
  • IMG_6893.jpeg
    IMG_6893.jpeg
    2.1 MB · Views: 11

crankbait cowboy

Chief Petty Officer
Joined
Mar 25, 2013
Messages
612
I used a solder iron for the soldering with connectors when possible and shrink wrap
I got the dashes and front consoles installed along with front bow brace
 

Attachments

  • IMG_6908.jpeg
    IMG_6908.jpeg
    1.7 MB · Views: 10
  • IMG_6911.jpeg
    IMG_6911.jpeg
    2.7 MB · Views: 10
  • IMG_6912.jpeg
    IMG_6912.jpeg
    3.1 MB · Views: 10
  • IMG_6909.jpeg
    IMG_6909.jpeg
    3 MB · Views: 10
  • IMG_6913.jpeg
    IMG_6913.jpeg
    3.7 MB · Views: 10
  • IMG_6917.jpeg
    IMG_6917.jpeg
    3 MB · Views: 10

crankbait cowboy

Chief Petty Officer
Joined
Mar 25, 2013
Messages
612
I meant heat shrink tape.
Next I cut my bow 3 pieces ( I was lucky and used old as templates ) using 3/4 marine plywood. In and out of boat a couple times to fit it, and put a coat of 2 part epoxy on one side. This is where I realized I hadn’t cut the 3 hatch holes.
 

Attachments

  • IMG_6919.jpeg
    IMG_6919.jpeg
    1.8 MB · Views: 3
  • IMG_6920.jpeg
    IMG_6920.jpeg
    2.4 MB · Views: 3
  • IMG_6922.jpeg
    IMG_6922.jpeg
    2.2 MB · Views: 3

crankbait cowboy

Chief Petty Officer
Joined
Mar 25, 2013
Messages
612
So then today I measured and cut hatch openings, and put a second coat epoxy on same side with a good dose on all edges
 

Attachments

  • IMG_6933.jpeg
    IMG_6933.jpeg
    2.7 MB · Views: 2
  • IMG_6934.jpeg
    IMG_6934.jpeg
    2.2 MB · Views: 2

crankbait cowboy

Chief Petty Officer
Joined
Mar 25, 2013
Messages
612
While drying epoxy, I fitted a couple of implement tanks I’ve had for some time and they fit beautifully ( luck sometimes is a wonderful thing)
 

Attachments

  • IMG_6926.jpeg
    IMG_6926.jpeg
    1.5 MB · Views: 4
  • IMG_6925.jpeg
    IMG_6925.jpeg
    2.7 MB · Views: 4

crankbait cowboy

Chief Petty Officer
Joined
Mar 25, 2013
Messages
612
Fit em, marked em, put elbows on to drain, and added some insulation ( and floatation )
Will it help both causes? It can’t hurt was my thinking
 

Attachments

  • IMG_6935.jpeg
    IMG_6935.jpeg
    1.8 MB · Views: 5
  • IMG_6943.jpeg
    IMG_6943.jpeg
    1.7 MB · Views: 5
  • IMG_6966.jpeg
    IMG_6966.jpeg
    1.4 MB · Views: 4
  • IMG_6968.jpeg
    IMG_6968.jpeg
    1.6 MB · Views: 5

crankbait cowboy

Chief Petty Officer
Joined
Mar 25, 2013
Messages
612
My tanks will be ice boxes ( no live wells) for a couple reasons. 1 cheaper and easier
2 . years ago, we just put the fish on ice till end of day, and I actually think they were easier to clean and far less slimy and firmer than in a warm livewell all day.
One will be for fish, the other for sandwiches and beverages
 

crankbait cowboy

Chief Petty Officer
Joined
Mar 25, 2013
Messages
612
Just got some spar varnish on the other side (2coats)
The spar goes on much nicer and actually soaks in better, where the 2 part epoxy is more of a coating
Both seem to do the job, but the spar was easier to work with ( no 2 part mixing and brushes on nicely . Now to get carpet on
 

Attachments

  • IMG_6971.jpeg
    IMG_6971.jpeg
    1.9 MB · Views: 4

crankbait cowboy

Chief Petty Officer
Joined
Mar 25, 2013
Messages
612
Got the front 3 pieces carpeted, and waiting for hatch covers
Started the top vinyl bow rails
Did some relief cuts with skill saw to help with the bend
 

crankbait cowboy

Chief Petty Officer
Joined
Mar 25, 2013
Messages
612
Also earlier I mentioned being lucky with good patterns from old
 

Attachments

  • IMG_6993.jpeg
    IMG_6993.jpeg
    2.4 MB · Views: 2

crankbait cowboy

Chief Petty Officer
Joined
Mar 25, 2013
Messages
612
A bit more progress
Got port side wires strung thru the lower bow area, ran a drain hose from tanks to bilge area behind the side panels, insulated around tanks , and buttoned up bow ( still have some wiring in upper bow area for nav light)
 

Attachments

  • IMG_6999.jpeg
    IMG_6999.jpeg
    3.2 MB · Views: 6
  • IMG_7013.jpeg
    IMG_7013.jpeg
    2.3 MB · Views: 5
  • IMG_7047.jpeg
    IMG_7047.jpeg
    2.6 MB · Views: 6
  • IMG_7048.jpeg
    IMG_7048.jpeg
    2.6 MB · Views: 6

crankbait cowboy

Chief Petty Officer
Joined
Mar 25, 2013
Messages
612
I believe I have it all wired up and all works as should. I actually used 2 wiring diagrams off the web, if anybody can find them useful.
I certainly did
 

Attachments

  • IMG_7078.png
    IMG_7078.png
    3.8 MB · Views: 6
  • IMG_6820.jpeg
    IMG_6820.jpeg
    3.8 MB · Views: 6

crankbait cowboy

Chief Petty Officer
Joined
Mar 25, 2013
Messages
612
Some more progress, I am now working on spar varnish and carpet for a front pedestal up in bow, and back seat area ( still working on a plan as I go for seat
 

Attachments

  • IMG_7074.jpeg
    IMG_7074.jpeg
    3.5 MB · Views: 5
  • IMG_7075.jpeg
    IMG_7075.jpeg
    2.3 MB · Views: 5
  • IMG_7104.jpeg
    IMG_7104.jpeg
    2.1 MB · Views: 5
Top