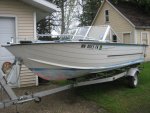
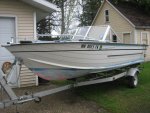
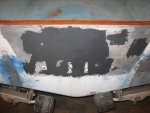
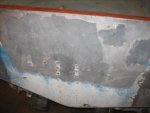
1973 starcraft ss restore in progress

Watermann

Starmada Splash of the Year 2014
Joined
Jan 12, 2013
Messages
13,787
Re: 1973 starcraft ss restore in progress

What I did was get a piece of 1/16" aluminum, cut it to length with it being wide enough to be extended over each side about 3/8". I screwed the flat piece in place to the top of the wood and started heating the outer edge where the transom skin is so there's a sharp edge to bend the lip over as it was heated. Once the outside was bent over and cooled, remove and switch it around putting the hang over part of the new cap outside again. Then repeat the heating and hammering. I did this before any painting of the hull or finish on the transom wood.

Here is how it looks, not too bad really can't tell it isn't factory/


jbcurt00

Moderator
Staff member
Joined
Oct 25, 2011
Messages
25,034
Re: 1973 starcraft ss restore in progress

user error :facepalm:
 
Last edited:

crankbait cowboy

Chief Petty Officer
Joined
Mar 25, 2013
Messages
574
Re: 1973 starcraft ss restore in progress

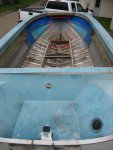
gotta apologize to any of you following this thread. not much happening now, as i have got real busy at work and fall is in the air here in northern mn. have got the transom and splashwell pretty much complete. a little more jb weld work on some holes, and then i would like to leak test one more time before too cold, to check my transom and gluvit work. thinking about getting splashwell and side rails sanded for paint, before turtling the boat to sand and prep hull for paint. then winter storage. thought is then after painting hull ( next spring ) i could go to work on interior and would be ready to paint splashwell and top rail when the time comes. really not thinking of painting inside boat at all, as i am planning on vinyl and carpet on walls and side storage area. got lots of holes to fill in top rail ( mostly for snaps i will not be using)and bow area, and thinking jb weld with a piece of flashing behind it. anybody see any issues with my plan so far, and what suggestions might you have for getting the flashing on behind the small holes. thanks
 
Last edited:

crankbait cowboy

Chief Petty Officer
Joined
Mar 25, 2013
Messages
574
Re: 1973 starcraft ss restore in progress

got a little bit done this week. put jb weld on snap holes and others on bow,top rail, and splashwell. let it cure for 3 days and then sanded off last night. pictures aint much, but thats where i am at.
 

glnbnz

Chief Petty Officer
Joined
Oct 4, 2011
Messages
458
Re: 1973 starcraft ss restore in progress

I don't know how I missed this but I am following along now. Top notch work CC :)
 

crankbait cowboy

Chief Petty Officer
Joined
Mar 25, 2013
Messages
574
Re: 1973 starcraft ss restore in progress

yo thanks glen. got lots to do and lots of ideas. but hitting time to store it away here in northern mn. so am gonna leak test again before that, then turtle it for winter. hope to spend winter months on trailer and consoles and such, so hope to have some progress next few months. kinda thinking of carpet or vinyl on top rails, as even with the jb weld these got some issues. any of you guys got any pros or cons to covering the top rail. i assume you gotta take bow cap and the rub rail housing off along with the inside trim piece. any thoughts or ideas would be greatly appreciated.
 

dozerII

Admiral
Joined
Oct 25, 2009
Messages
6,527
Re: 1973 starcraft ss restore in progress

yo thanks glen. got lots to do and lots of ideas. but hitting time to store it away here in northern mn. so am gonna leak test again before that, then turtle it for winter. hope to spend winter months on trailer and consoles and such, so hope to have some progress next few months. kinda thinking of carpet or vinyl on top rails, as even with the jb weld these got some issues. any of you guys got any pros or cons to covering the top rail. i assume you gotta take bow cap and the rub rail housing off along with the inside trim piece. any thoughts or ideas would be greatly appreciated.

I think you may find you can't get the rub rail channel back on if you install carpet or vinyl on top of the gunwals. I'm pretty sure at the Factory they used a narrower mounting piece for the channel to accommodate carpet. At least that is what I found on the Naked Lady. After removing the carpet and replacing the top gunwale aluminum we ended up with a gap on top under the rub rail channel.
 
Last edited:

crankbait cowboy

Chief Petty Officer
Joined
Mar 25, 2013
Messages
574
Re: 1973 starcraft ss restore in progress

k, yeah i would think the inside trim piece would work fine, after redrilling and riveting. just thinking for down the road. my top plate needs a lot of work to look decent after paint, and have seen boats with vinyl on the top rail to match the decking.am thinking of going with nautalex sharkhide for deck and would look real good if rail was the same. anybody know how thick that vinyl is ( should be less than carpet i would think ) maybe i could make that tight fit work for rub rail trim, or even take a little off underside of rub rail trim before reinstalling. also wondering best way to get that bow cap off, heard it can be a pita. anybody got any secrets on that? thanks
 

crankbait cowboy

Chief Petty Officer
Joined
Mar 25, 2013
Messages
574
Re: 1973 starcraft ss restore in progress

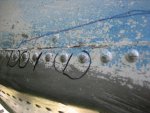
so after gluvit cured i leak tasted again, and rear end leak leaks no more but still got a slow drip on the bow seam. (see pic ) wondering if i clean this up real good and lay a bead of 5200 on outside along here would solve my problem. or any better ideas? thanksIMG_0002.jpg
 

jbcurt00

Moderator
Staff member
Joined
Oct 25, 2011
Messages
25,034
Re: 1973 starcraft ss restore in progress

so after gluvit cured i leak tasted again, and rear end leak leaks no more but still got a slow drip on the bow seam. (see pic ) wondering if i clean this up real good and lay a bead of 5200 on outside along here would solve my problem.

Post up a pix of the inside of that seam..... Gluvit is pretty thin, you may not have gotten it as well covered on the inside as you thought.

Some tip the boat stern high to treat the bow seam, and bow high to do the stern, tip to port to do starboard.......
 

crankbait cowboy

Chief Petty Officer
Joined
Mar 25, 2013
Messages
574
Re: 1973 starcraft ss restore in progress

well right or wrong what i have done is go over the gluvit with loctite sealant pretty heavily in all of bow area seam and rivets on inside. now planning a new bead of 5200 along that front seam on outside. did i screw up or you think that will work. thanks
 

jbcurt00

Moderator
Staff member
Joined
Oct 25, 2011
Messages
25,034
Re: 1973 starcraft ss restore in progress

The loctite was added before or after the last leak test? If it was added before the leak test & it still leaks, 5200 should fix it, if you use it where it's actually leaking.

That seam runs the length of the boat, and most of the seam is behind the keel runner along the bottom of the hull. That runner was not sealed originally, and has at least 1 weep hole drilled into it along it's length to allow water out.

Are you positive you've 100% ID'd where the water is getting in? If it's leaking into the seam behind that keel runner, using 5200 along where you've indicated, probably won't fix the leak....

Not a mistake, you just did it a different way :watermelon:
 

crankbait cowboy

Chief Petty Officer
Joined
Mar 25, 2013
Messages
574
Re: 1973 starcraft ss restore in progress

so, i filled with h20 to leak test after inside gluvit. found this seam to be leaking ( in first pick i marked rivets but really seams to be the seam, not rivets. there was some sealant on outside along this whole seam but you can see it missing in this area. i resealed the inside with loctite over the gluvit, and have not tested since, but plan was to run a bead of 5200 on outside along this whole seam on both sides after cleaning out old. hope that helps explain, and let me know what you all think, and thanksIMG_0113.jpgIMG_0002.jpg
 

crankbait cowboy

Chief Petty Officer
Joined
Mar 25, 2013
Messages
574
Re: 1973 starcraft ss restore in progress

in the red box is the rivets and seams that i applied loctite to after the second leak test over the gluvit. both the outside and inside looked a bit corroded in these area, on the inside a used 2 tubes of loctite and a very liberal amount (basically filled the area up and covered all rivets. now am planning on 5200 on outsidebead along that keel gaurd seam on both sides after cleaning out old adhisive real good. it was sealed before, but now you got me wondering about weep hole. if i seal it from outside i suppose i should also seal the weep hole or not? thanksIMG_0017.jpg
 

Watermann

Starmada Splash of the Year 2014
Joined
Jan 12, 2013
Messages
13,787
Re: 1973 starcraft ss restore in progress

From what I've seen the only reason the gluvit epoxy fails to seal is because the surface was not cleaned of all residue, old sealer or dirt. It took me days to make sure everything the gluvit went on was wheeled then wiped clean. Is the locktight you talking about a silicone sealant?

I had a real chore with my keel, it was ate up, cracked, dented, corroded and filled with an entire mega tube of silicone. After days of clean up, I layed in some marine tex first to fill in the gap and once it was hard, applied gluvit over the top since it's so watery it wouldn't have sealed gap between the bow plates and the keel plate.

It didn't leak a drop but if it had, I would have redone the gluvit job where the leak sprung up. Grinding off the gluvit, wire wheeled it again, wiped it down with cleaner and then re-applied the gluvit.
 

crankbait cowboy

Chief Petty Officer
Joined
Mar 25, 2013
Messages
574
Re: 1973 starcraft ss restore in progress

may be onto something there watermann, not sure if it shows in the pic but there is an area where two ribs come together up in that area that a person cannot get to without removing a couple of ribs. one running from port and one from starboard and meeting in middle of bow area. has any one on here laid a bead of 5200 down the keel guard on both sides from the outside before. i know i saw it on here but cannot remember which post or if it worked out for them. my thought was gluvit, then loctite 4000 over that in this problem area inside of bow, with the idea of a bead of 5200 on the outside of boat down the keel guard. i was thinking this would remedy my seapage. no real way to tell if this is a fine fix or not , but to do it and test again. right or wrong i have done the gluvit and laid the loctite over it already. so suppose i might as well lay the bead of 5200 on outside and do another test. if no good, i should start over on inside removing those ribs and my 2 tubes of loctite,clean up good and re apply more gluvit. the real question i guess is has anyone laid a bead on outside of hull along keel guard and how did it work out for them.this boat has a bead of something ( in poor shape ) along keel gaurd but not sure if it is factory or not.. thanks for any help or ideas
 
Last edited:

crankbait cowboy

Chief Petty Officer
Joined
Mar 25, 2013
Messages
574
Re: 1973 starcraft ss restore in progress

i also may be confused, the part i am talking about, in my mind would be a bow guard, probably not the keel gaurd. it is in front of boat and actually a seperate piece than the keel guard. i see no weep hole and it is on the very front v area
 

Watermann

Starmada Splash of the Year 2014
Joined
Jan 12, 2013
Messages
13,787
Re: 1973 starcraft ss restore in progress

A common area for damage and leaks from cracks or rivets in area of the keel where people beach the boat on hard surfaces over many years or from impact landing. The material SC uses to seal the seams on the inside is a burnt orange color goop that sort or looks like gluvit. There should also be the rubberized material that is sandwiched in between the 2 pieces and riveted together.

The thick strip of aluminum that joins the 2 sections of the bow plates is the keel plate. Most boats I've seen restored need work in that area to stop up leaks so your not alone in that endeavor. I'm not sure how permanent the repair would be with the bead on the outside being what's stopping the water since it would be subject to constant contact with water and other things.
 

crankbait cowboy

Chief Petty Officer
Joined
Mar 25, 2013
Messages
574
Re: 1973 starcraft ss restore in progress

so i got a little more done on the restore. that extra board on transom skin left a lot of pitting behind it in the skin, so i laid a skimming of jb weld over the pitted area and have started to sand it smooth. long ways to go sanding as that stuff is tuff! i will not replace that board as that is the only area pitted on this skin ( moisture behind that board i am sure. any secrets on sanding this stuff, or just hard work?IMG_0139.jpgIMG_0145.jpg
 
Top