1972 Starcraft Nova

captainnate

Petty Officer 2nd Class
Joined
Apr 19, 2011
Messages
195
The vinyl glue I use sticks to cured Helmsman Spar which is urethane. If the OTF is not gassed out leaving only the solids adhesion won't happen with paint or adhesive.
Watermann,

Which sheen do you use for the Helmsman Spar? Gloss, semi-gloss, or satin? I think I will put a final coat of this over the deck plywood.
 

captainnate

Petty Officer 2nd Class
Joined
Apr 19, 2011
Messages
195
I think I am going to use vinyl for the floor covering. What is a good place to buy vinyl? Also, I am thinking I might reuse the plywood for the side panels, but rewrap them with new vinyl. I don't know if I'll use the same vinyl for the floor and side panels.
 

Watermann

Starmada Splash of the Year 2014
Joined
Jan 12, 2013
Messages
13,786
Watermann,

Which sheen do you use for the Helmsman Spar? Gloss, semi-gloss, or satin? I think I will put a final coat of this over the deck plywood.
Gloss has the most solids and is what I've used.

Nautolex marine vinyl at Defender is where I get mine.
 

captainnate

Petty Officer 2nd Class
Joined
Apr 19, 2011
Messages
195
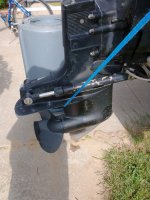
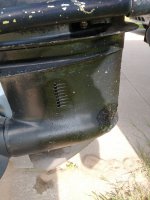
IMG_20210609_093725013.jpgIMG_20210609_093721463.jpg

I think I might have a bad seal in the outdrive. There's what appears to be gear oil slowly leaking out of the water inlet holes and possibly out of the prop shaft. What do you think?
 

Watermann

Starmada Splash of the Year 2014
Joined
Jan 12, 2013
Messages
13,786
Had the same oil leak on my drive, it was the lower water pump housing that has the driveshaft seal in it. If oil comes out of the drain hole further forward on the gear case then normally it's the shift shaft seal, my OB motor on my SS did that last year too. The shift shaft required a special spanner socket to remove. The water pump base is the easy one.

While you're in there take a close look at the upper driveshaft seal too, I replaced that while I was in there, mine was tore up, there's 2 of them and the lower one gets messed up easily. Also get a new water pocket grommet as well for the water tube, they're often overlooked.
 

captainnate

Petty Officer 2nd Class
Joined
Apr 19, 2011
Messages
195
So I'm still gathering tools and supplies. I need a retainer spring for my Harbor Freight air hammer. The brazier head bit is wider than the retainer spring that came with the air hammer. I guess I can order something online, or try Harbor Freight. The retainer spring that came with the air hammer is about 1/2". I need a 5/8" retainer spring for the brazier head tool.
 

Moserkr

Chief Officer + Starmada Splash Of The Year 2021
Joined
Nov 23, 2020
Messages
869
All the retainer springs I used were just cut by me to size. Believe thats all ya got to do.
 

classiccat

"Captain" + Starmada Splash Of The Year 2020
Joined
Dec 20, 2010
Messages
3,412
So I'm still gathering tools and supplies. I need a retainer spring for my Harbor Freight air hammer. The brazier head bit is wider than the retainer spring that came with the air hammer. I guess I can order something online, or try Harbor Freight. The retainer spring that came with the air hammer is about 1/2". I need a 5/8" retainer spring for the brazier head tool.
check out your local box store; I was able to find a larger Kobalt spring retainer from Lowes.
 

captainnate

Petty Officer 2nd Class
Joined
Apr 19, 2011
Messages
195
Definitely a retro fit of the braces and the rib end crack I bet was there when they put in the braces but either they didn't repair it or see it.

img_20210416_140856601-jpg.338014


Easy repair for the crack, remove the solid rivets at the rib end, with a tiny bit stop crack drill holes at the ends of the crack. Fashion a patch for the outside of the hull, I would remove the paint from under the area the patch will be placed. Drill all your rivet holes through the patch and bed it in 5200 then new solid rivets. It'll take some some longer rivets, seeing your have 4 layers of AL total. My advice would be 1/2"L x 3/16" dia.

My rib end cracks were minor less than 1/2" from the rivet holes so the patches were made smaller than you'll need but this is what they look like.

y4mBDUHtoBQZw0Qb8zSSmaMyBusQVbXoiQGZtzGA3mv8ThPvFjd1lGlrkXCCgVHdt-2OF2R87xsA0LvnwQ-JjOtt71tvmQJANico67UfbiEwriAQTuhrS9zBEmw8ucF0KPgkf2hANBywkShvu9qmZh4XOqtpL3l-mVmFZEEIKxkTCDRM1bHBdTshustpbRqlV0C
Watermann, Did you use some of the old rivet holes at the end of the ribs? I didn't know if that would be too hard to do, trying to line up multiple old holes.
 

captainnate

Petty Officer 2nd Class
Joined
Apr 19, 2011
Messages
195
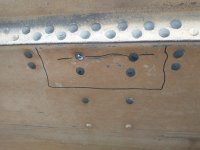
What do you think of the black outline for the patch? The four rib end rivets will be removed. I'm not sure of we're exactly I'll put the new rivets, something symmetrical I'm sure.
 

Attachments

  • IMG_20210623_202648547.jpg
    IMG_20210623_202648547.jpg
    2.2 MB · Views: 14
  • IMG_20210623_202545642.jpg
    IMG_20210623_202545642.jpg
    4.8 MB · Views: 14

Watermann

Starmada Splash of the Year 2014
Joined
Jan 12, 2013
Messages
13,786
Watermann, Did you use some of the old rivet holes at the end of the ribs? I didn't know if that would be too hard to do, trying to line up multiple old holes.
No not really, the best attempt to use the old holes is by marking their general location on the inside of the spray rail chine using a marker and square to either miss them or try to hit the same hole.
 

captainnate

Petty Officer 2nd Class
Joined
Apr 19, 2011
Messages
195
Had the same oil leak on my drive, it was the lower water pump housing that has the driveshaft seal in it. If oil comes out of the drain hole further forward on the gear case then normally it's the shift shaft seal, my OB motor on my SS did that last year too. The shift shaft required a special spanner socket to remove. The water pump base is the easy one.

While you're in there take a close look at the upper driveshaft seal too, I replaced that while I was in there, mine was tore up, there's 2 of them and the lower one gets messed up easily. Also get a new water pocket grommet as well for the water tube, they're often overlooked.
Thanks again Watermann. What is the difficulty level on fixing these seals. I'm debating on trying it myself or seeing if the local marina will do it. Thanks
 

Watermann

Starmada Splash of the Year 2014
Joined
Jan 12, 2013
Messages
13,786
Thanks again Watermann. What is the difficulty level on fixing these seals. I'm debating on trying it myself or seeing if the local marina will do it. Thanks
On the scale of difficulty 1-10, overall it's a 4 or 5 if you have the right tools. Seal puller, socket or seal driver with extension for the upper driveshaft seal. The water pump is very easy, just the bolts. the shift shaft seal is easy too, just need the special spanner socket for it is all. let me know in a PM if you want or need help with a parts list.

A local marina will charge you twice or 3 times the cost in labor over the OEM parts needed and most likely give you a time table of a couple weeks to a month to get to it right now.
 

captainnate

Petty Officer 2nd Class
Joined
Apr 19, 2011
Messages
195
On the scale of difficulty 1-10, overall it's a 4 or 5 if you have the right tools. Seal puller, socket or seal driver with extension for the upper driveshaft seal. The water pump is very easy, just the bolts. the shift shaft seal is easy too, just need the special spanner socket for it is all. let me know in a PM if you want or need help with a parts list.

A local marina will charge you twice or 3 times the cost in labor over the OEM parts needed and most likely give you a time table of a couple weeks to a month to get to it right now.
Thanks Watermann, I appreciate all the info. I ended up taking the outdrive to a marina. They are pretty reasonable. They quoted me, "$300 if it's just the seals." We will see how it goes. They are backed up a month, but I need to finish the patches and floor anyway, so that's not a big deal.
 

captainnate

Petty Officer 2nd Class
Joined
Apr 19, 2011
Messages
195
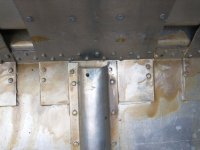
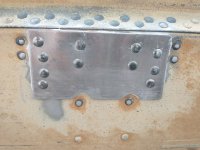
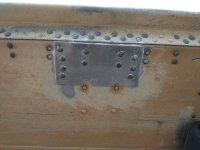
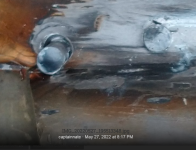
Almost a year later, but here's an update. I installed a patch over the crack at the rib end. I'm happy with everything except the last two rivets on the rib end. It seems like I might need to replace those two rivets with 1/4 inch diameter rivets. The hole in the rib end seem larger than 3/16" for some reason. I don't know how that happened, I don't think I did.
 

Attachments

  • IMG_20220527_195401787.jpg
    IMG_20220527_195401787.jpg
    5.1 MB · Views: 11
  • IMG_20220527_195408529.jpg
    IMG_20220527_195408529.jpg
    4.8 MB · Views: 11

captainnate

Petty Officer 2nd Class
Joined
Apr 19, 2011
Messages
195
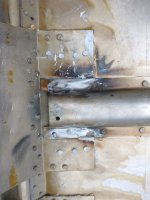
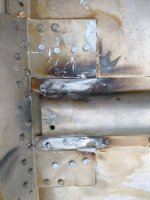
Almost a year later, but here's an update. I installed a patch over the crack at the rib end. I'm happy with everything except the last two rivets on the rib end. It seems like I might need to replace those two rivets with 1/4 inch diameter rivets. The hole in the rib end seem larger than 3/16" for some reason. I don't know how that happened, I don't think I did.
 

Attachments

  • IMG_20220527_195513348.jpg
    IMG_20220527_195513348.jpg
    1.8 MB · Views: 18
  • IMG_20220527_195508155.jpg
    IMG_20220527_195508155.jpg
    2.3 MB · Views: 18

classiccat

"Captain" + Starmada Splash Of The Year 2020
Joined
Dec 20, 2010
Messages
3,412
welcome back! yeah I agree, 1/4" would fill that hole. who knows... oblong from all of the flexing or just wallowed out during the extraction.

1653702259165.png
 

captainnate

Petty Officer 2nd Class
Joined
Apr 19, 2011
Messages
195
One thing that makes this a little tricky is the four rivets on the rib end. Once the old rivets are drilled out the rib wants to pull away from the bottom skin on the boat. My solution was to use a bolt and nut through the last two holes to act as a clamp while I riveted the other two holes. I can't think of another way to get the aluminum snug.
 

captainnate

Petty Officer 2nd Class
Joined
Apr 19, 2011
Messages
195
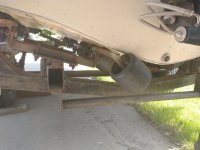
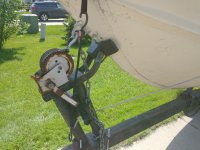
Here's a few more things I need to work on. This roller arn is bent. I'm assuming it is because all the weight at the back of the boat. Should I take it off and take it to a shop and see if they can beef it up with an extra piece of steel? Also my bow roller has never seemed to be in the right spot. It interferes with the wench strap a little. Also, the bow eye is above the bow stop which I'm not sure is ideal. Seems like this was more common with older trailers. New trailer s usually have the bow stop above the bow eye.
 

Attachments

  • IMG_20220529_111111363.jpg
    IMG_20220529_111111363.jpg
    4.5 MB · Views: 15
  • IMG_20220529_111240573.jpg
    IMG_20220529_111240573.jpg
    6.1 MB · Views: 15

Watermann

Starmada Splash of the Year 2014
Joined
Jan 12, 2013
Messages
13,786
Looks like your winching the boat too far on the trailer, that last roller is not even under the hull. The roller support rod does look bent and could stand to be bent back.

This is how the winch tower is set up on my SS trailer. The original trailer was an Ez-Loader roller trailer and the Y bow stop was above the bow eye.

y4muJIXSowik6BU3Ocrt7KuP1tfjGX4qzjDTan6zlsC2CnB8_FuKhLn7Js5nAf4UbLHyh4QeQvKjdcuWuB4ZH1R4fdFWvdm4mLYo4rWh0rN4rGnOGJixm7IC66KT2Ke_Nkh0Z2_4tMxu3vtgx99BNjtD24YZWD1Rksre0NAPgss5DBYGEniD4p7adpE-vKgvblw
 
Top