1971 Starcraft Falcon V14 - Merc400 (Pic heavy)

Woodonglass

Supreme Mariner
Joined
Dec 29, 2009
Messages
25,928
HMMM I hate to rain on your parade but using Treated Plywood in an aluminum boat is Very Big NO NO. The chemicals used in it will EAT the aluminum. It's been posted on this Forum for MANY years. I'd Highly recommend that you reconsider your choice.
 

jbcurt00

Moderator
Staff member
Joined
Oct 25, 2011
Messages
25,061
For what its worth:
Aluminum building products can be placed in direct contact with ProWood MCA treated wood products used for interior applications and above-ground exterior projects such as decks, fencing and gardens. Aluminum contact is not recommended when ProWood Professional Grade wood products are immersed in water or are subject to frequent and prolonged wetting or other severe exposure conditions. In such cases, a moisture resistant protective barrier should be placed between the aluminum products and ProWood.

Depending on your risk tolerance and final deck (floor) finish, seems MCA is better then ACQ pressure treated lumber, but it is a boat used in water..........

WOGs right about PT lumber and aluminum boats. Part of the problem is despite our best efforts, water typically finds a way into plywood decks.. And even well covered plywood gets wet, IF it does, it COULD letch the PT chemicals out of the lumber, and rhen it MIGHT collect/puddle in a nook, crany or seam below deck. That doesnt get noticed until a pin hole appears on the bottom of the hull.

Lots of guys have had to deal w major corrosion problems, PT lumber is suspect in quite a few. Others were waterlogged foam or water trapped under a below deck.fuel tank.
 

FoolishOne

Seaman Apprentice
Joined
Jul 28, 2019
Messages
40
I contacted pro wood prior to purchasing to confirm that by painting the aluminum and wood I should not have any issues. In addition I’ll be fiberglassing the seams and edges of the floor.

In order for galvanic corrosion to occur the copper in the wood needs to be in contact with the aluminum in the presence of an electrolyte. The assumption is that water is present in the hull providing the electrolyte. The water also acts to draw the copper from the wood producing a solution of corrosive water under the wood.

This leaching can be mitigated by sealing the wood. Further the action of the water/copper solution against the aluminum can be mitigated by coating the aluminum. By ensuring that the water can flow to the bilge the length of contact is reduced to a minimum.

The floor will need to be glued in as any fasteners penetrating the wood/coating can provide an opening for direct contact between the wood and water.

The problem of water logged foam is addressed by installing the foam by traversing the aluminum ribs to provide a space between the bottom of the hull and the foam. A gap of roughing 3/4” is created. Further the foam can also be coated so that water can’t get into the foam.

For what its worth I have considered the issue of using treated wood and I feel good about the steps taken to address it.
 

Woodonglass

Supreme Mariner
Joined
Dec 29, 2009
Messages
25,928
It's your boat and you can do as you see fit. Note: Normally aluminum boat floors are NOT glassed to the sides. Unless you use epoxy and even the, most likely the glass will not adhere to the aluminum Paint is NOT a very good "Sealer" When it peels then the issues mentioned will occur. It will probably take a few years, but there's a High Probability that it will eventually occur.
 

FoolishOne

Seaman Apprentice
Joined
Jul 28, 2019
Messages
40
I’m not glassing to the sides. Glass will be wrapped around the wood and allowed to cure before installation. I went back and forth on the floor for a long time considering using pt and decided it was a good choice assuming precautions were taken and mca was used.
 

FoolishOne

Seaman Apprentice
Joined
Jul 28, 2019
Messages
40
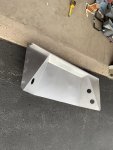
dq89e31.jpg Bit more time on the splash well. I ran the orbital with 220 on it. There’s a couple spots that I am having trouble getting into and there are more important things to be working on so I’m gonna put this to the side for now. Going out tomorrow to finish sanding the hull and start mocking up the livewell and seat boxes.

wAAACH5BAEKAAAALAAAAAABAAEAAAICRAEAOw==
 

Watermann

Starmada Splash of the Year 2014
Joined
Jan 12, 2013
Messages
13,798
Welcome to the Starmada :wave:

Looks like you started out with a Starcraft planter / garbage can :lol:

Do you have a plan for addressing hull repairs and sealing or did I miss that in your steps so far?
 

FoolishOne

Seaman Apprentice
Joined
Jul 28, 2019
Messages
40
There’s some rash on the bottom side that will be worked on when it gets turned back over. So far I have not found any rivets missing or loose. There are no dents in the hull either. As I strip paint it’s something I have been looking for. At least for now I don’t think it’s going to need anything more than paint.
 

GA_Boater

Honorary Moderator Emeritus
Joined
May 24, 2011
Messages
49,038
The floor will need to be glued in as any fasteners penetrating the wood/coating can provide an opening for direct contact between the wood and water.

Good luck with this idea. There are ways to physically attach the deck, but you seem to have all the answers, so carry on.
 

GA_Boater

Honorary Moderator Emeritus
Joined
May 24, 2011
Messages
49,038
You took the time to post this just to be snide?

No, I posted because glued decks won't work. Snide is some other guy.

You seem to ignore more than a few years of experience bringing these old boats back to life. These hulls flex and the deck is an important structural element.
 

FoolishOne

Seaman Apprentice
Joined
Jul 28, 2019
Messages
40
It’s not ignoring the advice. I recognized the problem and contacted the manufacturer for help.

Now with regards to fastening the floor. If you have an idea I’ll hear it.
 

GA_Boater

Honorary Moderator Emeritus
Joined
May 24, 2011
Messages
49,038
Look through classiccat 's thread.

The manufacturer told you the same thing the rest of us told you except said "if". I have firsthand experience with PT eating up my boat along with many others.

The way you cut the ply for decking may have saved a sheet, but your plan is faulty. The deck should go across the boat from chine to chine for structural integrity, especially since the bench seats won't be used.

It's your boat and you can do what you want.
 

FoolishOne

Seaman Apprentice
Joined
Jul 28, 2019
Messages
40
Look through classiccat 's thread.

The manufacturer told you the same thing the rest of us told you except said "if". I have firsthand experience with PT eating up my boat along with many others.

The way you cut the ply for decking may have saved a sheet, but your plan is faulty. The deck should go across the boat from chine to chine for structural integrity, especially since the bench seats won't be used.

It's your boat and you can do what you want.

If support is run across at the rear of the boat and at the console would this compensate? I was planning to have a livewell/bench in the rear and to run a sheet from the floor to the bow cover (for lockable storage in the bow). When planning it I was really concerned with installing the expensive PlasDeck onto a floor that would rot out which is one of the reasons I worked so hard to find a PT wood solution.

Are you referring to the chine bracing thread?
 

Watermann

Starmada Splash of the Year 2014
Joined
Jan 12, 2013
Messages
13,798
There’s some rash on the bottom side that will be worked on when it gets turned back over. So far I have not found any rivets missing or loose. There are no dents in the hull either. As I strip paint it’s something I have been looking for. At least for now I don’t think it’s going to need anything more than paint.

Some guys have all the luck :lol:

I've had to replace 100's if not a 1000 rivets. I would suggest a leak test when you have the hull stripped and flipped. That can help identify possible leaks before the deck goes in.

Also most times the keel seam will be leaky as it takes the brunt if all the landings over the years. Cleaning the seams well and applying either Gluvit epoxy or Coat-it will help keep your bilge dry down the road.
 

FoolishOne

Seaman Apprentice
Joined
Jul 28, 2019
Messages
40
Some guys have all the luck :lol:

I've had to replace 100's if not a 1000 rivets. I would suggest a leak test when you have the hull stripped and flipped. That can help identify possible leaks before the deck goes in.

Also most times the keel seam will be leaky as it takes the brunt if all the landings over the years. Cleaning the seams well and applying either Gluvit epoxy or Coat-it will help keep your bilge dry down the road.

How should I test for leaks? I’m out here working on it now and was planning on throwing primer today.

edit** found a couple videos showing guys just filling them up with water so I guess that’s what I’m going to do.
 
Last edited:

FoolishOne

Seaman Apprentice
Joined
Jul 28, 2019
Messages
40
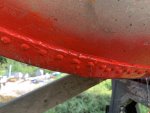
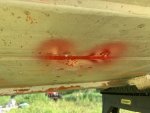
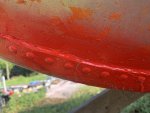
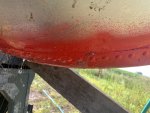
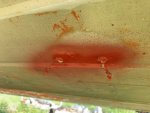
Filled the boat with water and found a few drips. Sprayed with red to trace the water back and mark the spots. One spot is a couple of small holes in seam along the bow. There are also 4 rivets leaking. I'm tempted to throw paint and worry about it over the winter...but they should probably get fixed now while its stripped.
 

Attachments

  • photo318240.jpg
    photo318240.jpg
    1 MB · Views: 1
  • photo318241.jpg
    photo318241.jpg
    833.4 KB · Views: 1
  • photo318242.jpg
    photo318242.jpg
    1.1 MB · Views: 1
  • photo318243.jpg
    photo318243.jpg
    1.2 MB · Views: 1
  • photo318244.jpg
    photo318244.jpg
    932.1 KB · Views: 1

FoolishOne

Seaman Apprentice
Joined
Jul 28, 2019
Messages
40
My wife's uncle is going to come by sometime with an air hammer and a bucking bar to give me a hand with the rivets. He is a retired machinist and very capable fabricator so I'm feeling pretty confident we'll be able to get it done.
 

Watermann

Starmada Splash of the Year 2014
Joined
Jan 12, 2013
Messages
13,798
Yeah a very good idea to do hull repairs while you have the boat stripped down bare.
 
Top