1968 StarCraft Holiday restoration
jdvasher

Petty Officer 1st Class
Joined
Jul 10, 2019
Messages
371
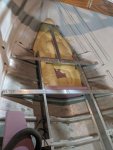
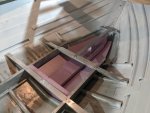
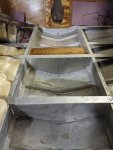
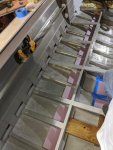
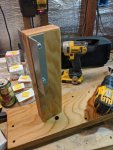
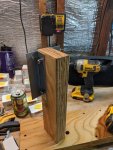
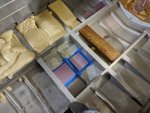
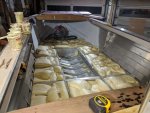
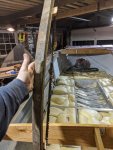
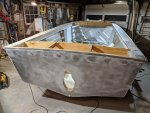
Here are a few more pics of what has been going on recently. Rebuild of main engine support, and adding flotation foam. Will trim everything down this week and start preparing for the sub floor. I also contacted the machine shop and I should have my motor back next week which I'm pretty excited about.
 

Attachments

  • photo325271.jpg
    photo325271.jpg
    64.3 KB · Views: 42
  • photo325272.jpg
    photo325272.jpg
    98.1 KB · Views: 41
  • photo325273.jpg
    photo325273.jpg
    67.5 KB · Views: 39
  • photo325274.jpg
    photo325274.jpg
    75 KB · Views: 101
  • photo325275.jpg
    photo325275.jpg
    90.8 KB · Views: 40
  • photo325276.jpg
    photo325276.jpg
    85.1 KB · Views: 40
  • photo325277.jpg
    photo325277.jpg
    114.6 KB · Views: 42
  • photo325278.jpg
    photo325278.jpg
    123.8 KB · Views: 42
  • photo325279.jpg
    photo325279.jpg
    139.9 KB · Views: 44

Watermann

Starmada Splash of the Year 2014
Joined
Jan 12, 2013
Messages
13,794
Yeah you can have a Mod merge your other topic in the general to here I believe, jbcurt00 should know.

Nice work on your Holly, those are very solid additions to the hull, should make for a timeless and safe new boat when you have her back on the waves again :thumb:

fetch
 

classiccat

"Captain" + Starmada Splash Of The Year 2020
Joined
Dec 20, 2010
Messages
3,412
Yeah man, you're the guy that ripped the front of his boat off and riveted it back on...definitely merge these threads! :madgrin:

Great works so far...and kudos on keeping the pace through the cold months! :thumb:
 

jdvasher

Petty Officer 1st Class
Joined
Jul 10, 2019
Messages
371
Yeah man, you're the guy that ripped the front of his boat off and riveted it back on...definitely merge these threads! :madgrin:

Great works so far...and kudos on keeping the pace through the cold months! :thumb:

LOL, yeah, I would NOT recommend anyone doing that. Although, I can offer some tips if anyone finds themselves in need to do the same thing. sometimes you just have to learn things the hard way.
 

jdvasher

Petty Officer 1st Class
Joined
Jul 10, 2019
Messages
371
Yeah you can have a Mod merge your other topic in the general to here I believe, jbcurt00 should know.

Nice work on your Holly, those are very solid additions to the hull, should make for a timeless and safe new boat when you have her back on the waves again :thumb:

[IMG2=JSON]{"data-align":"none","data-size":"full","height":"768","width":"576","src":"https:\/\/forums.iboats.com\/filedata\/fetch?photoid=10833024"**[/IMG2]

Thank you, I wasn't sure who the MOD was but I figured you would be able to point me in the right direction.
 

bchaney

Petty Officer 1st Class
Joined
Jul 3, 2018
Messages
246
Welcome to the Starcraft area of the forum and nice work on those braces, they look great.
 

GA_Boater

Honorary Moderator Emeritus
Joined
May 24, 2011
Messages
49,038
Moved the original thread into the best forum section, home of the Starmada and Angry Mob, then stuck the new thread at the end - Right above this post.

Welcome to the Starmada, JD. Now where did I hide that pitchfork and torch? I can't find the angry mob pic. LOL


If you want to move a thread in the future, just click the Flag button on the lower right corner of any post and tell us you want to move the thread. That way all Mods will see the request and will do the move. I happened to see you had a thread in the Starcraft section and knew you ripped the Holiday bow cap off in another thread. :joyous:
 

SHSU

Lieutenant Junior+Starmada Splash Of The Year 2019
Joined
Mar 8, 2017
Messages
1,744
YAY!!!! I am not the only one crazy enough to rerivet a boat!!

Great project, really looking forward to your updates.

SHSU
 

jdvasher

Petty Officer 1st Class
Joined
Jul 10, 2019
Messages
371
Moved the original thread into the best forum section, home of the Starmada and Angry Mob, then stuck the new thread at the end - Right above this post.

Welcome to the Starmada, JD. Now where did I hide that pitchfork and torch? I can't find the angry mob pic. LOL


If you want to move a thread in the future, just click the Flag button on the lower right corner of any post and tell us you want to move the thread. That way all Mods will see the request and will do the move. I happened to see you had a thread in the Starcraft section and knew you ripped the Holiday bow cap off in another thread. :joyous:

Thank you, Thank you
 

jdvasher

Petty Officer 1st Class
Joined
Jul 10, 2019
Messages
371
Started trimming the foam last night and I way underestimated how much work that was going to be. I whipped of this little trim tool out of a blade and a bourbon stave, ha (in Kentucky we can always find a way to incorporate bourbon). Anyways, I'm just over 1/2 way through with the trimming. Ill need to go back over and fill some of the low spots when finished and trim those down as well. I found a great price on the Coosa Board that I will use for the floor in Nashville. Hope to pick that up on my next trip down there.
 

Attachments

  • photo325329.jpg
    photo325329.jpg
    81.5 KB · Views: 28

GA_Boater

Honorary Moderator Emeritus
Joined
May 24, 2011
Messages
49,038
If you had to empty the barrel to re-purpose the stave, how's your head? :smile:

Working with foam is never fun.
 

classiccat

"Captain" + Starmada Splash Of The Year 2020
Joined
Dec 20, 2010
Messages
3,412
Started trimming the foam last night and I way underestimated how much work that was going to be. I whipped of this little trim tool out of a blade and a bourbon stave, ha (in Kentucky we can always find a way to incorporate bourbon). Anyways, I'm just over 1/2 way through with the trimming. Ill need to go back over and fill some of the low spots when finished and trim those down as well. I found a great price on the Coosa Board that I will use for the floor in Nashville. Hope to pick that up on my next trip down there.

Hey jdvasher...before you get too far along decapitating foam muffin-tops, get confirmation that it doesn't compromise it.

I read that somewhere but I fear the source was facebook...which usually varies somewhere between fact and folklore. :lol:
 

jdvasher

Petty Officer 1st Class
Joined
Jul 10, 2019
Messages
371
Hey jdvasher...before you get too far along decapitating foam muffin-tops, get confirmation that it doesn't compromise it.

I read that somewhere but I fear the source was facebook...which usually varies somewhere between fact and folklore. :lol:

Interesting, Ill have to look into this but unfortunately I don't really have a choice unless I want to raise the floor 6 inches
 

SHSU

Lieutenant Junior+Starmada Splash Of The Year 2019
Joined
Mar 8, 2017
Messages
1,744
Hey jdvasher...before you get too far along decapitating foam muffin-tops, get confirmation that it doesn't compromise it.

I read that somewhere but I fear the source was facebook...which usually varies somewhere between fact and folklore. :lol:

So it would compromise the foam air bubbles that are exposed/cut through, but not anything unexposed. I am guessing you used a 2lb or 4lb closed cell foam for this.

SHSU
 

jdvasher

Petty Officer 1st Class
Joined
Jul 10, 2019
Messages
371
So it would compromise the foam air bubbles that are exposed/cut through, but not anything unexposed. I am guessing you used a 2lb or 4lb closed cell foam for this.

SHSU

yes, 2lb. it makes sense that you would compromise the air bubbles that are cut. Although I think it would be worse having pockets that can hold more water
 

jdvasher

Petty Officer 1st Class
Joined
Jul 10, 2019
Messages
371
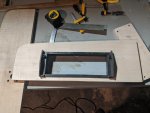
Port side dash panel cut and drilled to fit. I can't wait to see what this curly maple looks like finished.
 

Attachments

  • photo325597.jpg
    photo325597.jpg
    98.1 KB · Views: 14

jdvasher

Petty Officer 1st Class
Joined
Jul 10, 2019
Messages
371
Now I have a question.

I am wanting to mount the outdrive hardware on pretty soon as I will have the motor ready in a couple weeks. without painting the whole boat what should I do to the area directly around and behind where the gimbal housing mates up to the transom? Should I just prime with something or do I need to paint there? Fyi, pic is slightly outdated but needed to show the area.

Thanks
JD
 

Attachments

  • photo324475.jpg
    photo324475.jpg
    134.7 KB · Views: 86

SHSU

Lieutenant Junior+Starmada Splash Of The Year 2019
Joined
Mar 8, 2017
Messages
1,744
I will have to defer to some of the I/O guys but would think no priming or painting needed. Just plenty of 3M 5200 to make sure you get a good seal

SHSU
 

Watermann

Starmada Splash of the Year 2014
Joined
Jan 12, 2013
Messages
13,794
Smooth is the goal for where the transom assembly mates up to the transom skin around the keyhole. If there's any pitting or such then it needs to be filled and sanded smooth. The skin can be bare but I primed and painted my Chief's transom. The neoprene seal that goes on the assembly needs NO sealant applied to it. The best method is to use some super glue drops to secure the seal to the assembly so it stays in the groove while you're doing the assembly.

I remember you have a new transom skin so it should be good to go.

fetch
 
Last edited:
Top