1968 Larson 15-ft: new floor

bp1313

Petty Officer 3rd Class
Joined
Oct 26, 2012
Messages
84
Re: 1968 Larson 15-ft: new floor

Hey there,

Good to see another Larson project going on. I've got the 16' version and am in the process of rebuilding as well. I decided to take everything out and rebuild with a traditional wood stringer setup. Based on what I found while demo'ing mine... I think the materials you listed should be more than sufficient. I got a 25yd roll of CSM that was 50" wide, (2) 2yd sections of 1708 to cover the transom after installing, and 2 (2) 25yd rolls of 1708 that were 6" and 8" that i used for tabbing. I've still got some of both left and I'm nearing the end of the glassing. I used two gallon buckets of Cabosil...and ordered another 2 1/2 qt bucket to finish it off. (I cut my splashwell as well and will have to reattach) I made my own chopped fibers from the CSM I had. At this point I've used 8 gallons of resin and I think I'll be using 4 more.

so... I would replace the board on top of the stringers if you go back to the original design. Only because I don't think that the cost outweighs the small amount of additional support/rigidity you'd get from putting them back in.

Love to see some pics. Good luck.
 

petertay

Seaman Apprentice
Joined
Aug 23, 2012
Messages
48
Re: 1968 Larson 15-ft: new floor

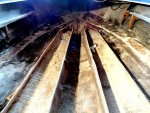
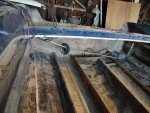
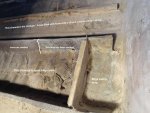
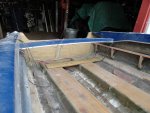
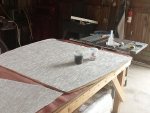
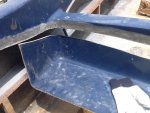
open.floor.jpgtransom.area.jpghull.holes.jpg

Thanks for the thoughts. Sounds as if I got enough material. Here are a few Pics: two are self-explanitory, the floor showing the 'stringers' with tops cut off; and the transom area.

The other photo will make you laugh (or cry). As I mentioned at the opening of this tread, PO had put new plywood over the rotten deck and covered it all with new carpet. It looked deceptively beautiful. Being new to boating, didn't know enough to look everywhere for problems, so we missed seeing the little holes around the hull. Apparently, PO had screwed his plywood down and the screws ran right through the hull, all the way around. No matter now, we will grind them inside and out and fix them. I'll have to look up how to do the little gelcoat repairs. --Peter
 

petertay

Seaman Apprentice
Joined
Aug 23, 2012
Messages
48
Need help with grinding

Need help with grinding

As seen in the photo in the previous post, I have cut off the top of the 'stringers' pulling off the 1x10 and removing the foam. I am now sanding the remaining sides (or walls) of the stringers with 36 grit flap wheel in preperation for rebuilding them with a new board on top then foam inside. I will waterproof the board with CSM prior to putting it in place, then rebuild the top of the stringer, first with a layer of CSM, then heavy roven wrapped down the sides. I assume that will be as strong as the original.

My question is: What is my goal as I am sanding? To scuff up the old roven sides? Or to grind way until it seem that I am into the glass fibers. In other words, when I hit an area with lots of resin, do I grind it all off?

I hope the photo helps. To the left of the white line has not been sanded, to the right has been sanded. Have I sanded enough? Thanks. --Peter

sand-question.jpg
 

bp1313

Petty Officer 3rd Class
Joined
Oct 26, 2012
Messages
84
Re: Need help with grinding

Re: Need help with grinding

I'm not really sure what the pros might tell you... I'd sand down until I started to hit fibers and take off the excess resin where possible.
 

petertay

Seaman Apprentice
Joined
Aug 23, 2012
Messages
48
Question about adding wax in resin

Question about adding wax in resin

I'm ready to start fiberglassing; putting CSM on both sides of the transom first. Somewhere in these forums I saw a note about the importance of wax added into the final layer of fiberglass.

I called USComposites where I got the supplies, and they said yes it must be added or the fiberglass surface will stay sticky. But as I review Frisco, Oops, and others, they mention mixing the resin and then the time it takes to 'kick,' but they don't seem to mention adding wax to the resin. I must be missing something.

Anyway, on the new transom and floor, do I need to add wax? Thanks. --Peter
 

JASinIL2006

Vice Admiral
Joined
Feb 10, 2012
Messages
5,673
Re: Question about adding wax in resin

Re: Question about adding wax in resin

Wax only gets added to final layer, generally. When I laid m new deck, I had a layer of CSM on the underside. I added wax to the resin so the underside would set good and hard. (I read somewhere that it is more impervious to moisture if it's been waxed, but I don't know if that is true.

Don't wax any layer that will have more glass laid on top; the next layer won't adhere properly (unless you sand and wash with acetone).

Jim
 

bp1313

Petty Officer 3rd Class
Joined
Oct 26, 2012
Messages
84
Re: 1968 Larson 15-ft: new floor

I used waxed resin for my whole rebuild. I'm just about done with glassing (after almost 14 gallons) I have to admit that it's a pain with the sanding and wiping with acetone. You don't have to between layers unless you let it cure fully. I tried to glass as much as possible each time to reduce the amount of sanding I would have to do overall.

I used waxed resin to laminate the transom and cover it with CSM prior to installation. That works fine as long as it's sanded well and cleaned with acetone prior to actually setting it in the boat.

Can't wait to see some pics.
 

petertay

Seaman Apprentice
Joined
Aug 23, 2012
Messages
48
Re: 1968 Larson 15-ft: new floor

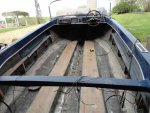
The transom has been replaced and the stringers rebuilt.
The tops were cut off the stringers with their horizontal boards (rotten);
Dug out the soaked foam;
Placed new 1x10 boards (with CSM on both sides) on little blocks to hold them at the right height matching the glass sides;
Used PL to glue the edges of the boards to the glass to hold them in place until foam was poured in;
Drilled holes and poured 4-pound foam;
Rewrapped the stringers with heavy roven.

Next is measure for the new deck. ?What thickness plywood is required or sufficient for the new floor?

The big surprise is that my new transom is thicker than the old one, so the splash well will not fit back in place. I'll have to cut it apart and remake it.

Thanks for all the advise and instructions on these forums. I've never done galss work or owned a boat, but with all the kind people here showing me what to do, all is going well.

stringers1.jpg stringers2.jpg
 

bp1313

Petty Officer 3rd Class
Joined
Oct 26, 2012
Messages
84
Re: 1968 Larson 15-ft: new floor

minimum of 1/2 inch for the deck. I went with 3/4 for mine. I covered the bottom with one layer of CSM and the top with two layers.

Looking good :)
 

petertay

Seaman Apprentice
Joined
Aug 23, 2012
Messages
48
Question about the fuel tank

Question about the fuel tank

In the engine forums, if someone asks about a poorly running engine, the answer sometimes is, "Check the anti-siphon valve." Since my fuel tank is out of the boat, now is the time to check it. Does it have any moving parts or is it just the brass hose fitting on top the built in tank? Thanks. --Peter
 

bp1313

Petty Officer 3rd Class
Joined
Oct 26, 2012
Messages
84
Re: Question about the fuel tank

Re: Question about the fuel tank

Hey Peter,

I believe it's the valve that allows air into the tank to replace the gas that's being pulled by the engine. When the valve is closed while running...the tank builds negative pressure that makes it harder and harder to pull gas and eventually starves the engine. (I believe.)

On a plastic tank it's usually just a plastic cap you can loosen and tighten.
 

Woodonglass

Supreme Mariner
Joined
Dec 29, 2009
Messages
25,927
Re: 1968 Larson 15-ft: new floor

On all the glass below the deck no wax is needed but.. on the final layer of glass on the transom and Top of the deck I would use surfacing wax, unless you are going to be applying Gelcoat. If so, then no wax until the final coat of Gelcoat.
 

petertay

Seaman Apprentice
Joined
Aug 23, 2012
Messages
48
Fiberglass question on splashwell

Fiberglass question on splashwell

As mentioned previously, I cut the splashwell out to do the transom replacement. Since the new transom is thicker than the old, the splashwell won't fit back in place, so I cut it in half to work on it. Now as it gets replaced, I am grinding the surface off to allow for new fiberglass. See photo.

Question Do I need to grind both sides and add glass to both sides, or can the repair be done on one side. AND, do I use CSM or 1708 for the repair ribbon. Thanks.

BTW: used 1.5 gallons of peanut butter filleting in the new floor. After the splashwell is done, the floor gets tabbed in and reglassed, then the tank goes back under the bow and we'll start thinking of how to replace wiring.

That brings up another question: With Johnson controls, can the steering cable and the throttle cables back at the engine all be fed through one boot, or do I need to cut two holes? The previous setup had two holes.

splashwell.jpg
Photo shows grinding on the upper part of the splaswell. The lower half also gets ground out, then pasted back together with new glass and fairing.
 

bp1313

Petty Officer 3rd Class
Joined
Oct 26, 2012
Messages
84
Re: 1968 Larson 15-ft: new floor

Nice progress!

I have my cables fed through one... I don't see why you couldn't do the same thing.

for the splashwell :) I used a strip of 1708 on the bottom side and filled with PB and fairing compound on the top. It turned out really solid. I'm not sure if you'd ever be able to get a smooth finish if you added glass directly over the top.

Looks good!
 

petertay

Seaman Apprentice
Joined
Aug 23, 2012
Messages
48
Re: 1968 Larson 15-ft: new floor

Thanks for the reply, Seaman. I don't live near a marina or dock so I don't get to see how others do it.
 

petertay

Seaman Apprentice
Joined
Aug 23, 2012
Messages
48
Re: 1968 Larson 15-ft: new floor

The new floor is finished but I still have a question about the bilge well. Of course there is the drain hole out the transom, but there is also a drain hole leading to the stringer area under the floor. I put that hole in because it was there originally. Also replaced under the floor the drain tubes leading from the outer bilge areas through the foam stringers to the central open bilge area.

I don't understand why the under-floor area has a drain to the bilge well. Unless the boat smashes the rocks, no water can ever get into the bilge area. But my real concern is that the inner bilge drain can let water INTO the under-floor area. Let's say the boat is in the water and two inches of rain falls. That two inches will fill the bilge well then flow back under the floor. Not what I would want. We have all chopped out the water-logged foam during our restoration work, why would we want water to get in there?

Have I made sense? Seems to me I should seal up the inner drain so the under-deck area stay dry.

Comments please. --Peter
 

Woodonglass

Supreme Mariner
Joined
Dec 29, 2009
Messages
25,927
Re: 1968 Larson 15-ft: new floor

Just use another Expansion type Drain Plug on the inside of the bilge to plug the hole;)
They come in various diameter sizes.

$T2eC16dHJGIE9nnWrcswBRW987UtEw~~60_35.JPG
 

sphelps

Supreme Mariner
Joined
Nov 16, 2011
Messages
11,462
Re: 1968 Larson 15-ft: new floor

^^Thats the way mine is and I have a vent tube that comes out from under the deck up into the bow area .. Water that gets on the deck never gets under it ..The under deck drain tube is separate from the deck drain tube that exits the transom ..
 
Top