1966 Dorsett San Juan 19' Full Restoration

Jake_Sin

Cadet
Joined
Jul 24, 2020
Messages
10
@Lectro88 Thank you for the positive encouragement. I bought this boat 2 years ago and due to my own ignorance (plus a dishonest seller) I was told & believed this was a turn key project with solid bones. After quickly realizing this was not the case I became discouraged and didn't do much work for a year. I have since changed my mindset & I am now embracing the challenge. I am looking forward to knowing first hand that all wood in this boat will be brand new & properly glassed. I am currently on a very tight budget but luckily have all the tools needed to prep this boat properly. I will hopefully be back to work soon as I am still recovering from a hip replacement & when money is available I'll have the boat ready to begin rebuilding.

As for the cored bottom of the boat (inside the hull), do you think it is best to lay a new layer of biaxial cloth before laying stringers or should I lay new stringers, tab them & then lay new glass over bare spots. I am thinking a single layer of glass 1st then stringers but this is all new to me & I want to do this right.

@todhunter, does the keel need to be one continuous piece of wood? Also money is quite tight so what other types of lumber would be suitable? I have read that fir & yellow pine are commonly used.

Thank you,
Jake
 

Jake_Sin

Cadet
Joined
Jul 24, 2020
Messages
10
There seems to be only 1 layer of glass on the original core for reference.
 

Attachments

  • 20220501_150347.jpg
    20220501_150347.jpg
    3.2 MB · Views: 7

Lectro88

Petty Officer 1st Class
Joined
Oct 24, 2020
Messages
303
@Lectro88 Thank you for the positive encouragement. I bought this boat 2 years ago and due to my own ignorance (plus a dishonest seller) I was told & believed this was a turn key project with solid bones. After quickly realizing this was not the case I became discouraged and didn't do much work for a year. I have since changed my mindset & I am now embracing the challenge. I am looking forward to knowing first hand that all wood in this boat will be brand new & properly glassed. I am currently on a very tight budget but luckily have all the tools needed to prep this boat properly. I will hopefully be back to work soon as I am still recovering from a hip replacement & when money is available I'll have the boat ready to begin rebuilding.

As for the cored bottom of the boat (inside the hull), do you think it is best to lay a new layer of biaxial cloth before laying stringers or should I lay new stringers, tab them & then lay new glass over bare spots. I am thinking a single layer of glass 1st then stringers but this is all new to me & I want to do this right.

@todhunter, does the keel need to be one continuous piece of wood? Also money is quite tight so what other types of lumber would be suitable? I have read that fir & yellow pine are commonly used.

Thank you,
Jake

I know about surgery. I have a small hardware store installed in my lower leg and that was a pretty big setback. Both bones.

I will tell you I lap jointed and wood doweled my long stringers then poured the gaps with epoxy. You can tape or dam up with aluminum duct or regular duct tape to contain the pour. Most probably don’t go to that trouble.

You can use bcx or cdx plywood x means exterior glue.
And you should plan to replace all the wood.
It’s done it’s job.

You are welcome to pm me especially if you end up being close enough for me to help you. Just an offer.
Looking forward to following your build.
 

todhunter

Canoeist
Joined
Sep 15, 2020
Messages
1,291
My original center stringers was mahogany, but I went back with ACX plywood for all my stringers, bulkhead, and transom, and fully encapsulated it all with 1708 and poly resin.

I would recommend you use ACX for everything.

And if you need a piece longer than a standard sheet of plywood (96"), you can do scarf joints or sister joints.
 

Lectro88

Petty Officer 1st Class
Joined
Oct 24, 2020
Messages
303
you can check out my cut and gut thread and see my methods with wood and encapsulation.
not the norm I venture to say.
 
Last edited:

Lectro88

Petty Officer 1st Class
Joined
Oct 24, 2020
Messages
303
just a friendly reminder.

Before you get too crazy demo'ing.
Either cradle or make sure your bunks aren't distorting the hull.
(You been around a while and prob know this)
But another thing you can do. is 1 stringer or section at a time.
same in a house, you wouldn't pull all rafters out with roof still on or all your floor joists with floor in place.

That old rotten wood is still "helping" hold things in place 'a little"
 

Jake_Sin

Cadet
Joined
Jul 24, 2020
Messages
10
Did a bit more sanding and found some more surprises. It does seem that over 75% of the keel wood is in good shape. Also the bottom of my hull has some rotten wood core. Luckily the wood, not sure what kind it is, is laid in small rectangular sections so replacement shouldn't be too hard. It appears to be roughly 1/4" thick. Current plan is looking like;
1. Completely separating the cap from the hull.
2. Removing bulkhead & inwale glass in one piece
3. Sand down all delaminated old fiberglass mat & removing any rotten wood core from the bottom of the hull.
4. Fix keel by joining existing wood to 3"4 ply at either end (open for suggestions), fill all remaining voids in the keel with a thickened epoxy then lay at least 1 layer of glass (biax) over the entire length of the keel. The original, or last repair, was a single piece of wood from stern to bow & went all the way up to the deck as a stringer. It was poorly encapsulated and tabbed so it's no wonder it rotted.

4. Bed new piece of core (most likely 1/4" ply) in a thickened epoxy (not sure if this is necessary) & then lay at least 1 layer of glass on the entire inside of the hull. The areas with no remaining glass from core replacement may get 2 layers so everything is nice and even.

I feel that this is what's necessary before I can move to the transom rebuild.

@Lectro88 I'm definitely conserved about the hull distorting lucky as for right now I feel between the attache cap and cored bottom hull, everything is where it should be. I could be wrong in assuming this is enough but it does seem to be so. Now considering I'm going to remove the cap, what's your best advice for maintaining the proper shape?

-Jake
20220504_153021.jpg20220504_153026.jpg
 

Lectro88

Petty Officer 1st Class
Joined
Oct 24, 2020
Messages
303
@Lectro88 I'm definitely conserved about the hull distorting lucky as for right now I feel between the attache cap and cored bottom hull, everything is where it should be. I could be wrong in assuming this is enough but it does seem to be so. Now considering I'm going to remove the cap, what's your best advice for maintaining the proper shape?

-Jake

Its a little tough as I have no seen it first hand and my projects are a totally different style.
I'm no expert nor does i claimtobee lol.

But if it was me,
I guess I'd get the ole tape measure out and measure everything I thought mattered.
I have not picked up if you cradled hull or not.
I have set my hull on old tires and on the ground,. BUT....
I also have not removed any stringers other than just in front of transom.
My cap is removed,. AND the hull splayed or spread apart when I did that.
Looking back, Knowing how wide of a board to replace and pull things back together or tie down straps to draw it back in,. And all this hampers working on things as its an obstacle every few feet. to have to duck or climb over.
I had to cut the @$$ out of the cap at the transom to get it to release.
And I didn't bother to measure that or put the puzzle back together. (again hind sight) It will all get pulled back in when I seat the cap back on,. But I beefed up how stiff the hull is with that board I epoxied in place running up where the side hull and the bottom hull meet or turns up.(theres that hind sight again)
You may could set the hull on tires like I did, they give a little and also leave black marks, a moving blanket or plastic would stop that if it matters.
But I supported the back rear corners and the front center or keel, made a triangle. But Again my stringers are in place and in FAIR condition since they have dried out.
Pull a string across or fishing line. make a cross or grid and measure down to hull in center And plot 6" or a foot from transom. then 2' or whatever you think. Then measure down to the hull, I'd say not the stringer as you are changing that and It won't most likely match perfectly. But the hull should stay, or be "made" to stay in the same place. even if you had to get under it with a jack.
The string placed where you can easily duplicate, like at the cap seam. or
tied to the back of the bow u-bolt and to top of transom(again I've not been in your boat) But you need a reference or starting point you can go back to.

On mine, I am adding stringers before I take anything out. to hold things in place.
Now my hull I "think" is thicker than a lot, being an old 1969 off shore era or style.
Lake boats are more conservative or thinner in the glass department. not subject to as much abuse.
My point is I may can get by with more than some others, And again I can't speak for your boat. But I think it was an ocean runner.

I'm hopping that others will join in with their expertise to help on this,

I'm going to post a pic on your thread to show you the board that I mentioned that stiffened things up. so you can see what I mean.
Everything you add Changes Something.
AND I've Added, & Changed a Lot.


A7A20B31-0DDC-433C-A424-ECD733B861D6.jpeg


These 2 boards stiffened up the side dull flop, to the point,
It will be under a little pressure, not terrible, but its something I noted after the fact, after it was done.
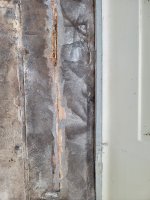
The cap was cut open at the transom, so that may offer some forgiveness, I'll post it too.
These are the sort of things to look out for, And I'm admitting guilt of a ut oh/goof.

64559508-B785-4172-B893-46D5DBD41BCA.jpeg


Below;
You can see how the transom is cut out of the cap


D32BA283-F692-447E-B61C-BCE6C627364D.jpeg
 
Last edited:

Jake_Sin

Cadet
Joined
Jul 24, 2020
Messages
10
@Lectro88 I wonder if tabbing in a new bulkhead prior to removing the cap would provide the support needed to keep the hull from flexing outwards. For now I'm just making sure to take as many measurements as possible. I plan on making my popsicle stick transom template prior to removing the cap as well, this way I can ratchet the sides of the hull back to proper width need be.
 

Lectro88

Petty Officer 1st Class
Joined
Oct 24, 2020
Messages
303
@Lectro88 I wonder if tabbing in a new bulkhead prior to removing the cap would provide the support needed to keep the hull from flexing outwards.
Probably wouldn’t hurt.
It’s a good bit of extra work.
But only you can tell or make that decision.

I’m waiting for some of the other seasoned members to write in.
 

todhunter

Canoeist
Joined
Sep 15, 2020
Messages
1,291
I'd say take a look at your trailer. If you've 4+ bunks that hold the majority of the boat and they are in good shape, with no pressure on the hull from any rollers, you can roll the dice and rebuild on the trailer with no cradle - that's what I did. When I pulled the cap, I measured widths of the hull every foot and made a "map" (before demoing the floor, transom, or stringers) - then before any structural glassing, I would check widths and ratchet strap it back into position if needed. I also demo'd / replaced the transom and 2 of the 5 stringers first, then demo'd /replaced the last 3 stringers to help prevent distortion.

The safest bet is to build a cradle either in addition to your bunk trailer, or completely pull the hull off the trailer and build a stand-alone cradle.
 
Top