1964 Glasspar Seafair Sedan - minor restore w/questions.

Thirsty Endgrain

Petty Officer 1st Class
Joined
May 30, 2020
Messages
245
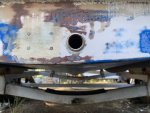
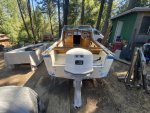
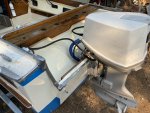
Haven't cored into transom yet, every time I go out to the boat thinking I might put something in I end up taking multiple things out.

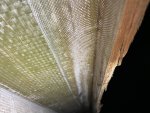
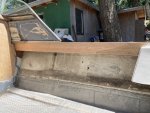
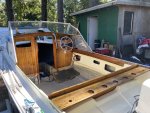
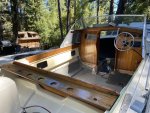
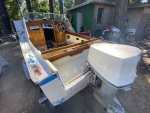
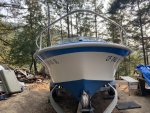
I'm almost done removing material (or so I think), have even sanded and varnished some of the old wood (first coats anyway). Need to remove some rotted wood at sides of gunnels and replace. Didn't intend on getting even this deep on the minor restoration but my actions are dictated by my findings, and I think I'll be pretty happy with this thing by the "end."

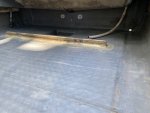
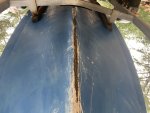
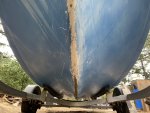
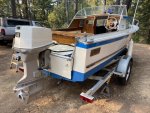
Cleaned the floor up, and took some pictures from the inside of the previous owners' floor and transom repair. I am and want to be skeptical, but everything I knock on and poke at feels solid. I was thinking I would paint the whole floor with non-skid coating, but I'm not sure how to prep? I don't know what the Grey colored coating is everywhere, is that a paint? Resin additive? Color of a certain type of resin?

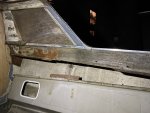
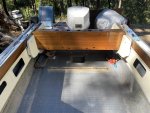
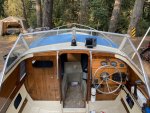
That little raised portion under the bench seat needs attention for me to feel good about it. I was thinking I'd give it a couple more coats of epoxy...
 

Attachments

  • photo333765.jpg
    photo333765.jpg
    292.4 KB · Views: 13
  • photo333766.jpg
    photo333766.jpg
    340.9 KB · Views: 12
  • photo333767.jpg
    photo333767.jpg
    1.8 MB · Views: 13
  • photo333768.jpg
    photo333768.jpg
    430.4 KB · Views: 13

Thirsty Endgrain

Petty Officer 1st Class
Joined
May 30, 2020
Messages
245
Well I ordered some Total Boat deck paint, so hopefully that'll work over the deck here.

One thing in need of attention are the rails at the top inside edge of the gunnels. (Inwhales?)

Attached are pics taken at dark but I think they show the goods. They're glassed to the side deck(?) in the third pic. I could replace the whole thing and I'm tempted to, or I was thinking of cutting out the bad section and scabbing/scarfing in a repair section. Replacing the whole thing would mean removing a bunch more hardware and whatever you call the draining deck across the stern, an idea I'm not too keen on at this point.

So if I were to scab a section in, I guess I could cut the glass and remove the bad part, and then just glass - and maybe fasten - the repair section in?
 

Attachments

  • photo333987.jpg
    photo333987.jpg
    470.2 KB · Views: 11
  • photo333988.jpg
    photo333988.jpg
    256.9 KB · Views: 11
  • photo333989.jpg
    photo333989.jpg
    311 KB · Views: 11

Thirsty Endgrain

Petty Officer 1st Class
Joined
May 30, 2020
Messages
245
Moving along, I suppose I'm just documenting here. Is this not the right place to ask questions? Genuinely curious. Should I be asking questions in a different part of the forum, or is there another forum that is more dedicated to repair type questions?

Got the helm glued together. Discarded the rotten section of the side of the gunnel with a little architectural scarf. Slowly getting everything varnished. Why didn't anyone tell me that boat restoration was time consuming and expensive?
 

Attachments

  • photo334096.jpg
    photo334096.jpg
    300.1 KB · Views: 9
  • photo334098.jpg
    photo334098.jpg
    419 KB · Views: 9

BWR1953

Admiral
Joined
Jan 23, 2009
Messages
6,113
Hey, I'm still following along but I don't know anything about glassing stuff because I'm a tinhead. But I'm sure some of the glasser guys will be chiming in when they can with answers, advice and whatnot. :cool:

Expensive? Time consuming? You betcha! Doesn't matter if it's glass or tin, it's the same. :p

Carry on! :eagerness:
 

sphelps

Supreme Mariner
Joined
Nov 16, 2011
Messages
11,456
Your plan for hardware backing wood sounds fine . Cut out the bad and replace with new ..
Just make sure when you mount the hardware later you seal it up good with 5200
 

Thirsty Endgrain

Petty Officer 1st Class
Joined
May 30, 2020
Messages
245
Thank you both, starting to feel like I have the reins on this thing (is probably something I shouldn't say).

So today I peeked into the hull drain hole, and I see that there is no foam under the deck. Does that mean that foaming the underdeck area is in my future at some point? There's only like 3"-4" of vertical space fore-to-aft, vee is deep in the front but apparently it's a planing hull? So flattens out fairly fast from that deep vee. Should that 3"-4" be filled with foam?

I also can see light through the fiberglass at the keel, I'll show pics tomorrow of what I mean. I think I'll need to re-gelcoat the keel, but I'm wondering if I need to add material as well? Pics to come.
 

Willyclay

Captain
Joined
Sep 8, 2006
Messages
3,252
There was no foam between the deck and hull on my Dad's 1960 Glasspar 16ft. Avalon runabout when I restored it in the 1980's. That air-space had a separate drain plug from the open cockpit/deck area. Good luck with your great old boat!
 

Thirsty Endgrain

Petty Officer 1st Class
Joined
May 30, 2020
Messages
245
Pics of the keel.
 

Attachments

  • photo334170.jpg
    photo334170.jpg
    307 KB · Views: 9
  • photo334171.jpg
    photo334171.jpg
    295.1 KB · Views: 9
  • photo334172.jpg
    photo334172.jpg
    305.1 KB · Views: 8

BWR1953

Admiral
Joined
Jan 23, 2009
Messages
6,113
There was no foam between the deck and hull on my Dad's 1960 Glasspar 16ft. Avalon runabout when I restored it in the 1980's. That air-space had a separate drain plug from the open cockpit/deck area. Good luck with your great old boat!

That reminds me. On my 1966 Seafair Sedan I also had that "dead air" space with separate plug. And when I pulled the plug for inspection, water came out. For about an hour! It was full of water in there. :eek:
 

Willyclay

Captain
Joined
Sep 8, 2006
Messages
3,252
And when I pulled the plug for inspection, water came out.

Never had large amount of water in mine; just small amounts accumulated from normal boating activities like wet anchor ropes, wet kids, wet dogs, etc. finding its way into that space. I never considered filling it with foam back then.
 

Thirsty Endgrain

Petty Officer 1st Class
Joined
May 30, 2020
Messages
245
Still trying to figure out the keel. It seems like to do it right I need to do some glassing. Current plan until I'm advised, coerced, or otherwise bribed into some sense is to sand out a couple-few inches of the gelcoat away around the affected area, cut 3-4 long pieces of fiberglass stepping down in width by about 1/4" each time, and 105/205 them on. I watched that video of the older gentleman who is a very much professional in YouTube that's like an hour and a half long. I think I got a decent sense of what to do from that, but I definitely have questions specific to this application.

Would I want to use 1708? Something else? I know doing this work upside down will present some unique challenges, but I bet more than a few of you have tackled this. I'd appreciate any advice you have!

P.S. A process pic of the new helm....

image_334277.jpg
 
Last edited:

sphelps

Supreme Mariner
Joined
Nov 16, 2011
Messages
11,456
Nice job on the helm !
As long as the keel glass is not worn down past the original glass layup I think you could just use csm ... Tear up a bunch of small pieces where it kinda resembles bunny tails then start dabbing them in place to build up the thickness desired .. Build up a little further than you need so you can grind it down to the right thickness . Make sure you grind the area down a bit to clean glass and wipe down with acetone first ... Get some micro balloons to mix with your resin to make a fairing compound for final shaping . Then paint or regell coat .. If its worn down to the wooden keel inside then you may want to add some 1708 layers first ...The upside down thing is never fun ..
Some folks will take some plastic or wax paper and and layup/wet out some strips of glass on the paper .. Then hold the paper up from underneath to place the whole assembly on .. Use your hand to press it in place and wipe it smooth ... A squeegee puled from the middle outward helps also .. Tape in place till it kicks then peel the plastic or wax paper off ..
 

Thirsty Endgrain

Petty Officer 1st Class
Joined
May 30, 2020
Messages
245
For the tl;dr just skip to "QUESTIONS"

Thank you for that! Really helps. I've spent way too much time reading and researching so many aspects of boat and engine repair in the last month my eyes are actually crossing and I think I need to just go on a bike ride. I think I'm starting to get a handle on what I need to do here though. I was just thinking hey now I can start putting everything back together and maybe even put this thing in the water, all my experience with it so far is on land so I'm starting to forget that it's actually supposed to float too? My story is every story of someone who bought a cheap boat...

Found some older threads on keel repair, like these:

https://forums.iboats.com/forum/boa...-a-keel-that-has-exposed-or-pitted-fiberglass

https://forums.iboats.com/forum/boa...and-hull-repair/444210-fixing-my-damaged-keel

lots of good info in there. Seems like there are different approaches, but all generally in the same line.

Video I referenced earlier. Probably a must watch for anyone who needs to glass but has little experience:

https://youtu.be/aSKbF6jGJKw

Sphelps you're suggesting using bunny tails of CSM, can you tell me why I'd want to do that and not longer strips of CSM with biax in between? I want to make this repair as strong as possible, this boat will be in the sf bay and others, so I'm looking for maximum peace of mind and safety. There is no wooden stringer inside that I can see. I'll try to get some pre-op pics that paint a better picture.

QUESTIONS:

1) So sanding and grinding away any rot and gelcoat, got it. Acetone wash before any resin. Then for the repair, this is where I need to "fill in some pieces" if you will. For the layer of resin that will bond the first layers of glass in, do I need to mix anything into the resin the help tooth it into the old keel? Some cabosill to help fill voids?

2) I guess 2 is what is the right cloth to use? So I guess question 2 is listed above #1 ;)

Pics attached are weird but so is literally everything right now. First one is to show you which hole we're looking down. Second is the light at the end of the keel (which sounds disproportionately optimistic considering the circumstances)...
 

Attachments

  • photo334337.jpg
    photo334337.jpg
    358.1 KB · Views: 6
  • photo334338.jpg
    photo334338.jpg
    196.7 KB · Views: 6

sphelps

Supreme Mariner
Joined
Nov 16, 2011
Messages
11,456
The bunny tails are just easier to conform to the rounded corners of the keel . If the damage gets into the structural cloth of the original glass work then yes couple layers of 1708 would be recommended .
A little tip on glassing corners .. Cut about a 1/2" of the bristles off of your chips brushes before you start .. It makes it easier to dab the bubbles out of the glass ... Work from the middle out to squeeze any air bubbles out from under the glass .Instead of brushing the glass you want to dab dab dab it .. If that makes since .. Once you get a bit of glassing behind you ,you will get better and better at it ...
Cabosil will help you re-form the keel if you need to but add some 1/4" chopped strands to the mix for strength..
I hope this helps ... And heck if you screw up at first for some reason just grind it back down and try again .. I doubt you will need to though ... There's really not much to it .. Just don't mix way more than you need at first to keep from wasting the resin .. Unless you need some fiberglass hockey pucks .. :lol:
 

Thirsty Endgrain

Petty Officer 1st Class
Joined
May 30, 2020
Messages
245
Great, I like the "tip" about the brushes! Have 105/205 already. Appetizer of fumed silica and chopped strands on the way, along with no-wax gelcoat, and a side of wax, also some 1708, CSM, and peel ply for desert.. Everything delayed as we all know, so if I'm lucky I'll have the stuff by next-ish weekend. Oh well, can get all prepped and have already done it in my head a thousand times by then.

1708 down first with some chopped strands against the old glass, and a few (4-5) layers of CSM over that, peel-ply and walk away. Peel it off next day and fill voids with PB if I have to, walk away. Wash it, 80 grit, rinse it, acetone, then 2-3 layers of gelcoat, the last layer of which gets wax added. Bottom paint and see if it floats.

Do I have that roughly right? I'll skip making too much, not much use for hockey pucks in my dry mixed conifer forest up here :)
 

Thirsty Endgrain

Petty Officer 1st Class
Joined
May 30, 2020
Messages
245
Still waiting on materials but here's at least some progress pics. I reinforced the splash well in some areas, and ended up painting it. Looks much better now. Engine mounted. Helm almost complete. Most of the trim still not on for reasons.

Anyone have recommendations for what kind of paint to use for the engine cowl cover? I don't need to have Johnson white specifically. Is a high quality UV stable rattlecan paint acceptable?

Anyways, pics:
 

Attachments

  • 82DA14ED-CFB7-4FDD-843E-7A6E94ECE357.jpeg
    82DA14ED-CFB7-4FDD-843E-7A6E94ECE357.jpeg
    340.1 KB · Views: 12
  • 2AFAEBE1-9774-4707-8809-7EF2635D15CF.jpeg
    2AFAEBE1-9774-4707-8809-7EF2635D15CF.jpeg
    418.9 KB · Views: 11
  • A26BB23D-802F-4204-A300-C4067DAB6E74.jpeg
    A26BB23D-802F-4204-A300-C4067DAB6E74.jpeg
    374.6 KB · Views: 13
  • D89BE241-97BD-4002-BF92-315BA353E8EA.jpeg
    D89BE241-97BD-4002-BF92-315BA353E8EA.jpeg
    410.2 KB · Views: 12
  • 9697DCFB-AF6C-4B69-ADD1-FC902CC2AF01.jpeg
    9697DCFB-AF6C-4B69-ADD1-FC902CC2AF01.jpeg
    451.4 KB · Views: 13
  • 8E852E5A-A7D0-4005-8029-BE732A916321.jpeg
    8E852E5A-A7D0-4005-8029-BE732A916321.jpeg
    430.3 KB · Views: 11
  • A2E3A246-B496-4B6B-AEA0-80A6F6700885.jpeg
    A2E3A246-B496-4B6B-AEA0-80A6F6700885.jpeg
    338.1 KB · Views: 14

Thirsty Endgrain

Petty Officer 1st Class
Joined
May 30, 2020
Messages
245
6CB2D09D-A37E-4EB6-9F69-2E04BE3932EF.jpeg OK got the keel glassed. I have gelcoat, wondering if it's necessary to put some gelcoat on first, or should I just get the bottom paint on? How important is gelcoat?
 

sphelps

Supreme Mariner
Joined
Nov 16, 2011
Messages
11,456
Gel coat certainly won’t hurt .. It would help seal things up and help fair it a bit ...
 

Thirsty Endgrain

Petty Officer 1st Class
Joined
May 30, 2020
Messages
245
5C697615-E499-46C6-B2DC-49295496D83E.jpeg Haven't been posting about it but I've been busy. So I did gelcoat, and got the bottom paint on. Electrical is allllllmmmost done done. I can flip switches and various things turn on, the correct things even! Anti-skid paint on the deck, a bunch of the fiberglass painted a nicer color than sun faded stain-grey. Tilt and trim figured out, dash all wire up, lights in the cabin, horn, just waiting on a couple of parts to mount a downrigger. Fish finder mounted. Got a couple of rollers on the trailer, replaced all of the lights, extended it 14" as it was a little short, sheesh what else.....aluminum all mostly kinda polished sorta....anyway pics!

Away this next week and hoping to actually get 'er in some water the following weekend...
 

Attachments

  • 667D1E2D-CB56-4E08-A9D8-27D23F73AC27.jpeg
    667D1E2D-CB56-4E08-A9D8-27D23F73AC27.jpeg
    534.1 KB · Views: 13
  • B05A6E00-82B3-45CF-97C3-C18D16E43C9B.jpeg
    B05A6E00-82B3-45CF-97C3-C18D16E43C9B.jpeg
    500.5 KB · Views: 13
  • 2E930F38-1BB8-4482-8504-B94C0887DE73.jpeg
    2E930F38-1BB8-4482-8504-B94C0887DE73.jpeg
    369.3 KB · Views: 13
  • C3DAB1C9-D2A3-4E2F-9937-EFD0BD4E02C8.jpeg
    C3DAB1C9-D2A3-4E2F-9937-EFD0BD4E02C8.jpeg
    477.9 KB · Views: 12
Top