1962 Evinrude Starflite IV 75hp no spark HELP!

Joined
Jun 9, 2021
Messages
10
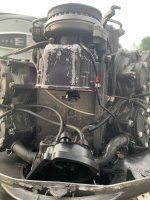
Okay folks. Please please please I need some help on this one. I have a 1960 Magnolia Cruiser with a 1962 Evinrude Starflite IV 75hp on it. Model # 50529
Here’s the backstory.
I bought the boat a few years ago, love the look of the boat and motor combo. Took a little doing but I was able to get the motor running and was out having fun days at the like for awhile. Sometimes while out on the lake we would start having issues. Usually it would run great but sometimes after running it for awhile and shutting it off I would have a hard time starting again. At the time I was a little stumped. I thought maybe it was flooding? Maybe overheating?
The last time I had the boat out was a couple years ago and it started running rough and then died. Wouldn’t start, towed back to the dock and loaded it up and back home. Not a great day.

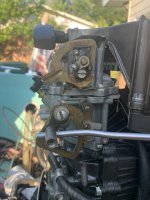
Now I’m trying to get the old girl back on the water but having some issues. I have it turning over. Got fuel in the carb. But no spark. Spark plugs look okay. I replaced them when I first got the boat and haven’t run them much.

I guess my general question is how to go down the list of checking for what could be causing this?
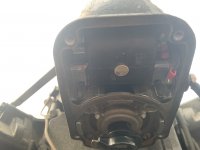
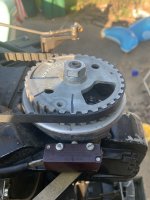
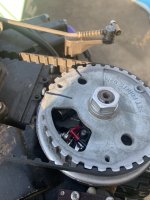
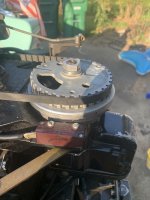
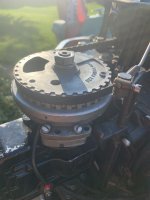
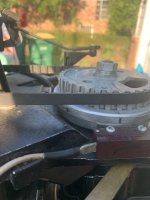
The points look good and everything is clean and nice in there. I’m thinking maybe the coil is the culprit? That would make sense with it failing intermittently when it gets hot right?
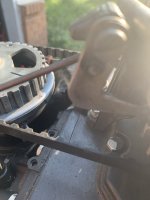
on this specific model the coil is a little different than others I have seen. Ill include pics. How could I check the coil with it still on the motor? And if I do find that to be the culprit can one of you guys tell me how to remove it? It’s not immediately obvious how it’s attached. I tried removing the 2 screws on either side but it still seemed stuck in there. Also, it looks like NOS coils for this model are running about 100 bucks. Sheesh!!! Would really like to be sure that’s what it is before I consider replacing it. Or if there are any aftermarket coils that might be a substitute would love to hear about that.
Thanks in advance for any help or suggestions you can offer!
 

Attachments

  • AAA75E5B-0A51-4BCA-9A57-A6096A2CFD19.jpeg
    AAA75E5B-0A51-4BCA-9A57-A6096A2CFD19.jpeg
    1.5 MB · Views: 10
  • 5BF25180-DA71-41D6-8621-F82DDEE6FB6D.jpeg
    5BF25180-DA71-41D6-8621-F82DDEE6FB6D.jpeg
    1.4 MB · Views: 10

racerone

Supreme Mariner
Joined
Dec 28, 2013
Messages
36,033
That is the simple magneto.----A wonderful device.-----Steps to take.-----Mark the belt timing.----Remove the magneto.-----Replace the condenser.----Replace points if badly pitted.---Replace rotor.----Test it before you put it back on the motor.----Spinning it by hand should produce a small electrical storm.----Install distributor cap and test again for spark on each lead.----Should jump a gap of 5/16" with ease.-----Install on the motor and make sure belt timing is the same again.
 

racerone

Supreme Mariner
Joined
Dec 28, 2013
Messages
36,033
And there are 2 similar looking rotors on the shelf.----One for the magneto unit and one for the battery powered distributor.
 
Joined
Jun 9, 2021
Messages
10
Look closely at the rotor.
The rotor looked pretty good. I lightly sanded the contacts on the nub and the bottom and the distributor contacts as well to see if that helped. They are now clean. But didn’t solve my issue. I had heard sometimes small holes can cause a short in the rotor. Didn’t see anything that looked out of whack to me though. I guess if the condenser doesn’t do anything I’ll try that next.
 
Joined
Jun 9, 2021
Messages
10
That is the simple magneto.----A wonderful device.-----Steps to take.-----Mark the belt timing.----Remove the magneto.-----Replace the condenser.----Replace points if badly pitted.---Replace rotor.----Test it before you put it back on the motor.----Spinning it by hand should produce a small electrical storm.----Install distributor cap and test again for spark on each lead.----Should jump a gap of 5/16" with ease.-----Install on the motor and make sure belt timing is the same again.
Just ordered a new condenser. Should be in next week.
If that doesn’t work should I suspect the coil itself is to blame?
Is there a simple way to test that the coil is good on this setup. I have seen plenty of people testing coils but not with this one in particular and I’m not exactly sure how to test it or what to looks for.
 

racerone

Supreme Mariner
Joined
Dec 28, 2013
Messages
36,033
Perhaps a local shop with a grey haired wrench turner has a ----MERC-O-TRONIC-magneto analyzer.------That can be used to fully test the coil , condenser , rotor and cap.----You can not find a pin holes in the rotor with your vision.
 

Chris1956

Supreme Mariner
Joined
Mar 25, 2004
Messages
27,033
Inspect the coil for cracks. They will be obvious. Replace coil if cracked.

Leave the distributor cap off and check for spark at the brass button on the coil. With a slow spin of the distributor pulley, the spark will give you a good jolt. You will be immediately convinced that the motor has good spark.

If you then install the distributor cap and you have weak or no spark, you know that the fault lies in the rotor, cap or wiring.
 

racerone

Supreme Mariner
Joined
Dec 28, 2013
Messages
36,033
Nope ----You want to see the lightning storm on a test device.---Set the gap at about 1/4".-----Easy to make a test device with wire glued on cardboard.
 
Joined
Jun 9, 2021
Messages
10
Nope ----You want to see the lightning storm on a test device.---Set the gap at about 1/4".-----Easy to make a test device with wire glued on cardboard.
I checked the spark from the bottom button on a spark tester. It seemed to work just fine.
My next question is how to get the pulley off the top of the shaft. Should I use a puller on it? Just wanted to make sure before I go tugging on it.
I suppose that has to come off to get to the points and condenser for easier replacement.

got a new rotor and condenser on the way and ordered a NOS coil as well. It was a good price so I figured I pick up a spare for insurance.
If I do need to replace that coil, how is it removed?
 

racerone

Supreme Mariner
Joined
Dec 28, 2013
Messages
36,033
As I recall the pulley just slides off once you undo the nut.----With the magneto on your work bench the coil comes out fairly easily.
 

Chris1956

Supreme Mariner
Joined
Mar 25, 2004
Messages
27,033
Distributor pully is on tapered shaft and has a woodruff key. Pry up gently with a screwdriver and tap the loosened nut and she should pop off.

Coil is held in distributor body with 2 screws and sheet metal clamps.
 

racerone

Supreme Mariner
Joined
Dec 28, 2013
Messages
36,033
Have not worked on one for many years.----Can not recall a taper on the magneto pulley.
 
Joined
Jun 9, 2021
Messages
10
Update: still need help,

but!!! I’m getting spark.

I replaced the points. Rotor. Condenser. And magneto coil.

Based on bench testing with a multimeter the condenser and coils we’re probably okay. I’ll be saving them for spares.
Turns out the spark issue was probably due to a couple bad plug wires. I pulled them all and tested them and I think 3 out of for were not getting good results. I bought some new wire and connectors and put together new ones. New plugs too for good measure.

now getting spark on all cylinders! And there was much rejoicing!!

however. Still no fire. I get a little sputter once in awhile but won’t catch. I’m thinking it might be a timing issue with the points maybe?

I followed the service manual instructions and put a timing light on it. I lined up the timing marks had adjusted the points until the just light up and then backed them off slightly so the light turned off.

now I was only able to do this with 1 set off points because based on the service manual I see the two timing marks on the fly wheel but when lining up the second one the window doesn’t seem to line up to allow adjustment.

that said they seemed to be correct based on the timing light but I couldn’t see to make it exact like the first one.

tricks tips?

also wondering about other adjustments that might be causing it not to start. Possibly fuel? The carb is cleaned and getting fuel. Not sure if I have the idle mixture screws adjusted correctly. I turn them all the way in without feeling like I’m over tightening and then back them out 1.5 turns based on the manual.

where should I start now? What should I try?
 

Chris1956

Supreme Mariner
Joined
Mar 25, 2004
Messages
27,033
You can set the points with a feeler gauge. Not as accurate as using timing marks and light (or ohmmeter), but since you do not have the mark on the back of the distributor pully base, it is better than nothing. Since the points are connected together, a bad setting on one set, affects both sets.

Set the point gap to max and then adjust the gap to .020 inch. that should get you real close.

from memory, a long time ago, Timing mark pairs should be on block and flywheel, distributor pully base and distributor support, distributor pully and distributor pully base, and scribe mark on carburetor cam and carb roller.

So set flywheel timing marks on flywheel to match block mark. Adjust brass link to align dist. pully base and dist bracket. Set timing belt teeth to match dist. pully mark with pully base mark, and finally, adjust set screw so carb cam just touches rubber roller at scribe mark. There is also a timing mark on the vertical linkage arm that moves the distributor and carb. I don't remember how to adjust that.

One more thing, the point wire that connects the two sets of points together can easily rub against the cam. This will short the points together, killing the spark. Make sure it is run correctly.
 
Joined
Jun 9, 2021
Messages
10
You can set the points with a feeler gauge. Not as accurate as using timing marks and light (or ohmmeter), but since you do not have the mark on the back of the distributor pully base, it is better than nothing. Since the points are connected together, a bad setting on one set, affects both sets.

Set the point gap to max and then adjust the gap to .020 inch. that should get you real close.

from memory, a long time ago, Timing mark pairs should be on block and flywheel, distributor pully base and distributor support, distributor pully and distributor pully base, and scribe mark on carburetor cam and carb roller.

So set flywheel timing marks on flywheel to match block mark. Adjust brass link to align dist. pully base and dist bracket. Set timing belt teeth to match dist. pully mark with pully base mark, and finally, adjust set screw so carb cam just touches rubber roller at scribe mark. There is also a timing mark on the vertical linkage arm that moves the distributor and carb. I don't remember how to adjust that.

One more thing, the point wire that connects the two sets of points together can easily rub against the cam. This will short the points together, killing the spark. Make sure it is run correctly.

i did set them using a .020 feeler first. Seemed to get it pretty close. I adjusted the 1st set of points with a light through the access window like I said but couldn’t get to the second set with the timing mark lined up. There are a few other timing marks on the flywheel that a PO had on there. It was running before so I’m assuming they are close to correct and they seem to correspond with correct positions in the manual. I’ll include some pics so you guys can check my work on the distributor timing and see what I mean about there being not access to the second set of points when the window is in position for timing adjustment.

should I just adjust it with the flywheel off based off the arrow on the cam? That’s not what the book says but seems like it would work.

Also for clarification on the idle mixture. How tight do you tighten those screws before backing them out the 1.5 turns? Lightly seated is what I’ve heard but not sure how about exact that is. This can be done with the knobs on correct?
 

Attachments

  • 2066FC2D-ECBD-4E5D-9E0A-1EE73D7C077E.jpeg
    2066FC2D-ECBD-4E5D-9E0A-1EE73D7C077E.jpeg
    1.3 MB · Views: 4
  • E1EAED62-C36C-4762-AC21-DD8C9943FD82.jpeg
    E1EAED62-C36C-4762-AC21-DD8C9943FD82.jpeg
    1.6 MB · Views: 4
  • 782941A6-2E62-4CF0-A950-EB67436EE629.jpeg
    782941A6-2E62-4CF0-A950-EB67436EE629.jpeg
    1.4 MB · Views: 4
  • 3BDA1B46-C910-4C53-B8E6-DE19E7B13ADE.jpeg
    3BDA1B46-C910-4C53-B8E6-DE19E7B13ADE.jpeg
    1.4 MB · Views: 4
  • 27214AFF-1ED6-4A71-B731-C089400814AC.jpeg
    27214AFF-1ED6-4A71-B731-C089400814AC.jpeg
    1.3 MB · Views: 4
  • 9D589F80-599B-4C3C-8C76-A5F4051CF676.jpeg
    9D589F80-599B-4C3C-8C76-A5F4051CF676.jpeg
    1.4 MB · Views: 4
  • 53606E08-B62C-4489-891B-49F95DC58D9E.jpeg
    53606E08-B62C-4489-891B-49F95DC58D9E.jpeg
    1.1 MB · Views: 4
  • EA2D135A-613F-4A5B-A617-639300E64884.jpeg
    EA2D135A-613F-4A5B-A617-639300E64884.jpeg
    1.4 MB · Views: 4

Chris1956

Supreme Mariner
Joined
Mar 25, 2004
Messages
27,033
Magic marker marks are not timing marks. Ignore all of them. Wipe them off with acetone or alcohol.

You obviously saw the cast timing mark on the distributor pully. That is the one to match with the one on the distributor pully base to set the first set of points. Then turn the distributor 90* CW and set the second set of points. Feeler gauge should be close at .020inch. For some reason the second timing mark on the dist. pully base is hard to find.

Now find the cast timing mark on the flywheel, and align it with the mark on the block and pull starter. Adjust the linkage from the throttle to align the dist pully base to the distributor bracket. Set the dist. pully to match the dist pully base and then slip the timing belt on.

Your throttle setting looked OK.
 
Joined
Jun 9, 2021
Messages
10
Update: just heard my motor run for the first time in 2 years!!
And there was much rejoicing!

I set the second set of points with the light. Very slight adjustment. Lined everything up. And gave it a turn. The was already some gas in the bowl. So I figured I’d try to just see if it would start without attaching the fuel line. sure enough it did!

I attached the fuel line and pumped it up and got it to run a bit with the throttle engaged but did not want to idle. Im thinking it’s flooding out pretty bad. I’m sure my idle screws aren’t set exactly right but they should be close enough to get it to work.

my next thought is to check my float level and make sure that’s adjusted properly. I took it apart recently and checked the needle. It’s one of the solid metal ones but it looked clean. Is there supposed to be a seat or something that seals to or is it just metal on metal? I didn’t notice anything like that when I was cleaning just making sure I’m not missing something while I have it apart again.
 
Top