19.5' Glasply build

Jasonfast

Seaman Apprentice
Joined
Jun 21, 2015
Messages
34
You can see how little room I had once suspension was compressed. I ended up cutting this bracket off.


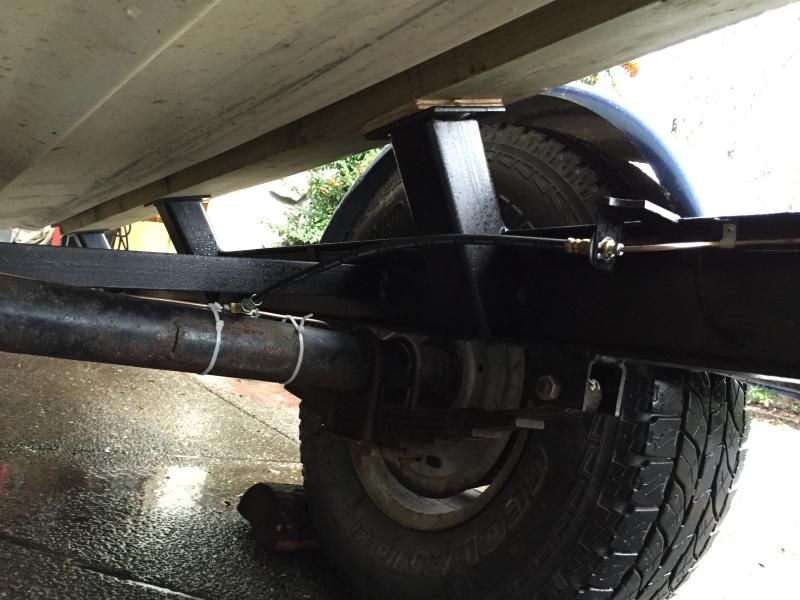
And welding on a taller one lifting it 1".

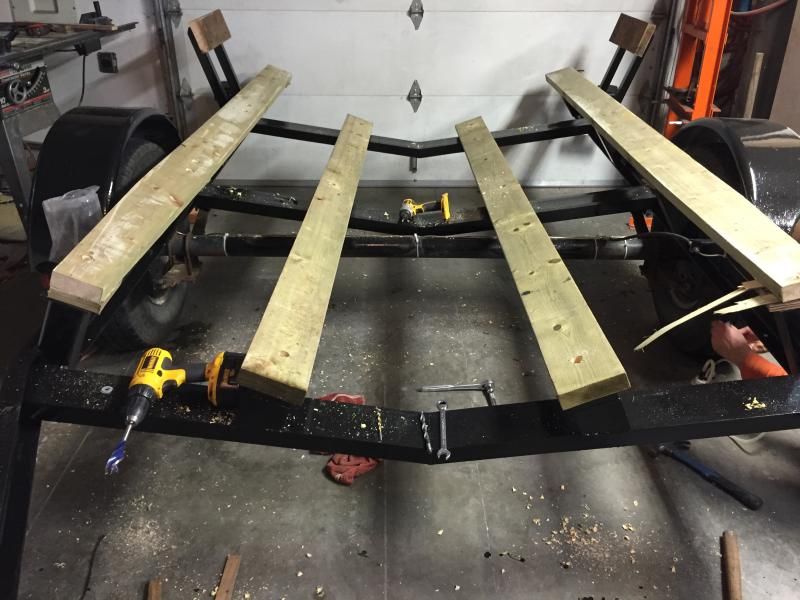
Started to fit all the bunks


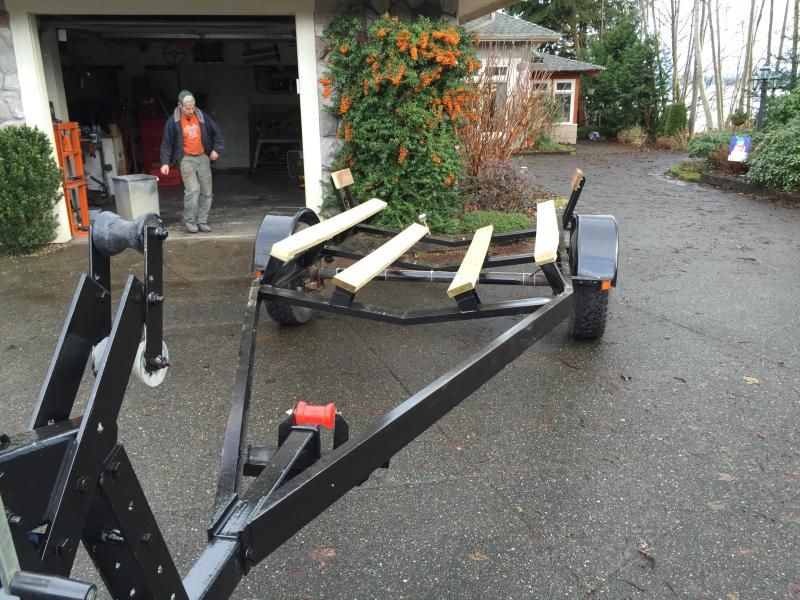
Welded up some centering bunks to help load the boat. Kinda frumpy looking but they work well


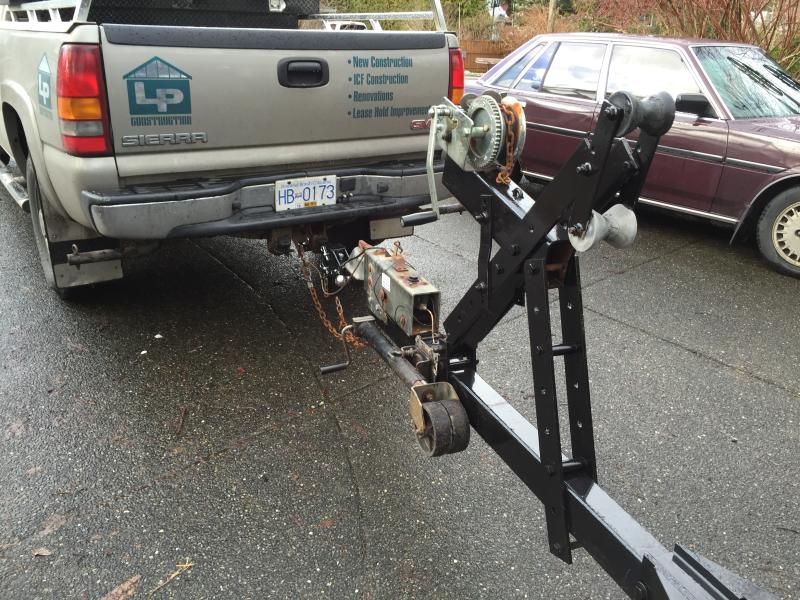
Everything mounted up front
 

Jasonfast

Seaman Apprentice
Joined
Jun 21, 2015
Messages
34
Coupler was now 2-5/16" so had to buy a new beefy hitch


Also picked up a pin for the latch not shown in the pic

All done with the boat loaded


Towed it back from courtenay to Victoria with zero issues. Tracked great. Trip was about 250km or 156 miles
 

Jasonfast

Seaman Apprentice
Joined
Jun 21, 2015
Messages
34
Centering is fine but with the side bunks it's super easy. I used them because the 2x6's ride on the inside of the ridges in the hull. I don't think it would be a good thing if is rode up on one of those ridges and all the weight of the boat crushed one?

But on another note... A buddy of mine had a roof leak in late November. I had helped him with a whole mess of work. New drywall, paint, trim and hardwood. Well the roof goes (shoulda left some money for the roof)

I pulled some favours and got my sales rep at our local construction supply to hook me up with a great deal on roofing. So we Got the roof done.

My buddies GF's dad is a lead engineer at Scotty plastics. So as payment/thank for the roof he delivered these two beauties...


Jasonfast

Seaman Apprentice
Joined
Jun 21, 2015
Messages
34
Well it's finally happening. Getting the 351w built and get this boat back onto the water. I have a shot of the motor somewhere? But basically the heads were no good and there was some rust from standing water inside the cylinders.

You can see the rust on the old Pistons


And the old heads.


Jasonfast

Seaman Apprentice
Joined
Jun 21, 2015
Messages
34
We sent the old block to the machine shop. Had to be bored .040 over. But everything else cleaned up nice.


While we were waiting for the machine shop I found some used (good condition) heads


Jasonfast

Seaman Apprentice
Joined
Jun 21, 2015
Messages
34
And ordered a whole rebuild kit. New cam rings Pistons bearings seals ect ect.


So over the coarse of the next few weeks we will have the engine built and ready to go. Hardest part will be getting it into the boat. Once we have it tuned and running with a break in we will look at tossing the supercharger on it. Run a mild 3-5 psi as I don't think the alpha leg will be too happy.
 

Jasonfast

Seaman Apprentice
Joined
Jun 21, 2015
Messages
34
Was a busy day but was able to squeek about 4 hours of work in on the boat. I've already done a right up on redueing heads. They were for the 470 but it's not much different on a 351w. All new seats, seals and lapped the valves.


As per the marine 351w manual each piston and rod are orintation specific. There is a mark on the piston specifying front of engine and a chamfer on the rod where it connects to the crank. Each existing was marked so the now ones could be assembled correctly.


Hard to see on the corrosion but it's there


And the chamfer on the rod


Pressed the pins out and removed the Pistons. Cleaned and checked new pins in new Pistons.


Jasonfast

Seaman Apprentice
Joined
Jun 21, 2015
Messages
34
in order to make sure the rods would be centred with the pins installed we found a washer that met our needs and spaced the pin during installation. Pin would bottom out on the washer and then because it floats the pin would be self centre. Washer was .070


In the little jig we made


Manual specs heating the rods (we used the oven) and pressing in pin (just hand pressure) and when cooled will be a press fit.


With that done it was on to the mains


Cleaned everything up


Bearing Inserts


Installed on caps. Assembly lube as per manual.


Used plastigage to ensure everything was in spec


Jasonfast

Seaman Apprentice
Joined
Jun 21, 2015
Messages
34
It was so onward.

Assembly lube on the mains


Install the crank again and torque to spec.


Got the timing chain on and then ran out of time.


Had family over so have to put some face time in. Tomorrow should be a good day.
 

Jasonfast

Seaman Apprentice
Joined
Jun 21, 2015
Messages
34
Was a productive day today. Quite rainy and windy so if I couldn't be on the water might as well be in the garage working towards getting on the water.

Wiped down the deck and lubed the cylinder walls with some oil in prep for piston installation.


Piston rings installed.


Installed bearing on the rods and rod caps


I don't have any pics of the installation as it was a bit finiky. The ring compressor we have is rather old and was being temperamental. So it took all of our limited skill to get them in. But it look like a oil filter wrench if you will.
You can see it on the piston in the pic. It just wasn't clamping down very well.


First one in.


Cap next


Jasonfast

Seaman Apprentice
Joined
Jun 21, 2015
Messages
34
Then the rest. Adding lube to wrist pins and making sure the rings are orientated as per manual.


Tighten and torque the rest of the caps


Install the new oil pump and reused pickup.


Timing chain cover is next. Little rtv sealant on the water jacket pre gasket.


Reused the water pump housing with updated seals.


Oil pan gasket


Then pan torqued to spec


#1 cyl set to top dead centre and the deck cleaned again in prep for heads


Jasonfast

Seaman Apprentice
Joined
Jun 21, 2015
Messages
34
Head gasket


Then head. Following manufacturer torque sequence.


Other side


Lifters, pushrods and rockers next.


Hydrolic lifters in first


Push rods


And rockers


And that's pretty much it. She is built. The valve covers are ugly so will order something a little nicer from summit racing. The intake is quite dirty so will take a few hours to get it cleaned and painted. There won't be much next weekend as I'm busy but dad will build the ecu. And we will wire up the engine. For now we will leave the engine as is. We need to build a gantry to lift out the 470 and set in this 351. So we will dress it in the boat to save on lifting weight. Gotta figure the exhaust manifolds and heat exchangers, starters altinator and else adds quite a bit of weight. 200lbs I'd guess.

My next venture will be rebuilding the alpha leg. I want to do a full tear down and inspect all the bearings and seals and such. I read there is an oil shower for these legs that can be installed to help longevity? Also need to to the steering bushings. Pretty much everything.
 
Top