1150 Link & Sync Question

jakec

Petty Officer 2nd Class
Joined
May 23, 2022
Messages
120
I was trying to show how one of the pulse hoses is kinked (lower left in photo). It kinks right as it exits the pumps and turns right. And yeah, that screw had been changed to a longer screw, I have not investigated why yet, but it was clamping (not stripped threads). They may have just lost the correct length screw.

I was able to purchase a set of 4 springs for $5 at the hardware store. I also purchased new hose (A-1 type) and hose clamps. Hope to rebuild and install everything tomorrow.
 

jimmbo

Supreme Mariner
Joined
May 24, 2004
Messages
13,463
Might be easier and put your mind at ease, by rerouting it, and shortening it
 

jakec

Petty Officer 2nd Class
Joined
May 23, 2022
Messages
120
You mean the pulse line? Yes, I am going to make absolutely certain there's no kinking. I don't think it can route much different but I can shorten it a bit and add the springs.

So my plan is 1. rebuild the carbs (ultra sonic cleaned), with 3x new floats, 3x new main jets, and block crossover passage. 2. rebuild fuel pump and install all new fuel hose. 3. double check carb link & sync (first step only where dist. begins to touch throttle arm). 4. use brand new gas (gas used previously was unknown age from gas tank given to me with engine). Hopefully with all that done I can try starting it tomorrow afternoon.
 

Chris1956

Supreme Mariner
Joined
Mar 25, 2004
Messages
27,942
You do not need new main jets, unless they are damaged. Make sure you clean the idle jet (idle restrictors is correct term), and the small holes from the idle circuit into the carb throat. Set the float height correctly and use new gaskets, plus new inlet needles and seats. You may or may not need gaskets under the inlet needle seats. It should be obvious whether you need them.

Use fresh 50::1 fuel mix, and set the carbs 1-1/2 turns open from seated. Final carb settings must be made in the water, in gear, motor warm. Set the carbs for smoothest running and then richen them up 1/8 turn, 1 carb at a time, starting from the top carb, until acceleration is smooth.
 

jakec

Petty Officer 2nd Class
Joined
May 23, 2022
Messages
120
Thanks for the advice, to address those points, I replaced the mains because they had to be removed with extractor (destroying fuel hole). I have new gaskets as they were rebuilt right before I got the engine. So I'm reusing those. Under the needle seats are brand new brass washers as well. I already pressure tested the needles and all are working so I am not replacing the needles and seats (may be new as well).
 

jakec

Petty Officer 2nd Class
Joined
May 23, 2022
Messages
120
After doing everything above the engine has started up after 3x 5-6 second cranks on the starter. Idles and changes rpm nicely so far. However I ran it for 1 minute (on timer) and it never shot water thru the telltale. I shut it down and check the water line from the jacket, bone dry inside.

When I blow compressed air into the engine block exit hole, I can hear air howling the lower unit where the impeller would be. So I assume there is no blockage, and my impeller is not pumping properly.
 
Last edited:

jakec

Petty Officer 2nd Class
Joined
May 23, 2022
Messages
120
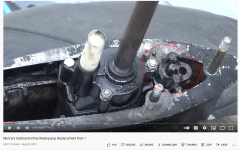
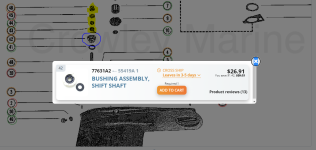
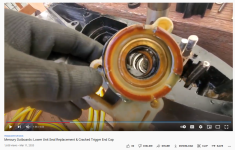
Ok so I plan to replace the impeller now. But as I'm watching some videos I noticed something. In the videos they mention this shifting guide and say dont loose it or don't change the position. Well I don't have one at all it seems. First pic is a screen cap from youtube. The only item I have on the shifter shaft is the one circled in blue and presumably anything underneath. All the highlighted parts above it are missing.
 

Attachments

  • Capture3.PNG
    Capture3.PNG
    1.3 MB · Views: 4
  • Capture1.PNG
    Capture1.PNG
    268.5 KB · Views: 4
  • Capture2.PNG
    Capture2.PNG
    280.5 KB · Views: 5

jakec

Petty Officer 2nd Class
Joined
May 23, 2022
Messages
120
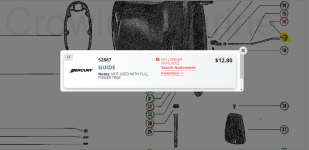
Checking around more, I see that the third image says "note, not needed for PT model." This applies to both the major parts I was missing. So I might be good, after all. Just need that impeller still
 

Chris1956

Supreme Mariner
Joined
Mar 25, 2004
Messages
27,942
Judging by the position of those impeller vanes, it was not turning with the driveshaft. You are installing the stainless steel key, to drive the impeller, right?

Non PTT models have a locking rod that locks the engine down in all but forward.

The shift guide in in the gearcase, just in front of the waterpump/driveshaft. It is a plastic casting, which you circled in red. Pull it out of the gearcase, and install it in the midsection, and it will hold the upper shift rod, in the correct position for reassembly.
 

jakec

Petty Officer 2nd Class
Joined
May 23, 2022
Messages
120
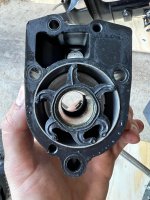
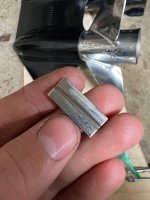
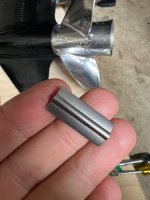
I didn't install this impeller, the guy who sold it to me did. And I assumed that the vanes were like that because he didn't twist the shaft as he installed (if he lowered housing onto impeller already on shaft). I have the woodruff key which seems to be in good condition aside from some small wear (see pics). The wear shown on the drive shaft side is flat when you run your finger over it.

I have read here (post #5) that you should "always" replace this key or it can allow the impeller to slide and cause intermittent flow. However I didn't have that, I had no flow.

Link

Finally, the part I circled in red is missing in my engine altogether. That image is from a youtube video. If you look at the final image in my previous post the crowley parts diagram says that it is not used in the PT models.
 

Attachments

  • IMG_7583.jpg
    IMG_7583.jpg
    336.1 KB · Views: 4
  • IMG_7581.jpg
    IMG_7581.jpg
    323.3 KB · Views: 4

jakec

Petty Officer 2nd Class
Joined
May 23, 2022
Messages
120
Also I have read that the shifter should be in forward, otherwise the lower unit may have trouble going back on? is this true?
 

Chris1956

Supreme Mariner
Joined
Mar 25, 2004
Messages
27,942
The image in post #51 is the drive key for the impeller. It comes in most kits, if not all kits. It is essential as it drives the impeller.

I like to install the gearcase in neutral. BTW - There is no issue installing the gearcase in any gear. Neutral is simpler, IMo.

Installing in neutral makes the synch of the upper shift rod and the gearcase simpler.
 

jimmbo

Supreme Mariner
Joined
May 24, 2004
Messages
13,463
As mentioned it doesn't matter which gear it is in, as long as neither the Control Lever or the Shift Shaft on the gearcase is moved while apart
 

jakec

Petty Officer 2nd Class
Joined
May 23, 2022
Messages
120
Yes that is my drive key.

So I have installed the impeller but I can't get the lower unit back in. I've tried neutral and forward. The shift shaft on the lower unit lines up with the collar on the one in the midsection. But it doesn't go "in" even though the splines are visually aligned. When you press up on the lower unit you can see it moves the shaft upward but doesn't go in.

I've also tried wiggling the shifter arm and rotating the flywheel but I'm not getting anywhere.
 

jakec

Petty Officer 2nd Class
Joined
May 23, 2022
Messages
120
To be more specific, when I try to install the lower unit the shift shaft lines up with the shaft in the midsection. It goes in about 1/8" where there is a chamfer, before the splines start. Then if you push on the lower unit at all instead of the shafts sliding into each other, it pushes the midsection shaft up as well. You can see the end which comes out at the lower cowl moving up and down (attached to shift arm).

With the splines visually lined up I would think I should be able to push it together. Maybe I should try jamming something at the top end of the shaft to remove the play. Then gently try pushing up.
 

jakec

Petty Officer 2nd Class
Joined
May 23, 2022
Messages
120
Chris said back in 2011:

...Grease splines on driveshaft and shift shaft. Make sure gearcase is in neutral and control is in neutral.

Stick driveshaft into midsection, motor tilted all the way up. Turn flywheel with hand until driveshaft splines align. Now watch for shift shaft splines to align. You may need to move upper shift shaft to make it so. Stick nut on one of the studs to hold gearcase on and wiggle it into place tightening nuts with fingers only until all the way seated.


Only difference between those instructions and what I did is that my engine is halfway up, since it's easier for my dad to hold the lower unit sitting down.

Does the driveshaft contact first? I have been turning the flywheel with a wrench while trying to insert the lower unit (once the shift shafts are lined up).
 

jakec

Petty Officer 2nd Class
Joined
May 23, 2022
Messages
120
Which way should the driveshaft oil seal face? When I disassembled mine it was the opposite from what I have seen in a couple videos. Screen shot from video attached shows the metal face of the seal facing down, toward the driveshaft bearing. However I have seen a manual excerpt that said to put the seal with "lips facing down" which is how I would think mine is, when the part is installed the lips are facing down.
 

Attachments

  • Capture4.PNG
    Capture4.PNG
    1.8 MB · Views: 4

Chris1956

Supreme Mariner
Joined
Mar 25, 2004
Messages
27,942
You may want to buy a new waterpump base. It will come with a new seal. I do believe the rubber "lips" face down. Make sure the driveshaft is clean and greased before installing new pump base and seal. Sand it clean if necessary. Grease both splines.

Not sure if you realized that driveshaft hits crank splines first. You push the gearcase on, making sure the plastic water pipe extension installed in the pump cover goes over the copper tube, then the driveshaft hits crankshaft, so turn flywheel until splines meet. Now the gearcase should slide on, until shift shafts meet.

If you do not have the plastic shift guide, you may need to use a needlenose plier or thin screwdriver to align shift shafts. Look for a place to push or grab the upper shift shaft and move it into position. You may need to rock the throttle handle to help it align.
 

jakec

Petty Officer 2nd Class
Joined
May 23, 2022
Messages
120
Well now that I'm searching for the whole unit with seals installed, every image I see online has the seals facing the same way that mine are. Lips down (when unit is installed). If that's the case I'm gona proceed with my part as is.

As for the lower unit installation, if the drive shaft is going in significantly before the shifter, it seems like I'm having now trouble there. It doesn't stop wanting to go in until I hit the shifter. I will try again today with all this advice in mind.
 
Top