Transom problems with Larson 186 SEI I/O Bowrider

jbcurt00

Moderator
Staff member
Joined
Oct 25, 2011
Messages
24,877
Re: Transom problems with Larson 186 SEI I/O Bowrider

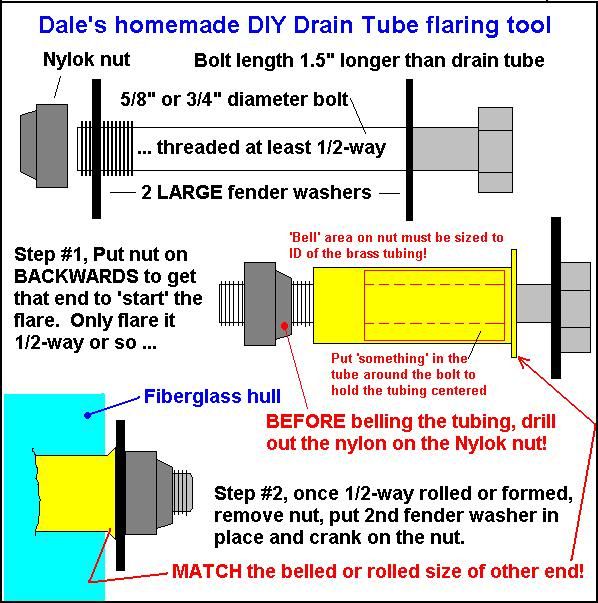
One of the design problems with this boat was that the drain hole in the rear of the ski locker was about a half inch off the floor of the locker. That caused a fair amount of water to collect in there and caused constant moisture and mold issues. (To make matters worse, it was carpeted -- that stuff was a moldy mess when I removed it) I'm planning to build up the floor of the locker so it will drain naturally via the limber hole to the bilge.

Why not just slightly lower the limber hole closer to the hull instead of adding to the hull & trying to raise the hull up to the too high hole?

Just a random thought.........:cool-new:
 

JASinIL2006

Vice Admiral
Joined
Feb 10, 2012
Messages
5,557
Re: Transom problems with Larson 186 SEI I/O Bowrider

Well, the 'hole' is really more than a simple hole; it looks like a section of PVC pipe that runs thru an engineered bulkhead (heavy fiberglass over foam, about 3-4" thick) into the fuel tank chamber. I really think it would be harder to modify the hole thru the bulkhead than to lay down some peanut butter and then several layers of CSM in the rear part of the locker. If I were rebuilding the stringers and bulkhead, I'd probably do as you suggest, but I'm happy to leave the stringers and bulkheads alone, since they are wood-free and in very good condition. Does that make sense?

Jim
 

jbcurt00

Moderator
Staff member
Joined
Oct 25, 2011
Messages
24,877
Re: Transom problems with Larson 186 SEI I/O Bowrider

Yep, a pix would help, but yeah, it sounds easier to raise the bottom then lower the hole.....
 

JASinIL2006

Vice Admiral
Joined
Feb 10, 2012
Messages
5,557
Re: Transom problems with Larson 186 SEI I/O Bowrider

Pics will have to wait... it's about 2 degrees outside! The section I would need to build up is only about 18" x 18".

Jim
 

JASinIL2006

Vice Admiral
Joined
Feb 10, 2012
Messages
5,557
Re: Transom problems with Larson 186 SEI I/O Bowrider

I took advantage of an unusually warm January day here in Illinois to see if I could glass in the engineered stringers I had to remove to drop in the new transom. I kept the pieces I cut out -- they have a foam core and a shell of gelcoated fiberglass (I ground the gel off to get to pink glass so I'd have a better bond).

This is what the rear stringers looked like before I removed the transom or cut out the sections:

P1020103.jpg

This picture shows the area after the stringers were cut, while I was in process of grinding out the old peanut butter to make way from the new transom:

P1020254 (2).jpg

Here is what I have now. I glassed in the stringer sections using 1708. I have at least three layers over each of the seams where I cut the stingers. I tabbed the stingers to the transom with strips of 1708, then put two full layers of 1708 over the stingers and up onto the transom.

P1020310.jpg

When I removed the stringers, there was only a single layer of tabbing to the transom, so I'm hoping the 2-3 layers of 1708 is sufficient. Also, I had a gap between the stringers and the transom, which I spanned with the 1708. That formed a cavity that I plan to fill with foam when I foam under the deck. (That's how it was when I tore it apart.)

I'm going to paint or gelcoat the bilge and the newly replaced stringers, and then I'm ready to start cutting pieces for the deck. My goal is to be done before mid-May, so I think I'm doing OK.

Jim
 

benjh1028

Petty Officer 2nd Class
Joined
Aug 17, 2009
Messages
107
Re: Transom problems with Larson 186 SEI I/O Bowrider

Jim,

Great job with those stringers! From the pictures, you can't tell you added "extensions" at all.

Ben
 

JASinIL2006

Vice Admiral
Joined
Feb 10, 2012
Messages
5,557
Re: Transom problems with Larson 186 SEI I/O Bowrider

I had an open weekend, so I decided to get back at the boat. Earlier in the week, I spent a few hours and cut some foam-board templates of the deck sections and I was able to get the deck boards cut out of the Aurauco plywood. It took a while to actually fit the pieces after I cut them. Most of them needed some additional trimming, and since I was working by myself I ended up doing quite a bit of climbing in and out of the boat.

Yesterday, I glassed the underside of the deck boards. It was only in the upper 40s, so I had to heat the garage with propane heaters. I laid out all the boards, bottom side up, for a layer of CSM with waxed resin. (I'm not going to paint the underside, so I went with the waxed resin after wetting out the boards with unwaxed.

P1020318.jpg

I cut out a hole for an access plate over the sender in the fuel tank. To make sure this wouldn't become a weak spot in the deck, I reinforced around the hole with some leftover pieces of 1708 biax.

P1020326.jpg

The forward section of the deck replacement after applying peanut butter to the stringers and bulkheads and screwing down with stainless steel screws. I cut the ski locker hole before putting down the deck, because the aft edge of the hole is very close to a bulkhead.

P1020327.jpg

The aft portion of the new deck. The bilge and transom still need a coat or two of gelcoat, but I ran out after applying the first coat.

P1020331.jpg

Below is a shot of much of the new deck. The forward part of the new deck, where it mates with the old section of the deck (top of the picture, where light wood meets darker wood), was a bit tricky. That seam is not over a bulkhead, so it's a floating seam. I installed a cleat on the underside of the old portion of the deck (using screws and peanut butter) to support the joint. Even without any glass on the top surface, the seam is already pretty solid.

P1020333.jpg

I have a day off on Tuesday; I hope to apply PB fillets and tab in the edges of the deck to the hull. Then I guess it's time to start getting ready to pour some foam. I'm not looking forward to cutting holes in my deck, but it has to be done.

I have new pedestal coming for the drivers seat. I thought about getting a new bolster seat, but the old seats still look good and I found a gas-assisted adjustable pedestal that should let me get up over the windshield when I need some extra height.

I'm whipped. Time to relax.

Jim
 

HalfFish5087

Petty Officer 1st Class
Joined
May 30, 2012
Messages
278
Re: Transom problems with Larson 186 SEI I/O Bowrider

Hey Jim, I'm a newbie but it certainly appears that you have done a heck of a job. We have very similar boats as I have a '98 22' Larson. I noticed gelcoat cracking below the outdrive and found that the bottom of the transom has rotted. I believe that most/all of the decking is good, but I guess we'll see. Would you mind sharing how much $ it took you to repair the transom? Thanks!
 

JASinIL2006

Vice Admiral
Joined
Feb 10, 2012
Messages
5,557
Re: Transom problems with Larson 186 SEI I/O Bowrider

Let's see:

One sheet of good Aurauco plywood from Home Depot, about $45. (I was able to get two thicknesses of my transom shield from a single sheet of plywood.)
A sheet of foam insulation (to make a template) about $10.


Fiberglassing supplies (from US Composites):
1 -gal. tub of polyester resin ($125 plus about $50 in UPS shipping and hazmat charges) total $175
8 yards of 50" 1.5 oz. CSM (I had some left over) about $25
6 yards of 50" 1708 biax about $50
5 qts. Cabosil (to make peanut butter) about $8
1 lb chopped strand (for peanut butter) $4

I probably spend at least another several hundred on various tools and equipment (e.g., a small, 4" cheapo grinder and sanding discs; Tyvek suits; a particle-filtering mask; mixing buckets, stir sticks, latex gloves, bubble roller). I already a lot of other handy things (a Sawzall, a respirator mask for organic vapors needed for laying up resin).

To pull the engine, I built a gantry (about $100 in materials) and $35 for a chain hoist to lift the engine. I spent about $50 to buy wood and castors to build dollies for the engine and outdrive.

For just the transom, then, I probably have spent about $700-800. That doesn't include buying a few gasket kits and I have yet to actually reinstall the engine and outdrive, so there may be unanticipated costs with getting everything back together.

(Disclaimer: I probably could have done this a bit more cheaply, but I like getting new tools and I tend to overbuy supplies so I don't run out in the middle of a project. Finding chunks of free time to work on this is hard to do, so I didn't want to run out of CSM or resin and lose part of a weekend.)

Hope this helps.

Jim
 

jbcurt00

Moderator
Staff member
Joined
Oct 25, 2011
Messages
24,877
Re: Transom problems with Larson 186 SEI I/O Bowrider

Cast around, you may find a local or an iboater w/ an engine~outdrive alignment tool, you'll need it when the time comes, evil-bay @$125+/-....
 

JASinIL2006

Vice Admiral
Joined
Feb 10, 2012
Messages
5,557
Re: Transom problems with Larson 186 SEI I/O Bowrider

Cast around, you may find a local or an iboater w/ an engine~outdrive alignment tool, you'll need it when the time comes, evil-bay @$125+/-....

Good point. I got mine off Amazon for about $30. Recommended by several people here.

Jim
 

jbcurt00

Moderator
Staff member
Joined
Oct 25, 2011
Messages
24,877
Re: Transom problems with Larson 186 SEI I/O Bowrider

Well that was a DEAL... If you're replacing the transom, you'll likely need to replace the drain tube too....

And iboats sells the Moeller flange tool:
2563742c_4.jpg


or you can make 1 for less:
FlaringTool.jpg


Many prefer the Moeller.... And it's currently on sale.......
 

JASinIL2006

Vice Admiral
Joined
Feb 10, 2012
Messages
5,557
Re: Transom problems with Larson 186 SEI I/O Bowrider

Well that was a DEAL... If you're replacing the transom, you'll likely need to replace the drain tube too....

And iboats sells the Moeller flange tool:
2563742c_4.jpg


or you can make 1 for less:
FlaringTool.jpg


Many prefer the Moeller.... And it's currently on sale.......

Hey, that's pretty slick! Did you design that? I lucked out; my drain was OK. It's part of the engineered fiberglass structure below the wooden transom core. It was in good shape.

I like that flaring, too, though. Very clever design!

Jim
 

jbcurt00

Moderator
Staff member
Joined
Oct 25, 2011
Messages
24,877
Re: Transom problems with Larson 186 SEI I/O Bowrider

Not mine, Dale's (from the top of the graphic).... Another iboater, I'm not sure which username though :facepalm:

I think it was posted in Don's helpful how to & tips thread.......
 

JASinIL2006

Vice Admiral
Joined
Feb 10, 2012
Messages
5,557
Re: Transom problems with Larson 186 SEI I/O Bowrider

And here we are with the deck tabbed in and the seams filled with peanut butter:

P1020370.jpgP1020379.jpgP1020380.jpg

Question: in the original design, the edges of the deck around the motor enclosure/bilge (see picture below) were not tabbed to the bilge tray; they were held with the same staples and peanut butter that held down the deck.
Photo Feb 15, 3 39 39 PM.jpg
Is there any advantage in tabbing these edges or is that just overkill?


I'm surprised and happy that, even without foam underneath, the deck is really solid. I need to wait for some warmer weather so I can heat up the garage enough to pour foam. What's optimal temp for foaming? I know it can't be too cool or the foam doesn't expand sufficiently.

While I'm waiting, I'm going to make up some bases for the seat pedestals. I feel like I can finally see light at the end of the tunnel. I'm still not sure how the deck is going to be finished. I was thinking about Durabak, but I've been having second thoughts. I'm now considering (again) gelcoating the deck and using some sort of closed cell foam product (e.g., Hydroturf). Decisions, decisions...

Jim
 

Alwhite00

Master Chief Petty Officer
Joined
Apr 14, 2011
Messages
885
Re: Transom problems with Larson 186 SEI I/O Bowrider

Looks great, you are turning into a master with fiberglass.

LK
 

Woodonglass

Supreme Mariner
Joined
Dec 29, 2009
Messages
25,924
Re: Transom problems with Larson 186 SEI I/O Bowrider

70 degrees. I'd tab the bilge.
 

fat fanny

Lieutenant Commander
Joined
Feb 9, 2006
Messages
1,935
Re: Transom problems with Larson 186 SEI I/O Bowrider

I have to agree with Wood tab the bilge especially since it's so close to the main entry point of the boat for swimmers,skiers and such water will find it'd path of least resistance to any open area or seam!, A nice rounded edge all the way around will look nice and be a perfect for tabbing to wrap around. By the way great work so far especially on the deck plates fabrication, Did you reinforce under the deck plat dor the seat pedastols?
 
Top