Intake manifold, 350 GM

Lou C

Supreme Mariner
Joined
Nov 10, 2002
Messages
14,659
Good LORD that looks way worse than any part of my raw water cooled motor used in salt! don't know if that could be saved with rust converter, might be worth removing all the loose rust, then poke at it with a pick see if there is still solid cast iron there.
Normally a rotor just pulls off but I see 2 hex headed screws there maybe those have to be removed?
Merc guys what say you?
 

jimmbo

Supreme Mariner
Joined
May 24, 2004
Messages
14,699
Normally a rotor just pulls off but I see 2 hex headed screws there maybe those have to be removed?
Merc guys what say you?
While this may or may not be a GM Distributor, Rotors on GM Distributors, were almost always secured with screws, as they sat on top of the Advance Mechanism
 

rickasbury

Ensign
Thread starter
Joined
Jul 13, 2011
Messages
913
While this may or may not be a GM Distributor, Rotors on GM Distributors, were almost always secured with screws, as they sat on top of the Advance Mechanism
It is a gm distributor. I see at least one hex bolt holding it in. The timing on this motor is not adjustable so it has to come out and go back 100% correct for sure...
 

Lou C

Supreme Mariner
Joined
Nov 10, 2002
Messages
14,659
While this may or may not be a GM Distributor, Rotors on GM Distributors, were almost always secured with screws, as they sat on top of the Advance Mechanism
The last time I had one of those, was our '75 Olds, 5.7 with a Quadrajet
I think I had to change the HEI module once in the 15 or so years we had it.
 

Lou C

Supreme Mariner
Joined
Nov 10, 2002
Messages
14,659
Before that we had a '72 Chevy Impala 5.7 with points, I had to climb up on top of the engine to change the points. God forbid you dropped one of those screws in the distributor! GM did have that nice allen key adjustment for the points, you could set the dwell with the engine running.
 

Scott Danforth

Grumpy Vintage Moderator still playing with boats
Staff member
Joined
Jul 23, 2011
Messages
53,415
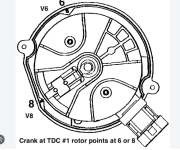
manually rotate the motor to TDC on #1. use a paint pen. mark where the rotor is before you pull the dizzy. then when you pull it, the rotor will move. mark where it is when it stops moving.

installation is reverse. but there are markings on the dizzy body and pics in the manual.
1794344903221.png
 

Scott06

Fleet Admiral
Joined
Apr 20, 2014
Messages
7,668
Many days..I will need to pull the rotary to full assess and hopefully repair. I understand how a rotor works but have never pulled one...can someone help me with this so I don't screw up the timing? I'm fresh water cooled..water is apparently coming from the pedestal base over the enging compartment...2009 350 mpi 350 mercView attachment 421045
No reason to worry that’s surface rust. If in fresh water you have water coming down from swim pad or deck above. Do you still have the flame arrestor cover on it ?

you will sell the boat before that rusts through.
 

rickasbury

Ensign
Thread starter
Joined
Jul 13, 2011
Messages
913
Before that we had a '72 Chevy Impala 5.7 with points, I had to climb up on top of the engine to change the points. God forbid you dropped one of those screws in the distributor! GM did have that nice allen key adjustment for the points, you could set the dwell with the engine running.
That is old school lou for sure!
 

rickasbury

Ensign
Thread starter
Joined
Jul 13, 2011
Messages
913
No reason to worry that’s surface rust. If in fresh water you have water coming down from swim pad or deck above. Do you still have the flame arrestor cover on it ?

you will sell the boat before that rusts through.
I could only hope but that is not my luck! Plus, it should not be a big deal to pull it? Can I mark the intake and the rotar and put it back the same as long as I don't move the crank?
 

rickasbury

Ensign
Thread starter
Joined
Jul 13, 2011
Messages
913
I could only hope but that is not my luck! Plus, it should not be a big deal to pull it? Can I mark the intake and the rotar and put it back the same as long as I don't move the crank?
And yes the arestor and such are all there..
 

rickasbury

Ensign
Thread starter
Joined
Jul 13, 2011
Messages
913
manually rotate the motor to TDC on #1. use a paint pen. mark where the rotor is before you pull the dizzy. then when you pull it, the rotor will move. mark where it is when it stops moving.

installation is reverse. but there are markings on the dizzy body and pics in the manual.
View attachment 421050
Im just seeing this and will look again am..thx for the help.
 

Scott06

Fleet Admiral
Joined
Apr 20, 2014
Messages
7,668
I could only hope but that is not my luck! Plus, it should not be a big deal to pull it? Can I mark the intake and the rotar and put it back the same as long as I don't move the crank?
Yes but it were mine I would wire brush and paint the intake, and call it a day
 

Lou C

Supreme Mariner
Joined
Nov 10, 2002
Messages
14,659
Get some rust converter from Eastwood & after removing all the loose rust coat it with that and then prime & paint. You just have to neutralize the rust.
 

Scott Danforth

Grumpy Vintage Moderator still playing with boats
Staff member
Joined
Jul 23, 2011
Messages
53,415
I would get it sand-blasted then epoxy coated. the original e-coat on the intake simply sucked. it was ok for the factory floor, however was fairly porous in nature and allowed rust to build up.
 

rickasbury

Ensign
Thread starter
Joined
Jul 13, 2011
Messages
913
I watched a really good youe tube. Some one that had the motor out doing what ever work, but posted specifically removal and re install...lining up TDC on the compression stroke, with the rotor pointed at cylinder 1 cap position, no adjustment for timing. I really don't think I need to pull all the plugs, belt etc so I can do that TDC thing...If i mark the intake and the rotor tube for alignment, mark where the rotor is pointing, as long as it goes back the same. Would there be any tension on the motor that would be relieved when the rotor gear separates? Other than that, I would not understand the need to move the crank around..
 

Lou C

Supreme Mariner
Joined
Nov 10, 2002
Messages
14,659
The process of doing that is confusing because unless you have a way of ascertaining that both valves on cyl #1 are closed, you're not sure that you are at TDC of cyl #1 compression stroke. You could line up the TDC mark and the rotor with #1 and it could be 180* out of phase or on the exhaust stroke. Remember the cam turns 1/2 turn for each turn of the crankshaft.
If I were doing this, another way to know is to hook up a compression tester to cyl #1 and you'll see the compression rise when it brings the piston to TDC on the compression stroke with both valves closed. If one is open compression won't rise.
I recall having to think this through when I replaced the heads on my 4.3 years back but it was easy because I left the valve covers off since I had to set the hydraulic lifter preload anyway. That way I could see clearly when it came up to TDC on #1 and both valves were closed.

no tension on the cam gear when you pull out the distributor.
be careful doing this, it's easy to get confused!

If it were me, I'd get all the rust off that I could, and coat it with Eastwood's rust converter and prime and paint. I don't know if it's worth pulling the distrubutor and intake to do that.
 
Last edited:

alldodge

Moderator
Staff member
Joined
Mar 8, 2009
Messages
44,768
I watched a really good youe tube. Some one that had the motor out doing what ever work, but posted specifically removal and re install...lining up TDC on the compression stroke, with the rotor pointed at cylinder 1 cap position, no adjustment for timing. I really don't think I need to pull all the plugs, belt etc so I can do that TDC thing...If i mark the intake and the rotor tube for alignment, mark where the rotor is pointing, as long as it goes back the same. Would there be any tension on the motor that would be relieved when the rotor gear separates? Other than that, I would not understand the need to move the crank around..
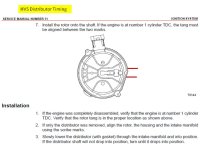
I would suggest
Rotate motor until rotor aligns with notch.
Remove/replace things, then install distributor so alignment marks align as before. Doing it this way the Distributor does all the aligning and it makes no difference where everything else is

HVS Distributor Timing.jpg
 

rickasbury

Ensign
Thread starter
Joined
Jul 13, 2011
Messages
913
The process of doing that is confusing because unless you have a way of ascertaining that both valves on cyl #1 are closed, you're not sure that you are at TDC of cyl #1 compression stroke. You could line up the TDC mark and the rotor with #1 and it could be 180* out of phase or on the exhaust stroke. Remember the cam turns 1/2 turn for each turn of the crankshaft.
If I were doing this, another way to know is to hook up a compression tester to cyl #1 and you'll see the compression rise when it brings the piston to TDC on the compression stroke with both valves closed. If one is open compression won't rise.
I recall having to think this through when I replaced the heads on my 4.3 years back but it was easy because I left the valve covers off since I had to set the hydraulic lifter preload anyway. That way I could see clearly when it came up to TDC on #1 and both valves were closed.

no tension on the cam gear when you pull out the distributor.
be careful doing this, it's easy to get confused!

If it were me, I'd get all the rust off that I could, and coat it with Eastwood's rust converter and prime and paint. I don't know if it's worth pulling the distrubutor and intake to do that.
Thanks! That is a really good tip on TDC on the compression stroke...that's going to help some people who did not think of this like me.
That being said, and maybe I'm just trying to convince myself, since all I'm doing is pull it out , cleaning/painting reinstalling. The engine is not going to budge, no other repairs. Even if I'm only kicking the can down the road a couple of years. We need to get on the water as for other reasons we have used it very little over the last 6 years. There is no room to do anything around the rotor without pulling it. With the whole rotor asy out. I don't have anything to really point it to right? Once I have it out, it it turns inside the tube then I'm screwed...if I've only marked the tube and the intake...ah, but that's what I belive you are saying is to align the rotor ro something in the asy...as below was offered...starting to make sense, scary..
 

Lou C

Supreme Mariner
Joined
Nov 10, 2002
Messages
14,659
When you have it all lined up before you pull it out you make a mark on the distributor body that lined up to where the rotor is pointing. Or when you still have the cap on the distributor find the receptacle for the #1 plug wire in the cap and make a mark on the body of the distributor straight down from it. That way you always know where the rotor should point for #1.
 
Top