Chaparral 2000 SL Sport floor, and more?? [SPLASHED Sept 2017]

Baylinerchuck

Commander
Joined
Jul 29, 2016
Messages
2,726
No Title

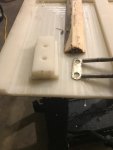
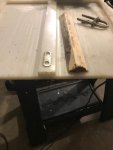
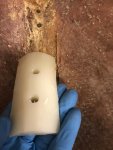
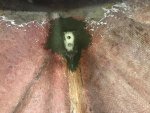
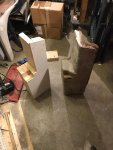
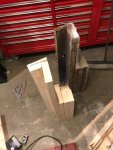
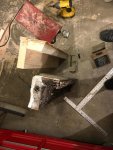
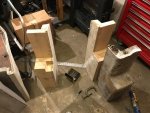
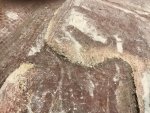
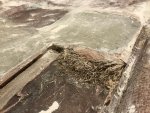
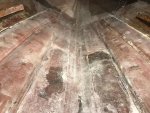
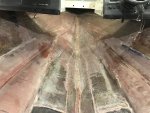
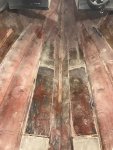
Got some more grinding done today. This boat had some crazy thick tabbing. Especially where the front seat boxes meet the hull under the dash(s). Also took a lot of time to grind through the puddles of unthickened resin that gathered beside the keel wood (whatever the heck it was). I ground through several layers of roving that delaminated due to not being properly wet out. I also ground down the keel area to put the pvc pipe exactly in the middle. As you can clearly see, someone severely lacking the skills necessary to figure out how to center the keel wood left me a fine mess.
 

Attachments

  • photo256937.jpg
    photo256937.jpg
    121.2 KB · Views: 11
  • photo256938.jpg
    photo256938.jpg
    131.9 KB · Views: 11
  • photo256939.jpg
    photo256939.jpg
    115.2 KB · Views: 11

proshadetree

Lieutenant Commander
Joined
Jul 19, 2008
Messages
1,887
Sorry about the mess but it will have to be better than the junk that was there. Mass production limits quality in most cases. Thats why I think even most iffy builds still beats factory.
 

mickyryan

Rear Admiral
Joined
Apr 18, 2016
Messages
4,210
big thing to watch out for is where it was designed to be aft of centerline or anyplace if its designed for aft only its because no baffling and will wind up sloshing too much
 

Baylinerchuck

Commander
Joined
Jul 29, 2016
Messages
2,726
big thing to watch out for is where it was designed to be aft of centerline or anyplace if its designed for aft only its because no baffling and will wind up sloshing too much


Its a poly tank and there is no baffling. So I understand your point. I'll have to measure again, but I'm really confident the tank is still aft of center. Definitely a good point though.
 

ripazka

Petty Officer 1st Class
Joined
Jul 30, 2016
Messages
246
Do you recommend to replace that pvc drain pipe once doing a rebuild? Its hard to say the real condition of the old one so I guess its better to replace it.
 

Baylinerchuck

Commander
Joined
Jul 29, 2016
Messages
2,726
Do you recommend to replace that pvc drain pipe once doing a rebuild? Its hard to say the real condition of the old one so I guess its better to replace it.

Mine didn't have PVC pipe at all. It had 12" wood strips in the center and any water flowed under the false ski locker and fuel tank plywood floor to the bilge. On mine this is where the initial rot started. It was really a poor design that ensured water stayed to soak plywood.

I'm not sure what I would recommend in your case honestly. If the pipe was damaged during the tear out I would recommend replacing it. Unlike wood, PVC pipe will not rot. I will be installing a PVC pipe drain system in my build from bow to stern. It will be grand!! stay tuned, lol. :pop2:
 

Baylinerchuck

Commander
Joined
Jul 29, 2016
Messages
2,726
No Title

Tonight was bow ring restoration time. The u-bolt for the bow hook was bolted through the top piece of keel reinforcing wood. Needless to say, like the rest of the wood in this boat, that piece was rotted too. Much of the u-bolt had pulled through the wood. Luckily it had not yet pulled through the hull. I decided to replace the wood with a piece of UHMW I had laying around. I used short strand filler to glue it in place. I'll go over it in the future with some 1708. I bet it won't rot again!!!
 

Attachments

  • photo256985.JPG
    photo256985.JPG
    366.3 KB · Views: 14
  • photo256986.jpg
    photo256986.jpg
    155.9 KB · Views: 14
  • photo256987.jpg
    photo256987.jpg
    158.1 KB · Views: 14
  • photo256988.jpg
    photo256988.jpg
    143.6 KB · Views: 14

proshadetree

Lieutenant Commander
Joined
Jul 19, 2008
Messages
1,887
Great ideal on that bow eye. The one on my next project is definitely rotted out and this should ensure it never happens again.
 

Baylinerchuck

Commander
Joined
Jul 29, 2016
Messages
2,726
Happy New Year iboaters!! I wish you much success on your restorations and endeavors in the upcoming year! Time to get moving on this rebuild!!!
 

Baylinerchuck

Commander
Joined
Jul 29, 2016
Messages
2,726
No Title

No grinding today! The only day I could do anything and it rains all day! Oh well, I'll just blame it on local climate change, lol.
I decided to work in the garage a little bit. I built both engine mounts using dimensional lumber. The old mounts were a 1/2" wider so I had to use some of my fiberglass coated plywood to make up the difference. I also improved the design a little by carrying the 2x6's to the top as opposed to using plywood like the OEM. I used PL construction adhesive and coated screws to put it all together. I'll most likely round the corners before fiberglassing in the future.
I also built my clamps for the transom. I need to get this grinding done. I'm getting close to a standstill.
 

Attachments

  • photo257140.jpg
    photo257140.jpg
    145.5 KB · Views: 19
  • photo257140.jpg
    photo257140.jpg
    145.5 KB · Views: 19
  • photo257141.jpg
    photo257141.jpg
    144.5 KB · Views: 19
  • photo257142.jpg
    photo257142.jpg
    138.2 KB · Views: 20
  • photo257143.jpg
    photo257143.jpg
    137.9 KB · Views: 19
  • photo257144.jpg
    photo257144.jpg
    134 KB · Views: 20

ripazka

Petty Officer 1st Class
Joined
Jul 30, 2016
Messages
246
How does that motor mount structure work? Do you anchor some kind of bolts inside of it? Its a lot different than my sea ray had. Just curious :yo:

You've done a lot of prep work, good job!
 

proshadetree

Lieutenant Commander
Joined
Jul 19, 2008
Messages
1,887
Man that is a complicated mount compaired to most. Heck 4x4s used tp be the universal mount for builders. Good looking build
 

mickyryan

Rear Admiral
Joined
Apr 18, 2016
Messages
4,210
yeah looks like they said hey lets do it this way so when chuck comes along we can at least frustrate the hell out of him remaking these! :)
 

Baylinerchuck

Commander
Joined
Jul 29, 2016
Messages
2,726
How does that motor mount structure work? Do you anchor some kind of bolts inside of it? Its a lot different than my sea ray had. Just curious :yo:

You've done a lot of prep work, good job!


Thanks guys for the encouragement. The raised part of the mount (three stacked 2 x 6), is what the engine sits on. They are standing up in the pictures, but in the boat they lay flat with the long 2 x 6 butted into the transom. Chaparral secured the engine with 3/8" x 3" lag bolts screwed right into the top, which was a bit surprising to me. I was really expecting a more secure mount at the front of the engine. But as I was getting ready to pull the engine I found the rear mounting bolts that connect the motor to the Inner transom mount. This is my first stern drive, so I wasn't sure how these things were put together. Honestly, the way the engine is attached to the transom, the front mounts just keep it stable. It totally makes sense now.

The original mount was plywood at the top of the mount, (where the lag bolts are drilled in), with the 2 x 6 lumber under that. The plywood was totally rotted out, but the dimensional lumber was still solid, albeit soaked. Luckily the 1/4" thick fiberglass was enough to keep the front of the motor from sinking. I decided to use all 2 x 6 for the mounting surface eliminating the plywood on top. There were no mis-alignment issues when I pulled this apart. Hopefully thats the case when I start putting it back together!! :thumb:
 

Baylinerchuck

Commander
Joined
Jul 29, 2016
Messages
2,726
No Title

Got some more grinding done today. About 4-1/2 hours is about all my hands and knees can take. Pulled the boat out of the garage and it was about 24 F today. Cold enough to freeze my airline up...guess there was some moisture in the hose. Pictures don't do justice to how much grinding was done. This old tabbing is crazy thick, and some of it has delaminated due to water intrusion. Grinding to good glass is still not hitting the hull layers, so this beast is built really tough. I have several more hours ahead of me.
 

Attachments

  • photo257273.jpg
    photo257273.jpg
    129.7 KB · Views: 15
  • photo257274.jpg
    photo257274.jpg
    103.1 KB · Views: 14
  • photo257275.jpg
    photo257275.jpg
    137.1 KB · Views: 15
  • photo257276.jpg
    photo257276.jpg
    111.2 KB · Views: 15

gsxrdan

Petty Officer 1st Class
Joined
Aug 28, 2016
Messages
317
... and grind and grind some more :caked:. dont kno how u guys do work in freezing cold - here in adelaide we just hit 40c 2 days in a row - and i love it!! (but then again i have no 'padding' to insulate from the cold) :smow:
 

ripazka

Petty Officer 1st Class
Joined
Jul 30, 2016
Messages
246
Thanks guys for the encouragement. The raised part of the mount (three stacked 2 x 6), is what the engine sits on. They are standing up in the pictures, but in the boat they lay flat with the long 2 x 6 butted into the transom. Chaparral secured the engine with 3/8" x 3" lag bolts screwed right into the top, which was a bit surprising to me. I was really expecting a more secure mount at the front of the engine. But as I was getting ready to pull the engine I found the rear mounting bolts that connect the motor to the Inner transom mount. This is my first stern drive, so I wasn't sure how these things were put together. Honestly, the way the engine is attached to the transom, the front mounts just keep it stable. It totally makes sense now.

The original mount was plywood at the top of the mount, (where the lag bolts are drilled in), with the 2 x 6 lumber under that. The plywood was totally rotted out, but the dimensional lumber was still solid, albeit soaked. Luckily the 1/4" thick fiberglass was enough to keep the front of the motor from sinking. I decided to use all 2 x 6 for the mounting surface eliminating the plywood on top. There were no mis-alignment issues when I pulled this apart. Hopefully thats the case when I start putting it back together!! :thumb:

Sea ray has completely different kind of mounts. Hmm.

My motor was also sitting on a fiberglass. The plywood had gone long time ago... Im going to seal the holes for the bolts this time. Not yet sure how...

Keep it going man!
 

proshadetree

Lieutenant Commander
Joined
Jul 19, 2008
Messages
1,887
Chaparral boats are built like a tank. Just goes to show even the best built can still suffer from water intrusion. Looking great so far. Every hour grinding ia an hour closer.
 

tpenfield

Moderator
Staff member
Joined
Jul 18, 2011
Messages
17,711
Chaparral boats are built like a tank. Just goes to show even the best built can still suffer from water intrusion. Looking great so far. Every hour grinding ia an hour closer.

They are decent boats . . . but it didn't look much like a tank when Chuck was taking this thing apart. As I recall there were a few disappointments.
 

mickyryan

Rear Admiral
Joined
Apr 18, 2016
Messages
4,210
thing is we have to put it into perspective, I mean my boat was 30 yrs old and severely neglected but it still stayed together put any other product in the world through that kind of abuse and see how well it stands up, could it have been done better? yes could they have been treated better? most definitely, but it is what it is and I still say most of these boats held up well after the original intended use and post neglect.
 
Top