The whole shebang. 16' aluminum shell to fishing machine.

dysco

Seaman Apprentice
Joined
Feb 9, 2014
Messages
45
No Title

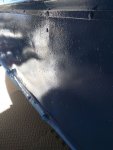
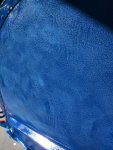
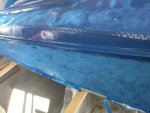
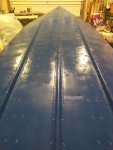
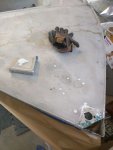
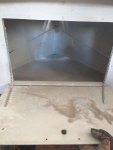
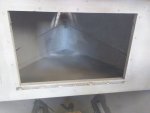
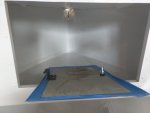
I rolled on my paint after Valspar Galvanized primer. I think the sandblasted surface of the boat cut the rollers a bit during primer and lead to fuzz in my paint. I spent a lot of time sanding my gluvit drips but I didn't want to be neurotic. You can see the drips in my sanding on the paint. Mostly I wanted to get the paint flat enough to look good, but I gained an understanding that I was also never going to get a mirror finish on a 60-year old boat.
 

Attachments

  • photo259625.jpg
    photo259625.jpg
    217.7 KB · Views: 0
  • photo259626.jpg
    photo259626.jpg
    269.5 KB · Views: 0
  • photo259627.jpg
    photo259627.jpg
    114.6 KB · Views: 0

dysco

Seaman Apprentice
Joined
Feb 9, 2014
Messages
45
No Title

The bottom took about 8 days since I took some time to sand. I'm doing this work in my mom's insulated garage and heating it with a Buddy heater on a propane tank. I'm getting about 5 days out of a 5 gallon propane tank depending on how hot I need it. It's winter and we're at 7k' elevation so it's cold out. No spray paint in the garage. I can't stand the smell for days and days after.
 

Attachments

  • photo259628.jpg
    photo259628.jpg
    189.3 KB · Views: 0

dysco

Seaman Apprentice
Joined
Feb 9, 2014
Messages
45
No Title

Once I flipped the boat over, I found I had to take more stuff off to prep. I filled some holes on the bow to make sure the compartment stays waterproof. I'll drill new holes if I need them. I removed the front drop-down hatch, too, so I could reach the bow eye to replace the backer. It turns out you get much more space if you're lid isn't hanging into the boat. I've ordered a part to see if I can improve on the design. I picked up an oscillating tool for the little sanding and it does a good job to knock off aluminum edges and the quick-fill marine epoxy.
 

Attachments

  • photo259629.jpg
    photo259629.jpg
    131.1 KB · Views: 0
  • photo259630.jpg
    photo259630.jpg
    119.9 KB · Views: 0
  • photo259631.jpg
    photo259631.jpg
    60.8 KB · Views: 0

dysco

Seaman Apprentice
Joined
Feb 9, 2014
Messages
45
At this point I have a ton of stuff staged to go on the boat as soon as the inside paint is done. Challenges include mounting rod holders, making sure my two little boys aren't able to throw all my gear under the drop-in floor (or in the water), wiring lights, and completely overhauling the trailer. I did Gluvit all of the rivets in the floor of the boat and spread a light coat on the super corroded transom area since I had an extra can lying around from an order I made a year ago thinking I was going to go for it then. I have primer on that needs to be filled in a bit and then we'll be able to throw some paint on and start mounting things up. The outside of a boat is infinitely easier to paint than the inside.

I'm keeping a spreadsheet of my expenses. It's eye-opening. .
 

ezmobee

Supreme Mariner
Joined
Mar 26, 2007
Messages
23,767
I think you're going to really regret putting that Gluvit on the outside. Gluvit's whole deal is that it flows into cracks and crevices and seals them from the inside. I don't think it's meant for a more spread out application. Down in the bilge of my boat much of the Gluvit out around my rivets and seams is cracked/flaked off. For me it's no big deal as I'm pretty sure it's still down in there sealing stuff but it could be devastating to your exterior paint job. :(
 

bonz_d

Vice Admiral
Joined
Apr 22, 2008
Messages
5,276
Enjoyed the pictures. keep up the work and you'll be on the water soon.
 

dysco

Seaman Apprentice
Joined
Feb 9, 2014
Messages
45
I think you're going to really regret putting that Gluvit on the outside. Gluvit's whole deal is that it flows into cracks and crevices and seals them from the inside. I don't think it's meant for a more spread out application. Down in the bilge of my boat much of the Gluvit out around my rivets and seams is cracked/flaked off. For me it's no big deal as I'm pretty sure it's still down in there sealing stuff but it could be devastating to your exterior paint job. :(

I'm optimistic. I let it set for three days and really prepped well for paint. I barely sanded the inside before priming so we'll see how that goes. The surface was also roughed up by the sandblasting. If the hull paint takes too much of a beating on our lakes this summer I'll just repaint it in the winter. I've been enjoying the paint work more than I thought I would.
 

ezmobee

Supreme Mariner
Joined
Mar 26, 2007
Messages
23,767
I hope it works out for you. If you do have an issue it won't be due to your prep. It'll just be that Gluvit doesn't adhere well for long. I'm kinda not a fan of it based on what I've seen on my boat. If I did another one I'd prolly go with Coat-It. Cheaper and more of a JB-Weld type product.
 

dysco

Seaman Apprentice
Joined
Feb 9, 2014
Messages
45
No Title

Made a Kydex catch and used a truck topper locking handle for the hatch. Too bad about those cockeyed rivets.
 

Attachments

  • photo260011.jpg
    photo260011.jpg
    48 KB · Views: 0
  • photo260012.jpg
    photo260012.jpg
    64.1 KB · Views: 0

dysco

Seaman Apprentice
Joined
Feb 9, 2014
Messages
45
No Title

I had two plates machined for either side of the transom to replace my sketch drain hole. The original hardware was destroyed in the sand-blasting. I've really been fretting about this install but it went pretty well.I'll pull the tape off tomorrow afternoon for good edges. I'm going to drill out the holes and press in aluminum tubes. Is there any reason to extend the tubes and make them a certain length? Right now it'll be just under 3/4".
 

Attachments

  • photo260014.jpg
    photo260014.jpg
    60.5 KB · Views: 0
  • photo260015.jpg
    photo260015.jpg
    83.6 KB · Views: 0

dysco

Seaman Apprentice
Joined
Feb 9, 2014
Messages
45
Unintended strength testing of the storage area. Holds 50lbs of four-year-old without complaints. drewfus in cubby.jpg


Foam in the benches and they are straight and strong. My littlest helper makes a cameo on this shot. foam benches.jpg
 
Last edited:

dysco

Seaman Apprentice
Joined
Feb 9, 2014
Messages
45
Rod mount solution: Geartrac 4" sections between rivets. Strong enough for aluminum boats, but pH balanced for kayaks. 15 bucks plus a $10 quick connect. Not terrible. I'm going to try to cut larger sections into smaller sections for less cost per inch

image_260081.jpg
.
 
Last edited:

dysco

Seaman Apprentice
Joined
Feb 9, 2014
Messages
45
I'm planning on using Moeller aluminum drain tubes. Do I need to extend the tubes to >1 inch or is 3/4" adequate to make a seal with a standard drain plug?
 

Watermann

Starmada Splash of the Year 2014
Joined
Jan 12, 2013
Messages
13,753
This is what you need to replace the bilge drain that accepts the standard plug.

http://www.iboats.com/Drain-Fittings-Kit/dm/cart_id.572362711--session_id.951751670--view_id.39181

2563745c_0.jpg
 

Watermann

Starmada Splash of the Year 2014
Joined
Jan 12, 2013
Messages
13,753
Well the above would work the way your boat was designed originally. Not so sure now?

fetch


fetch


You'll need 1" tubes for the 1" bilge drain plugs
 

dysco

Seaman Apprentice
Joined
Feb 9, 2014
Messages
45
Well the above would work the way your boat was designed originally. Not so sure now?

fetch


fetch


You'll need 1" tubes for the 1" bilge drain plugs

I sized those blocks to take those tubes with space for O-rings and have them ready to go. I am hoping to not have to use the backers beside the tube in your picture. I am pretty sure that a standard 1" drain plug doesn't need much more than 1/2" of tube to create a good seal. I should have just under 3/4" linear measurement of 1" tube. I'm going to knock out one side of my drain when the 5200 cures and flange in a tube and keep the other side intact until I need a livewell. Hopefully I don't need extra length to keep water on the outside.
 

Watermann

Starmada Splash of the Year 2014
Joined
Jan 12, 2013
Messages
13,753
I misread your post but now I get it, sounds like you have things well in hand. :thumb:
 

dysco

Seaman Apprentice
Joined
Feb 9, 2014
Messages
45
A little fishing practice on the kayak before working after everyone else went to bed. Check out that technique!
fishing practice.jpg
 
Top