73 Sea Ray restoration

GSPLures

Chief Petty Officer
Joined
Sep 3, 2019
Messages
564
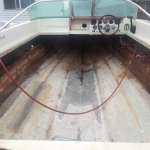
Grinding is done now I can properly enjoy my weekend and be proud of what I accomplished on my vacation from work :whoo:.
Click image for larger version  Name:	20200905_151549_compress70.jpg Views:	1 Size:	759.8 KB ID:	10927216Click image for larger version  Name:	20200905_151559_compress73.jpg Views:	1 Size:	663.5 KB ID:	10927217 still needs an amazing amount of cleaning. But all solid and ready for the next step!
 

kcassells

Fleet Admiral
Joined
Oct 16, 2012
Messages
8,600
A good hosing with soapy water, let dry. Little bleach to kill off mold in cavities and a acetone bath at the end.

PICT0006_zps6b889771.jpg~c200
 

GSPLures

Chief Petty Officer
Joined
Sep 3, 2019
Messages
564
A good hosing with soapy water, let dry. Little bleach to kill off mold in cavities and a acetone bath at the end.

PICT0006_zps6b889771.jpg~c200

I wish I didnt put the transom in already. I dont want to put water in it now lol. I have to plastic off my keyhole real good then I am going to carefully hose it out.
 

kcassells

Fleet Admiral
Joined
Oct 16, 2012
Messages
8,600
bag that. roll all the raw edges out with poly or epoxy for thw keyhole. Has to be done anyway. I forgot what your using.

TRANSOM GOOD.

smoking-frankenstein-friends-are-good.jpg
 
Last edited:

GSPLures

Chief Petty Officer
Joined
Sep 3, 2019
Messages
564
Well she is washed out and drying. Unfortunately it's not that pretty pink I was hoping to see but again I discovered when I fixed the crack no matter how deep I go it never turned pink (unless it was just before the red gelcoat lol). Looks like at the manufacturer they used gelcoat shot some chop over it and then put a layer of woven.But it is all solid I may end up going with a layer across the entire hull we will see.
20200906_125916_compress12.jpg(Still drying)

unfortunately because after tomorrow my vacation comes to an end and I live in Michigan I am running out of good temps for glassing. So my plans are to cut and fit the stringers and bulkheads.

If the temps are to low by that point I will try out my new garage heater to see if I can keep it at 60 if I cannot I will bed the stringers with PL (can use down to 40deg). After those are bedded I will cut my floors so by spring time I will be able to glass everything in and have her in the water by next season!
 

GSPLures

Chief Petty Officer
Joined
Sep 3, 2019
Messages
564
OIP.cEroSzmmpNLbj0YIsLVgawHaHa
pl blows for fillets. Shapes horribly. Nice clean hull for the moment.

Love the pic lol. I was just going to use the pl depending on temps around me just to bed them and then do my fillets with PB and glass them in once the temps are above 60 again (unfortunately by the time I get them all cut and ready to go in it will probably be colder then 60, stupid Michigan). But i more than likely have enough work to get me through the winter with the electrical, some motor work, and designing new side panels and dash.
 

kcassells

Fleet Admiral
Joined
Oct 16, 2012
Messages
8,600
Very hard to form a smoothe curve for fillets. BTW...you can get different mixes for lower temps. Make a cover and add a heater.
I work all winter. Well...if I feel like it. I can get from 10 deg. to 80 in 15 min. with a torpedo heater.
 

GSPLures

Chief Petty Officer
Joined
Sep 3, 2019
Messages
564
Very hard to form a smoothe curve for fillets. BTW...you can get different mixes for lower temps. Make a cover and add a heater.
I work all winter. Well...if I feel like it. I can get from 10 deg. to 80 in 15 min. with a torpedo heater.

I just bought a 5000btu heater for my garage not sure how it will work out yet I have to change out my 240 outlet before I can turn it on
 

GSPLures

Chief Petty Officer
Joined
Sep 3, 2019
Messages
564
So before I start measuring and designing the stringers for my boat I have a couple questions.

I know I have to put drainage between the ski locker and bilge I am going to use 1"pvc pipe cut in half glued in with PB for that but I keep hearing about limber holes in the stringer system. Is this a good idea to put them in? I feel it will just make an access hole for water to get in, but unsure if they will be necessary or a good idea with pour in foam.


Also for the ski locker, should I put in a false bottom and sides in with plywood or would a few layers of glass be sufficient?
 

kcassells

Fleet Admiral
Joined
Oct 16, 2012
Messages
8,600
you will hear every variety of answers pro/con. Tough decision. most guys go so hey this is a sealed area and will never get wet.
Utters say yup let the water flow from the trapped areas. Also provides aeration. Most boats if not all rot from the bottom up.
 

GSPLures

Chief Petty Officer
Joined
Sep 3, 2019
Messages
564
Yeah, everything I have read about them is people saying that their way is the right way because they do it that way lol.
 

Baylinerchuck

Commander
Joined
Jul 29, 2016
Messages
2,726
Honestly I mulled this over in my build for weeks. I just couldn’t figure out how to add drainage in a thoughtful way that really would be of benefit. I decided to spend my energy ensuring water doesn’t get in in the first place. I made sure water can flow down the keel from the storage areas under the cushions, the anchor locker, storage under the helms, through the fuel coffin, (with a valve), into the bilge. All foam areas are sealed off with no penetrations.


I left my anchor locker with no floor. I simply added a thick rubber mat to protect the fiberglass.
 

GSPLures

Chief Petty Officer
Joined
Sep 3, 2019
Messages
564
Honestly I mulled this over in my build for weeks. I just couldn’t figure out how to add drainage in a thoughtful way that really would be of benefit. I decided to spend my energy ensuring water doesn’t get in in the first place. I made sure water can flow down the keel from the storage areas under the cushions, the anchor locker, storage under the helms, through the fuel coffin, (with a valve), into the bilge. All foam areas are sealed off with no penetrations.


I left my anchor locker with no floor. I simply added a thick rubber mat to protect the fiberglass.

Rubber mat is a good idea, I didnt think of that. My original idea was to only have drainage from the ski locker because that is the only under deck storage my boat has. The original stringers had 2 holes drilled halfway up the stringers in the bilge (I am assuming these were weep holes) but the way I looked at those was water can go in then never drain out because of the height of them.
 

GSPLures

Chief Petty Officer
Joined
Sep 3, 2019
Messages
564
So after reading as many things as I could find on bedding stringers I believe I have my plan.

once I have my stringers and bulkheads cut out I plan on positioning them and marking the location, then putting 1/8" spacers in and putting the stringers and bulkheads back in and using PB in a bag and pipe it under the stringers to bed and make my fillets.

for the 2 bulkheads that will be spanning from side to side I was going to notch out 4" on each side where the stringer will be and 1" of the stringers so it will slide into place so my bulkheads will not be in 3 pieces . Which should help hold the stringers in place along with some additional bracing.
 
Top