kcassells
Fleet Admiral
- Joined
- Oct 16, 2012
- Messages
- 8,600
bondo spreader
Like Scott said and cut a couple so you can get into smaller cavities, angles, rounded areas. Keep them ready next to you.
Good luck!


bondo spreader

Need to improve your skills!:embarassed:
That pointed chip brush will get you out of trouble a lot of times.
Why not use 4lb foam? It's more dense to begin with and from what I have read the cell wall is thicker and more resistant to water and breakdown....
| [SIZE=-2]Product Information: Free Rise Density: 16.0 lbs per cubic ft. Expansion Rate: Approx. 4x Liquid Volume Buoyancy (flotation): 46 LBs per Cubic Ft.[/SIZE] | [SIZE=-2]*Physical Properties: Parallel Compressive Strength: 580 psi Tensile Strength: 450 psi Shear Strength: 230 psi Flexural Strength: 750 psi[/SIZE] |
| [SIZE=-2]Product Information: Free Rise Density: 2.0 lbs per cubic ft. Expansion Rate: Approx. 25-30x Liquid Volume Buoyancy (flotation): 60 LBs per Cubic Ft.[/SIZE] | [SIZE=-2]*Physical Properties: Parallel Compressive Strength: 40 psi Tensile Strength: 30 psi Shear Strength: 30 psi Flexural Strength: 50 psi[/SIZE] |


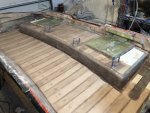
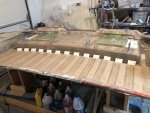
Starting to look really strong !
? Any reason you used individual blocks rather than a continuous piece ? I guess with the glass turned back in on the sides of the blocks that might just be a stronger application ..idk
Starting to look really strong !
? Any reason you used individual blocks rather than a continuous piece ? I guess with the glass turned back in on the sides of the blocks that might just be a stronger application ..idk
")