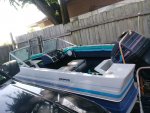
Bought this 1988 fully expecting a rotten deck, Broke engine and blown out transom. Comes with a force 50.
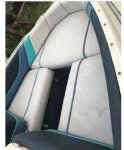
So far I've ripped out the faux grass carpet, removed the pool noodles glued to the side. Greased all the grease points, including the trailer axles. Picked the lock to the glove box and found the engine safety switch. bent the engine stop bracket back into place, ordered the parts missing for the trailer lock and reverse lock and replaced the bow light that must have flown of when towing.
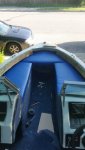
Didn't bother inspecting the boat on pick up. Just worried about having my paper work ducks in a row. Upon tearing the carpet up the back section of the boat cut out and redone in old fence planks. No glass open seems. Steering and remote shifter seems in working order and engine not seized. Cleaned the carb and waiting on a primer bulb to see if she`ll fire. Noticed the Ribs in the battery bank are cut out and rotted from being opened with cutting. Luckily the ribs butt up against the stringers and the rot ends there. I`m thinking I can get away with replacing just the middle of these ribs and glassing them back in to the stringers for support. Also screwing the floor up into the seat wells cross braces for better floor support. As of now, with neither, the cut floor is floating here and feels unsupported around battery well.
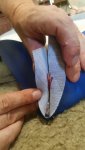
Noticed the plastic drain tubes for the motors splash well are rotted, poked a finger in, one came up mush but the other feels fine. The garboard drain has no tube but wood feels fine. Temporarily shoved modified 1/2 -3/4 pvc reducers connected with a 1/2" pipe into the top drains and a length of pvc behind the brass drain on the garboard until I figure out what I plan on doing about the transom. The PVC drain tubes are getting glued in permanently. They look bretty good for $2.20 a piece and much more rigid and rot resistant. Probably going to glass in the garboard and redrill to keep that wood protected.
Not sure about what to do about the partial rot on the transom. She seems pretty solid. probed the hole down with a wire and got pretty deep into rot. Definitely next step is to pull the engine and examine the bolt through holes and possibly start core sampling. Saw a product discussing cutting in from the top and coring only the rotten portion and gluing in a ply wood patch. Also considering a full transom replacement.
So far I've ripped out the faux grass carpet, removed the pool noodles glued to the side. Greased all the grease points, including the trailer axles. Picked the lock to the glove box and found the engine safety switch. bent the engine stop bracket back into place, ordered the parts missing for the trailer lock and reverse lock and replaced the bow light that must have flown of when towing.
Didn't bother inspecting the boat on pick up. Just worried about having my paper work ducks in a row. Upon tearing the carpet up the back section of the boat cut out and redone in old fence planks. No glass open seems. Steering and remote shifter seems in working order and engine not seized. Cleaned the carb and waiting on a primer bulb to see if she`ll fire. Noticed the Ribs in the battery bank are cut out and rotted from being opened with cutting. Luckily the ribs butt up against the stringers and the rot ends there. I`m thinking I can get away with replacing just the middle of these ribs and glassing them back in to the stringers for support. Also screwing the floor up into the seat wells cross braces for better floor support. As of now, with neither, the cut floor is floating here and feels unsupported around battery well.
Noticed the plastic drain tubes for the motors splash well are rotted, poked a finger in, one came up mush but the other feels fine. The garboard drain has no tube but wood feels fine. Temporarily shoved modified 1/2 -3/4 pvc reducers connected with a 1/2" pipe into the top drains and a length of pvc behind the brass drain on the garboard until I figure out what I plan on doing about the transom. The PVC drain tubes are getting glued in permanently. They look bretty good for $2.20 a piece and much more rigid and rot resistant. Probably going to glass in the garboard and redrill to keep that wood protected.
Not sure about what to do about the partial rot on the transom. She seems pretty solid. probed the hole down with a wire and got pretty deep into rot. Definitely next step is to pull the engine and examine the bolt through holes and possibly start core sampling. Saw a product discussing cutting in from the top and coring only the rotten portion and gluing in a ply wood patch. Also considering a full transom replacement.

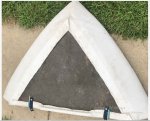
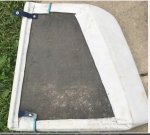
 picture 2)