1991 Searay 225 BR Transom and Stringer Evaluation

GCartwright

Petty Officer 2nd Class
Joined
Jul 1, 2012
Messages
149
Still plugging away, it's either too hot under my canopy or too cold too glass these days , lots of heat coming up from the asphalt and heating up the hull on sunny days , above 90 is too hot for me to be in there
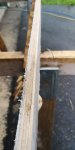
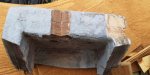
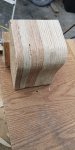
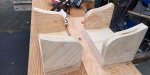
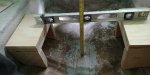
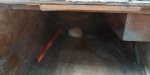
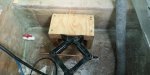
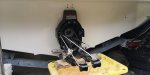
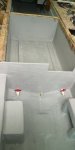
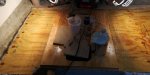
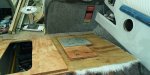
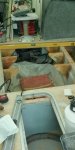
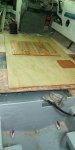
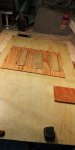
Just about finished putting wood back in, one bulkhead left then it's time to foam under the ski locker and tank, then put some bilge paint down, getting closer


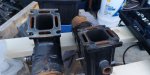
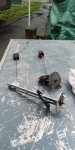
Picked up a used dash panel off ebay for $20 as is, temp sensor didn't work so found a used one locally for $10 so I have oil pressure, water temp and a tach at the least.
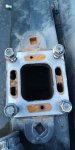
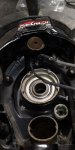
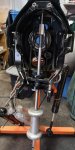
Compression checked out at 145 +- 3 across the board, need to inspect the risers and change the starter and impeller

https://youtu.be/nZt7hX81rrY
 

GCartwright

Petty Officer 2nd Class
Joined
Jul 1, 2012
Messages
149
The tarps are back up and the heaters moved back into the boat for the cool weather that's here.
I had originally planned on keeping the original deck lip and butting up to it with the new deck but as I was drilling some holes to make sure it was dry I found a small section that tested wet so I cut the lip out completely and put the grinder to use, my trusted Milwaukee of 20 years finally packed it in, I'm using a hf grinder at the moment and it can't handle any type of load without tripping out, maybe it's just mine but this thing wants to be babied, what do I want for 20 bucks though

Tank now fits with the tabbing and fileting I had done since the original test fit, some more grinding needed there.

Did a quick check of the manifold and risers and was happy with what I saw, not sure if these are original or not
 

Attachments

  • photo322217.jpg
    photo322217.jpg
    199.4 KB · Views: 4
  • photo322218.jpg
    photo322218.jpg
    511.4 KB · Views: 4
  • photo322219.jpg
    photo322219.jpg
    406.5 KB · Views: 4
  • photo322220.jpg
    photo322220.jpg
    295.5 KB · Views: 4

GCartwright

Petty Officer 2nd Class
Joined
Jul 1, 2012
Messages
149
Started working on the engine mounts this past week , the originals had just over an inch of ply with another inch of solid wood on top.
I'm using 3 x 3/4" ply with a 1/4" piece in between.
The original height from bilge pump mount board to the top of the engine mounts was 11", new ones are 10 1/2 to allow for 1/4" gap off the hull and 1/4" of tabbing on top.

I bought a gallon kit of foam a few months ago and want to use it before it expires so planning on foaming under the ski locker and tank as well as a few other places this week using heaters to get the temp up
 

Attachments

  • photo322565.jpg
    photo322565.jpg
    325.1 KB · Views: 5
  • photo322566.jpg
    photo322566.jpg
    418.6 KB · Views: 5
  • photo322567.jpg
    photo322567.jpg
    397.3 KB · Views: 5
  • photo322568.jpg
    photo322568.jpg
    379.8 KB · Views: 5

steve_h7

Chief Petty Officer
Joined
Sep 16, 2018
Messages
401
One thing I did when foaming that I read here was running a hair dryer in one of the deck expansion holes to let the area heat up before foaming.
Great progress. :thumb:
 

GCartwright

Petty Officer 2nd Class
Joined
Jul 1, 2012
Messages
149
Did some more work on the motor mounts, sealed them in resin and csm'd the edges with two layers of 1708 on the inside that's easier to access now. The mounts will get pb'd in place and 4 layers of tabbing once rear bulkhead and step out under the motor are finished

Foamed in under the ski locker, tank, and rear step out, it went well with a 2 gallon kit of foam with only a few ounces left over, will need a 10 gallon kit for under the deck.
I used halogen lamps lamps on the outside of the hull and electric heater inside with a hair dryer to warm up the cavities which got the temperature up into the 80's, then pb'd the pucks back in place after coating edges with resin.
Time to put 2 layers of csm on the ski locker and tank floor, is that enough?

​​​​​​​Thanks to all that have have helped me along the way, couldn't do this without the assistance!
 

Attachments

  • photo322792.jpg
    photo322792.jpg
    283.1 KB · Views: 4
  • photo322793.jpg
    photo322793.jpg
    386.4 KB · Views: 5
  • photo322795.jpg
    photo322795.jpg
    421.5 KB · Views: 5
  • photo322796.jpg
    photo322796.jpg
    457.6 KB · Views: 5
  • photo322797.jpg
    photo322797.jpg
    280.2 KB · Views: 5

GCartwright

Petty Officer 2nd Class
Joined
Jul 1, 2012
Messages
149
Got some work done over the holidays, put two layers of csm on the ski locker floor, not sure if I need any more glass down there for abrasion since I often store heavy objects there. I want to put some type of rubber or neoprene mat in the ski locker that will allow any water to drain back to the bilge.
I got the engine mounts installed, going with 4 layers of 1708 with some csm in between for the tabbing
 

Attachments

  • photo324119.jpg
    photo324119.jpg
    398.6 KB · Views: 4
  • photo324120.jpg
    photo324120.jpg
    469.4 KB · Views: 5
  • photo324121.jpg
    photo324121.jpg
    528.9 KB · Views: 5
  • photo324122.jpg
    photo324122.jpg
    545.8 KB · Views: 5

Mad Props

Lieutenant Commander
Joined
Jul 8, 2016
Messages
1,766
Looking good man! I built my mounts the same way as you cuz it seemed like a good idea to be able to through bolt the engine mounts, and I still think that it is, but man is it a pain in the arse glassing them in to the hull and stringers lol.

I have a similar thought on the ski locker floor as well.. I haven't found what I want to use yet, but basically like a rubber shower mat kinda material that allows water to flow under it but keeps skis/accessories/etc... from scratching up the locker floor. I'll be curious to see what you end up using.
 

GCartwright

Petty Officer 2nd Class
Joined
Jul 1, 2012
Messages
149
Looking good man! I built my mounts the same way as you cuz it seemed like a good idea to be able to through bolt the engine mounts, and I still think that it is, but man is it a pain in the arse glassing them in to the hull and stringers lol.

I have a similar thought on the ski locker floor as well.. I haven't found what I want to use yet, but basically like a rubber shower mat kinda material that allows water to flow under it but keeps skis/accessories/etc... from scratching up the locker floor. I'll be curious to see what you end up using.

You're right about the pain it is to glass the mounts on the inside edges, I was able to hang over the rear bulkhead to get access since my deck isn't in yet. There's just no room back there to get a good view

These drainage mats have little nubs on the bottom to allow liquids to drain, just looking for the cheapest supplier
 

Attachments

  • photo324232.jpg
    photo324232.jpg
    51.5 KB · Views: 2

Mad Props

Lieutenant Commander
Joined
Jul 8, 2016
Messages
1,766
Yea I saw those, I was just trying to find something in the long and skinny department, like 2' x 6' without much luck.
 

GCartwright

Petty Officer 2nd Class
Joined
Jul 1, 2012
Messages
149
Been a real washout here lately, 4 inches of rain on Sat and 10 inches for the month of January, close to record amount.

After I put the csm down in the ski locker it bubbled up around the foaming plug, must of had some small holes in the peanut butter and had the off gassing from the foam that was discussed on the forum recently, more to add on the grinding list. Not going to make the peanut butter as thick any more so it fills the gap better

I wonder if the rain and constant dampness has made nature's own expanding foam pop up
 

Attachments

  • photo324784.jpg
    photo324784.jpg
    369.9 KB · Views: 3
  • photo324785.jpg
    photo324785.jpg
    586 KB · Views: 3

kcassells

Fleet Admiral
Joined
Oct 16, 2012
Messages
8,600
Looking good man! I built my mounts the same way as you cuz it seemed like a good idea to be able to through bolt the engine mounts, and I still think that it is, but man is it a pain in the arse glassing them in to the hull and stringers lol.

I have a similar thought on the ski locker floor as well.. I haven't found what I want to use yet, but basically like a rubber shower mat kinda material that allows water to flow under it but keeps skis/accessories/etc... from scratching up the locker floor. I'll be curious to see what you end up using.

Their are a lot of rubber interlocking floor mats. They come in 1' increments. This one is 3'
Here's 1 example
https://www.uline.com/Product/Detail...E&gclsrc=aw.ds
 

GCartwright

Petty Officer 2nd Class
Joined
Jul 1, 2012
Messages
149
Getting back at it after taking care of some home projects, though this would buy me some time working on the boat but things don't work that way

Replaced the fuel sender unit, test fit the gimbal housing and started taking it apart.
I knew I had a water leak past the swivel shaft seal so it's all getting rebuilt.
Took some force to get the rusted swivel shaft out, not much left of the seal

Next steps are prepping bilge, tank area and ski locker for bilge paint, capping the stringers and putting in cleats for the deck

Getting there
 

Attachments

  • photo329433.jpg
    photo329433.jpg
    394.5 KB · Views: 1
  • photo329434.jpg
    photo329434.jpg
    158.2 KB · Views: 1
  • photo329435.jpg
    photo329435.jpg
    294.8 KB · Views: 1
  • photo329436.jpg
    photo329436.jpg
    384 KB · Views: 1
  • photo329437.jpg
    photo329437.jpg
    436.4 KB · Views: 1
  • photo329438.jpg
    photo329438.jpg
    268.7 KB · Views: 1

GCartwright

Petty Officer 2nd Class
Joined
Jul 1, 2012
Messages
149
Was able to get a few things knocked of the list this past week, all stringers are capped with csm , deck cleats coated pb'd and screwed to the stringers, 3 coats bilgekote put down in the ski locker, tank area and bilge plus a few sections of the deck test fit
I would have put the tank in but my neoprene didn't show up on time,

Time to stiffen up the deck above the ski locker and tank area
​​​​​​
 

Attachments

  • photo330817.jpg
    photo330817.jpg
    286.6 KB · Views: 3
  • photo330818.jpg
    photo330818.jpg
    317.5 KB · Views: 3

GCartwright

Petty Officer 2nd Class
Joined
Jul 1, 2012
Messages
149
Been working on reinforcing the deck for the forward section of the cockpit, going with a helm seat and keeping the back to backs on the port side but decided to put a backing plate under the deck on both side in case I want to change it one day, the mounting studs are there and will be inside the seat box out of site.
Ski locker floor area has been doubled up, made a big difference in stiffness but I'm going to add the triangle ply trusses that the factory used for more deck support.

Tired of flipping that 7 ft wide board with little side clearance , had to trim the outside stringers down to get the backing plates into a pocket
 

Attachments

  • photo331569.jpg
    photo331569.jpg
    254.5 KB · Views: 1
  • photo331570.jpg
    photo331570.jpg
    290.6 KB · Views: 1
  • photo331571.jpg
    photo331571.jpg
    664.1 KB · Views: 1

rad1026

Chief Petty Officer
Joined
May 1, 2006
Messages
443
Looking great! Stay motivated. I know this is where it starts getting tough. Glad to see you were going to change out the engine starter while you had the engine out. Do that for sure. I didn't and now need to. May have to pull the engine to get to it.
 

GCartwright

Petty Officer 2nd Class
Joined
Jul 1, 2012
Messages
149
More work on the underside of the floor, added some gussets to the area around the ski locker and it made a big difference in the deck stiffness
Also beefed up the floor over the fuel tank with another layer of half inch pb'd and screwed and some ribs with two layers of 1708, half inch ribs were the thickest I could use with the tank to deck clearance
The small backing plate is for the rear mounting screws of the back to back chair, using t nuts in the backing plate

Gas tank is in with strips of neoprene under and on the sides
 

Attachments

  • photo331997.jpg
    photo331997.jpg
    720.5 KB · Views: 4
  • photo331998.jpg
    photo331998.jpg
    707.6 KB · Views: 4
  • photo331999.jpg
    photo331999.jpg
    686.8 KB · Views: 4
Top