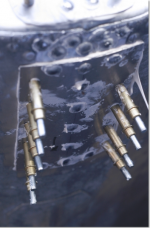
What am I looking at?

hawkman222

Seaman Apprentice
Joined
Feb 20, 2006
Messages
45
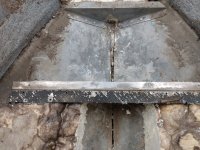
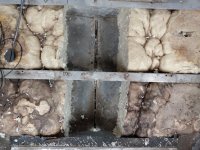
Working on an 89 Dominator CS and need an experienced eye to help me understand what I have.

I was taking on more water than I liked last fall so I put some water in the boat to locate leaks. Found a few hull cracks and also had a dribble coming out of drain hole at the back of the keel guard.

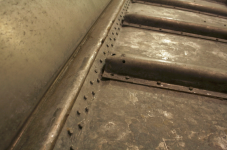
Fast forward, I'm now replacing the deck and tracking down hull cracks and leaks while the hull is open. In the bow, there is a void at the bottom that opens into the V shaped keel piece. If I pour water in this void, water will drip out the keel drain hole. It looks like at one time there was a gasket or seal of some sort separating the bow interior from the keel channel. Not sure.

Can someone tell me what keeps water from coming up the keel from the drain hole and into my boat?
 

Attachments

  • IMG_20201123_122322533.jpg
    IMG_20201123_122322533.jpg
    3 MB · Views: 32
  • IMG_20201123_122252366.jpg
    IMG_20201123_122252366.jpg
    4.3 MB · Views: 32
  • IMG_20201123_122242630.jpg
    IMG_20201123_122242630.jpg
    4.2 MB · Views: 32

gm280

Supreme Mariner
Joined
Jun 26, 2011
Messages
14,604
I tried to look at the pictures but they
Working on an 89 Dominator CS and need an experienced eye to help me understand what I have.

I was taking on more water than I liked last fall so I put some water in the boat to locate leaks. Found a few hull cracks and also had a dribble coming out of drain hole at the back of the keel guard.

Fast forward, I'm now replacing the deck and tracking down hull cracks and leaks while the hull is open. In the bow, there is a void at the bottom that opens into the V shaped keel piece. If I pour water in this void, water will drip out the keel drain hole. It looks like at one time there was a gasket or seal of some sort separating the bow interior from the keel channel. Not sure.

Can someone tell me what keeps water from coming up the keel from the drain hole and into my boat?
I tried to look at the pictures, but for some reason they don't come up for a closer look. All I get is a spinning circle and even waiting for that to work itself out, no picture comes up.
 

Scott Danforth

Grumpy Vintage Moderator still playing with boats
Staff member
Joined
Jul 23, 2011
Messages
49,582
my guess is that the elastomeric sealing strip between the keel and hull is damaged or your keel itself is leaking.

pouring water into the keel V trough will run to the back of the boat. that is what its supposed to do.

yes, the boat is riveted together with 2 sheets of aluminum and a formed angle keel with a rubber gasket between them
 

hawkman222

Seaman Apprentice
Joined
Feb 20, 2006
Messages
45
Thanks for taking a look.
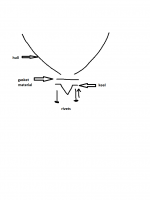
I take it this rubber gasket is supposed to be 1 piece from one side of the keel to the other and span the 1/2" gap in the bottom of the bow?
I attached a crude drawing of what I believe we're talking about. If this is a true representation, then the center seal portion of the gasket has failed and the hull is improperly open to the keel. If the center has failed should I assume the entire gasket is failed?
 

Attachments

  • keel.png
    keel.png
    10.6 KB · Views: 9

gm280

Supreme Mariner
Joined
Jun 26, 2011
Messages
14,604
Thanks for taking a look.
I take it this rubber gasket is supposed to be 1 piece from one side of the keel to the other and span the 1/2" gap in the bottom of the bow?
I attached a crude drawing of what I believe we're talking about. If this is a true representation, then the center seal portion of the gasket has failed and the hull is improperly open to the keel. If the center has failed should I assume the entire gasket is failed?
If that is how it is assembly via the factory, then you could drill out the rivets and clean up the area and buy some rubber material and make a new one. The chances of the factory having parts is extremely remote, but you can try and ask them about it. However, there are some very good rubber sheet manufacturers that you can buy direct from, that have virtually any type rubber material in most any thickness size and width you can imagine. And they can easy fix you up with replacement material. Is it going to be a piece of cake? NO! But it is very doable as well... I have bought rubber sheets from one of those venders and the material is top notch. I am thinking one such place is named rubberwarehouse, but not 100% positive on that.
 

hawkman222

Seaman Apprentice
Joined
Feb 20, 2006
Messages
45
Yep, that sounds like like the proper way to do it. My OCD drives me towards this solution.

I bought this boat a couple of months ago as a winter fixer upper project. Not a lot of money invested. Probably the best part of the deal was a nice 60 HP Johnson that came with it. So, there's a part of me that wants to brush Gluvit on it from the inside and seal the keel where the open void ends and start using it. Problem is, I'll always be worrying about my patch job failing while I'm out trying to enjoy my boat.
Looks like a couple hundred rivets to remove. I'm thinking I should only have to go half way back with the rivet removal to give me enough room for removal and replacement of the gasket material. That is if the keel will flex down a few inches.

Do you recommend solid rivets or could I get away with sealed blind rivets? I haven't set a solid rivet since I was in the Coast Guard 30 years ago and that was for training.

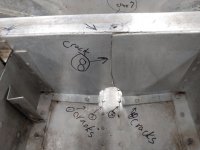
For your viewing pleasure I've attached a picture of some other fun stuff I've run into since opening her up.
 

Attachments

  • crack.jpg
    crack.jpg
    79.3 KB · Views: 54

GA_Boater

Honorary Moderator Emeritus
Joined
May 24, 2011
Messages
49,038
LOL. Yea, if all else fails I'll at least have a nice 3 cylinder looper to do something with. Make's a guy wonder how far he should go to save an old boat.
When to throw in the towel is always the question. CC kept mopping his brow and drove rivets.
 

classiccat

"Captain" + Starmada Splash Of The Year 2020
Joined
Dec 20, 2010
Messages
3,412
LOL. Yea, if all else fails I'll at least have a nice 3 cylinder looper to do something with. Make's a guy wonder how far he should go to save an old boat.

I'm a big fan of solid rivets securing external patches of ~ 0.090" aluminum sheet buttered with 3M 5200...after of course the cause of the cracking is determined/resolved.

crack-jpg.329533


However, this one would be tricky given that you'd have to remove the keel to patch externally...then reinstall the keel over the external patches --> That's not practical IMHO.

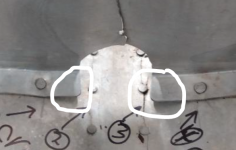
So with internal patches (formed to the curvature of the bottom hull skin), the challenge lies with the stress cracks under the bulkhead/cross member(s).

I'd 1st reinforce the bulkhead/cross members with 1/8" aluminum plate and aluminum angle for the top portion. Use solid rivets close to the cracks.

I'd then cut away the rivet tabs on those cross members so that cracks 1, 2, 3 and 4 can all be repaired with 1 internal patch. Do this by cutting parallel to the hull skin then partially through the tab so that you don't hit the hull skin. When you remove the rivet, you can just wiggle that piece you want to remove up&down to full metal fatigue.

You can tie the bulkhead/cross member back-in to the bottom hull-skin with a piece of aluminum angle.

Lastly, I'd add additional 3/16" solid rivets to the patch for additional support to provide more mechanical coupling to the patch.

Definitely repairable. but if it's more than you feel like dealing with, sell it for scrap and buy a 16' starcraft to park that 3cyl looper on!:p
 

classiccat

"Captain" + Starmada Splash Of The Year 2020
Joined
Dec 20, 2010
Messages
3,412
this is an indication how much that hull is flexing.

1606337103967.png
 

gm280

Supreme Mariner
Joined
Jun 26, 2011
Messages
14,604
Okay, have you ever thought about buying a TIG welder setup? I see some real issues with so many cracked areas. Can it be fixed/repaired? Of course it can, but it makes me really wonder about the rest of the hull now. If you had the ability to weld aluminum, then you can fix it a lot easier then patching everything up. But that doesn't mean you can't patch everything up either and had an enjoyable boat. Just another real option for repairs. I know aluminum doesn't "dry rot" but that is what comes to mind seeing all those cracks...
 

Scott Danforth

Grumpy Vintage Moderator still playing with boats
Staff member
Joined
Jul 23, 2011
Messages
49,582
remember, recreational boats are designed to last 15 years and be replaced or re-stored.

fiberglass or aluminum boats get rotten structures, wet foam, stress cracks and soft surfaces deteriorate. plastic thru-hulls fail between 5 and 15 years.
 

hawkman222

Seaman Apprentice
Joined
Feb 20, 2006
Messages
45
I was thinking I'd just have those cracks welded. In fact, I've already talked to someone about taking care of it. Not sure either of us appreciate the magnitude of the damage. Reinforcing with some aluminum plate and angle makes a lot of sense.

I saw those tabs bent up but assumed they were that way from the factory. That's a lot of repeated force to move those that much. I think this boat has had the hell beat out of it in some heavy water. If that's the root cause of the cracking, then stopping the beat down would be the corrective action.

This discussion has been very sobering.

So how much would a 750 lb aluminum boat be worth for scrap?
 

GA_Boater

Honorary Moderator Emeritus
Joined
May 24, 2011
Messages
49,038
Just toting it to recycler, not much. If you break it down to smaller pieces and get rid of all the non-aluminum, not much more.


classiccat

"Captain" + Starmada Splash Of The Year 2020
Joined
Dec 20, 2010
Messages
3,412
I was thinking I'd just have those cracks welded. In fact, I've already talked to someone about taking care of it. Not sure either of us appreciate the magnitude of the damage. Reinforcing with some aluminum plate and angle makes a lot of sense.

I saw those tabs bent up but assumed they were that way from the factory. That's a lot of repeated force to move those that much. I think this boat has had the hell beat out of it in some heavy water. If that's the root cause of the cracking, then stopping the beat down would be the corrective action.

This discussion has been very sobering.

So how much would a 750 lb aluminum boat be worth for scrap?
You can try welding but some things for your welder to consider:
  • the aluminum is fatigued
  • the aluminum contaminated/oxidized inside of the cracks.
  • verify the grade of aluminum is weld-friendly (Starcraft uses 5052)
  • you have access to only 1 side of the crack unless you remove the keel
  • Is there sealant between the keel & hull skin? That's a show-stopper b/c it will melt and contaminate the weld.
  • We often see weld repairs crack again at the edges of the weld.
Patches provide structural reinforcement and don't create dissimilar metal grain structures that would occur from welding.

one thing that I neglected to mention is be sure to drill small holes at the ends of the cracks so that they don't propagate further. be sure to stop the drill short of going through the keel rivet tab. The other cracks, I think I'd do an internal & external patch that butts up against the keel rivet tab.

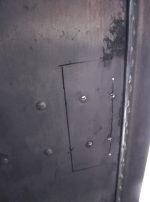
Here's how my '75 Starcraft was fatigued...I had big cracks along all of those rivets. Needless to say, my rig has alot of patches šŸ¤£ (and the bilge is bone-dry.)
1606394421690.png

1606394467376.png

1606394593001.png
 

hawkman222

Seaman Apprentice
Joined
Feb 20, 2006
Messages
45
I'm a big fan of solid rivets securing external patches of ~ 0.090" aluminum sheet buttered with 3M 5200...after of course the cause of the cracking is determined/resolved.

crack-jpg.329533


However, this one would be tricky given that you'd have to remove the keel to patch externally...then reinstall the keel over the external patches --> That's not practical IMHO.

So with internal patches (formed to the curvature of the bottom hull skin), the challenge lies with the stress cracks under the bulkhead/cross member(s).

I'd 1st reinforce the bulkhead/cross members with 1/8" aluminum plate and aluminum angle for the top portion. Use solid rivets close to the cracks.

I'd then cut away the rivet tabs on those cross members so that cracks 1, 2, 3 and 4 can all be repaired with 1 internal patch. Do this by cutting parallel to the hull skin then partially through the tab so that you don't hit the hull skin. When you remove the rivet, you can just wiggle that piece you want to remove up&down to full metal fatigue.

You can tie the bulkhead/cross member back-in to the bottom hull-skin with a piece of aluminum angle.

Lastly, I'd add additional 3/16" solid rivets to the patch for additional support to provide more mechanical coupling to the patch.

Definitely repairable. but if it's more than you feel like dealing with, sell it for scrap and buy a 16' starcraft to park that 3cyl looper on!:p
This seems to make a lot of sense. Applying a sturdy aluminum patch which will both seal and reinforce. I agree that welding may leave a weakened skin that will probably fail sooner than later. I assume you'd use 5200 on the internal patch as well. I think this is the path I'll take with the hull cracks.

Still not sure what to do about sealing the bow from the keel. Thinking maybe an internal patch with adhesive\sealant there too. The existing gasket material between the keel flange and the hull looks solid. The missing portion of the gasket spanning the gap in the hull could be replaced with a generic rubber gasket material over the gap glued and screwed in line with the keel rivets. Then cut the ends of the SS screws off flush with keel flange on the outside. Not sure yet, just brainstorming.

Whatever I do, it's with the understanding that this won't be a 'forever' fix and that I need to keep an eye out for my next new to me boat.

BTW, I sold a nice 16' Starcraft when I moved 4 years ago. Had a good running 70hp Johnson on it. I'm an OMC guy for sure. Have done complete rebuilds on several of them. My greatest outboard regret is selling a '75 75hp Hustler I rebuilt. It was a beast.
 

classiccat

"Captain" + Starmada Splash Of The Year 2020
Joined
Dec 20, 2010
Messages
3,412
This seems to make a lot of sense. Applying a sturdy aluminum patch which will both seal and reinforce. I agree that welding may leave a weakened skin that will probably fail sooner than later. I assume you'd use 5200 on the internal patch as well. I think this is the path I'll take with the hull cracks.

Still not sure what to do about sealing the bow from the keel. Thinking maybe an internal patch with adhesive\sealant there too. The existing gasket material between the keel flange and the hull looks solid. The missing portion of the gasket spanning the gap in the hull could be replaced with a generic rubber gasket material over the gap glued and screwed in line with the keel rivets. Then cut the ends of the SS screws off flush with keel flange on the outside. Not sure yet, just brainstorming.

Whatever I do, it's with the understanding that this won't be a 'forever' fix and that I need to keep an eye out for my next new to me boat.

BTW, I sold a nice 16' Starcraft when I moved 4 years ago. Had a good running 70hp Johnson on it. I'm an OMC guy for sure. Have done complete rebuilds on several of them. My greatest outboard regret is selling a '75 75hp Hustler I rebuilt. It was a beast.
Ah! Starmada Alumni! :cool: I have the original '75 70HP on my 18' SuperSport...most would say that its underpowered but i've been very happy with it. Only~ 220#, simple/reliable operation, easy to wrench on and decent fuel economy.

Regarding that leaky bow keel, they didn't put enough rivets in there IMO. Starcraft uses a double rivet seam there and they still leak. With yours, I'd rebuck those rivets (and maybe add a few more). Once that's done, surgically apply GFlex sealing epoxy to the exterior of the keel plate so it seeps into the seam...gently heat the aluminum with a heat gun to lower the GFlex viscosity...not too much or it will boil. Once it cures, clean-out that interior void the best you can then apply sealing epoxy to the interior seam as well (GFlex, Gluvit, Coat-it, etc.).

On patches, 5200 you ask? šŸ¤£
1606405158820.png
 

hawkman222

Seaman Apprentice
Joined
Feb 20, 2006
Messages
45
Ah! Starmada Alumni! :cool: I have the original '75 70HP on my 18' SuperSport...most would say that its underpowered but i've been very happy with it. Only~ 220#, simple/reliable operation, easy to wrench on and decent fuel economy.

Regarding that leaky bow keel, they didn't put enough rivets in there IMO. Starcraft uses a double rivet seam there and they still leak. With yours, I'd rebuck those rivets (and maybe add a few more). Once that's done, surgically apply GFlex sealing epoxy to the exterior of the keel plate so it seeps into the seam...gently heat the aluminum with a heat gun to lower the GFlex viscosity...not too much or it will boil. Once it cures, clean-out that interior void the best you can then apply sealing epoxy to the interior seam as well (GFlex, Gluvit, Coat-it, etc.).

On patches, 5200 you ask? šŸ¤£
View attachment 329562
Holy cow, did you ruin your clecos?

As far as clecos, I've seen them, played around with them a little and find them interesting but I don't own any. Do you recommend I hunt some down for installing the patches?

Thinking as I'm typing, I'm not sure how I would hold those patches in place without them. Maybe throw in a few temporary small screws, install rivets, pull screws and install rivets where the screws were? I may have answered my own question.

I'm going to try the epoxy idea on the bow gasket. I'll still have to do something to stop water from migrating from the keel drain hole up and into the bow. Maybe just fill the keel full of sealant. I've seen that suggested elsewhere.
 
Top