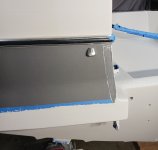
Transom replacement.

DunbarLtd

Petty Officer 1st Class
Joined
Nov 8, 2016
Messages
357
It would need thinned quite a bit with acetone, but would be doable.

I know acetone isn't ideal, it can interfere with the chemical bond, but practically it's fine. I've never had any issues once I finally got a feel for everything.

If you don't want the mess of spraying though, I think I would go with a brush. It'll be easier to build it up thick.
Ok thanks brush it is!! Im not worried about the finish on this old boat.
 

MikeSchinlaub

Petty Officer 2nd Class
Joined
Jan 14, 2025
Messages
154
If you want, I can try to write a more thorough walkthrough for your specific job tonight.

There is also a more general how to on fiberglass somewhere here, but I couldn't find it quickly.
 

DunbarLtd

Petty Officer 1st Class
Joined
Nov 8, 2016
Messages
357
If you want, I can try to write a more thorough walkthrough for your specific job tonight.

There is also a more general how to on fiberglass somewhere here, but I couldn't find it quickly.
Yes since this is the first time I am doing this type of repair it would be helpful. Im taking my time at this point and doing as much research as possible. so far everything is straightforward.

But Im stuck at the part of adding glass to the bevelled seams after the glue up using the old skin Its in fine shape so no reason not to use it. Its 1/2" thick so it came off no problem.

. Im thinking of doing multiple layers of 1708 until im a bit proud and sand and fair. But I read to use 1700 in between 1708 to build up Basically sandwiching the 1700, starting with 1708 and ending with mat side out for nicer finish. Im not sure why I cant just use 1708 for every layer and flip the last piece. From my understanding when using epoxy you can orient the biax any way and its fine. Ending with a chop strand side will give me a better finish. Why they suggested the 1700 im not sure.
 

MikeSchinlaub

Petty Officer 2nd Class
Joined
Jan 14, 2025
Messages
154
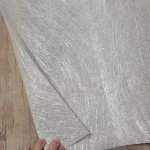
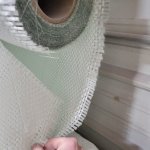
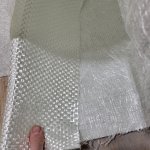
I'm not familiar with the product numbers, but from a quick google it seems that 1700 is what we call byply, which is a biaxial weave with a thin layer of csm stitched to the bottom. 1708 I think is just the woven strands, or what we call roving.

The roving by itself wont give a good bond to the surface. It's strong because it's made with long continuous strands, but that woven structure prevents the strands from laying into the surface scratches well.

You need at least one layer of csm under the roving, but we always do two. You also need to finish with the csm. If you sand the roving smooth, you will break those long fibers and eliminate what makes it strong, which defeats the purpose of using it.

I'll get some pics of our rolls when I get back from lunch.
 

Pmt133

Senior Chief Petty Officer
Joined
Jan 6, 2022
Messages
701
The 1708 is 45 degree cross stitched 17oz bias ply with 3/4 CSM stitched on the back. I think 1700 is just the cross stitched piece.

CSM and woven will build faster. I believe the 1708 with the 45 degree bias and stitching is easier to work with (for me) and stronger for the same weight while needing less resin. Honestly it's preference and what you're comfortable with. They both accomplish the same thing.
 

jbcurt00

Moderator
Staff member
Joined
Oct 25, 2011
Messages
25,101
Several great writeups and projects^^^

Esp item 18 Decks, Transoms & Stringers
Re: 1962 Lonestar "Flamingo" - I finally Started w/pics My Recommendations on how to fabricate Decks, Stringers and Transoms. These drawings are based on my experiences and the vast amount of information I have gleaned from all the Pros and Skilled Amateurs and their projects here on the Forum. These are NOT set in stone, only Recommendations. It's your boat, so you can and should do as you see fit. .


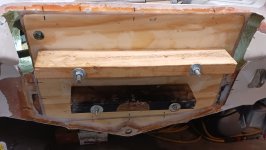
Transoms (updated 06/28/2016): Epoxy When using Epoxy for your transom it's basically the same as for Stringers. You'll use 17 oz Cloth instead of 1708 Biaxial and NO CSM! You could also use a couple of layers of 8.5oz glass. With epoxy lighter weight glass and multiple layers is sometimes a better method to build bulk and strengthPolyester Resin  Note: When using screws as clamps, it's best to predrill the holes a bit oversiized on one piece of the transom. This keeps the piece from catching the screw threads and allows the other piece to be drawn up tight against the pre-drilled piece. Pics of clamps I recommend for clamping an Outboard Style Transom when the top cap of the boat has been removed. I modified the construction of them just a bit using bolts instead of all thread. Takes a bit longer to build em but I like em better. Doing it this way I can use my 3/8" air drive ratchet to tighten em down which make is a lot faster to clamp em down. You need to be as fast as possible when you are using that much PB. Don't want it to set up on you before you get it clamped in place. Speed is of the essence!!!!   FINISHING UP THE TRANSOM INSTALL. Note: To avoid any possibility of getting a "Waffling Effect" on the outer transom skin, It's recommended that you use a Plywood "Backer Pad" on the outside before applying the clamps. Once the transom is clamped into the boat, All that's left is to form the fillets and lay the glass. During clamp up, If you elected to create the OOZE holes you'll need to be prepared to smooth out the PB as it oozes out of the holes as well as form the fillets from the ooze out around the edges of the transom. You'll probably need to have a bit extra PB to form the fillets. A large Plastic Spoon is a great tool for forming these fillets and a bondo spreader is great for cleaning up the fillets and knocking down the inevitable left over waste and nubs that will occur. The cleaner and smoother you can make these fillets now the less work you'll have later when it all cures. After everything cures in a couple of hours you can remove the clamps and check for any rough spots on the fillets and sand them smooth. Cut your first layer of 1708 glass so it will extend out onto the sides and bottom of the hull approx 4-5 inches. I like to use Masking tape to hold it in place along the top edge of the transom and hull sides while I fit it in place and make my cuts. You can then start applying resin. Once the first layer starts to "Kick" and harden You can prepare to do the next layer and have it extend out onto the hull approx. 8-10". and repeat the resin process. If you want a smoother appearance you can follow up with a layer of 1.5 oz CSM to Hide the weave of the 1708 fabric. The Transom installation is now complete.
 

MikeSchinlaub

Petty Officer 2nd Class
Joined
Jan 14, 2025
Messages
154
Several great writeups and projects^^^

Esp item 18 Decks, Transoms & Stringers
Thanks, I was still at work, so didn't look very hard.
 

DunbarLtd

Petty Officer 1st Class
Joined
Nov 8, 2016
Messages
357
Several great writeups and projects^^^

Esp item 18 Decks, Transoms & Stringe
The 1708 is 45 degree cross stitched 17oz bias ply with 3/4 CSM stitched on the back. I think 1700 is just the cross stitched piece.

CSM and woven will build faster. I believe the 1708 with the 45 degree bias and stitching is easier to work with (for me) and stronger for the same weight while needing less resin. Honestly it's preference and what you're comfortable with. They both accomplish the same thing.
Yes 1700 is 1708 without the chopped strand backing. This is why I post these kinds of comments because when you start doing research, you sometimes find conflicting ideas. Good to know I can use 1708 for the tabbiong process and simply flip the last piece so i have something to sand without breaking the woven strands.
 

MikeSchinlaub

Petty Officer 2nd Class
Joined
Jan 14, 2025
Messages
154
Looks like the how to has it covered. I'll still write my version if you want, but I have different experience and will have some conflicting advice. It might be best to follow one set of instructions. Up to you.
 

jbcurt00

Moderator
Staff member
Joined
Oct 25, 2011
Messages
25,101
Looks like the how to has it covered. I'll still write my version if you want, but I have different experience and will have some conflicting advice. It might be best to follow one set of instructions. Up to you.
Do your write up, multiple ways to do most things boat related.

WOGs method works and is budget friendly. Not the only way....
 

MikeSchinlaub

Petty Officer 2nd Class
Joined
Jan 14, 2025
Messages
154
Do your write up, multiple ways to do most things boat related.

WOGs method works and is budget friendly. Not the only way....
I'll take pictures of materials and tools at work tomorrow. I do have a small spot that I need to grind and glass on the current job, but it will probably be Monday before I get to it. I might wait until then so I can get some in progress pictures.
 

MikeSchinlaub

Petty Officer 2nd Class
Joined
Jan 14, 2025
Messages
154
Sorry I'm taking a bit, but I haven't forgotten. As of a few minutes ago, my walkthrough is about 8,000 characters over the limit. That's after I decided to do the body work seperate and did a bunch of editing. I'm thinking the initial post will be half, and post the rest as a reply. Not here of course, as it's own thread. Hopefully mods are alright with this.
 

MikeSchinlaub

Petty Officer 2nd Class
Joined
Jan 14, 2025
Messages
154

Here is a link to the walkthrough I wrote. I thought there might be some sort of review this would go through, but nobody seems interested. Sorry about the pictures. It seems like copying and pasting turned then into link text, but the still seem to work.
 

DunbarLtd

Petty Officer 1st Class
Joined
Nov 8, 2016
Messages
357

Here is a link to the walkthrough I wrote. I thought there might be some sort of review this would go through, but nobody seems interested. Sorry about the pictures. It seems like copying and pasting turned then into link text, but the still seem to work.
Thanks Mike, very helpful write up.

Just to update this post, Im at the point of getting ready to attach the outer skin (fiberglass). Glueing the transom wood was a success using thickened epoxy 2:1. I was surprised how much cabosil it needed to keep from sliding down.

Anyways, I want to use tapered stainless screws to screw into the transom through the skin in some areas around the outer edges where the clamps dont reach.

Would thickened epoxy be good enough for sealing screw heads? I suppose I can remove them but I like the idea of the screws staying as it is just extra insurance. Not worried about water intrusion as i will coat the screws with epoxy before screwing them in. Sealing the hole. My only fear would be the filler on the screw head cracking off. I could possibly grind down to glass around the screw and add a small piece of glass over the screw heads. Seems like a better idea but maybe is overkill?

I also wanted to add a layer of glass to the wood before the skin goes on but i read the screws will twist the cloth. Wondering what I can do about that?
 

Attachments

  • 20250308_164146.jpg
    20250308_164146.jpg
    1.1 MB · Views: 6

MikeSchinlaub

Petty Officer 2nd Class
Joined
Jan 14, 2025
Messages
154
You're on the right track, but screws by themselves aren't enough. You need to distribute the clamping force, otherwise you'll just be clamping the area around the screw head. Screw through some boards to clamp it. Coat the threads in some wax to help with removal.

You can add a layer of glass to the wood first if you want. Clamp the skin on, pre-drill any screw locations, and screw together. It'll be fine.
 

DunbarLtd

Petty Officer 1st Class
Joined
Nov 8, 2016
Messages
357
UPDATE: Now onto gelcoat. Color matching is a huge pain for this. I wetsanded the above area. Having a tough time getting a match. Im using white base and added little yellow black and brown heavy on the black. The lighting in my garage makes it difficult to tell. Also I decided to ROLL on the gelcoat so the color probably wont match even if I hit it on the mark. Im using non waxed so I can roll on as many coats as i need. Then spray it with PVA.

Any idea what color to add to get it a little closer? Off white is such a pain. the original gel is obviously yellowed so i wetsanded and its a little whiter now. Just something doesnt seem right to me. I spent an hour matching little by little what a tedious little pain it is. I may just be happy with this and move on. Been 6 weeks now I just want to get it finished.
 

Attachments

  • 20250403_160646.jpg
    20250403_160646.jpg
    1.7 MB · Views: 3

MikeSchinlaub

Petty Officer 2nd Class
Joined
Jan 14, 2025
Messages
154
Wait, did you already roll the whole area before you were done with the color? If you put catalyst in that, then job's done now.

Also, with gel you need to peel your tape line as soon as you're done. If you leave it on and the gel hardens, you'll have to cut along the tape line with a razor blade to have a chance for a good line.

As far as the color, I've been doing it for 12 years and still have a hard time. I still get it wrong too. Typically the tinting colors are black, red, and yellow. Very rarely a bit of blue.

Good luck.
 
Top