Transom replacement- need glassing advice (caution - fun inside)

JASinIL2006

Vice Admiral
Joined
Feb 10, 2012
Messages
5,674
Well good news. This morning the peanut butter seemed to have cured quite well. I also have a 80 degree day today should help finish it off.

I used 1.5% mekp with this poly. It was a middle ground for what this was rated too. I have to mention it does not exotherm like vinyl does. When i mix up some vinyl i do it at 1.25% and within an hour its gel at least already. Yesterday i checked the poly after 4 hours and it was cool to the touch and still pretty liquid. It must have really kicked overnight though. Only a minor Tack to the very top and i have to tab over this anyways still.

Sounds like maybe you were toward the light side of the MEKP-to-resin ratio. When I was glassing with polyester, the mix would get warm as it kicked, and it usually took less than an hour to reach full hardness (I imagine it continued to cure after an hour, but for all practical purposes, it was hard within an hour, often less). I don't know if vinylester has a more engergetic reaction, but it sounds like you were either a bit light on MEKP or the ambient temps were low for the mixture you used. Either way, it sounds like it eventually kicked, so all is well.

By the way, nice work on the transom. That looks really good.
 

hanslanda

Seaman
Joined
Jul 9, 2019
Messages
56
Sounds like maybe you were toward the light side of the MEKP-to-resin ratio. When I was glassing with polyester, the mix would get warm as it kicked, and it usually took less than an hour to reach full hardness (I imagine it continued to cure after an hour, but for all practical purposes, it was hard within an hour, often less). I don't know if vinylester has a more engergetic reaction, but it sounds like you were either a bit light on MEKP or the ambient temps were low for the mixture you used. Either way, it sounds like it eventually kicked, so all is well.

By the way, nice work on the transom. That looks really good.

Why thank you sir! I spent some good time on that. Two pieces of 3/4 miranti PL glued and stainless screwed together. Coated it with resin and one layer of csm after that. Hopefully shes pretty sealed. I bored the motor bolt holes out larger than they are and plan to coat that with epoxy before I bolt up.

One question now that i reviewed your larson rebuild, nice work btw! How thick do you think your deck was? Or what did you use to replace it? The rear of my boat looked identical to the condition of yours and deck thickness as well.
 

JASinIL2006

Vice Admiral
Joined
Feb 10, 2012
Messages
5,674
I used 1/2” plywood, with a coating of CSM on the underside and two layers of CSM on top, followed by 6 oz. woven. It’s plenty sturdy, although I bet 5/8” plywood would have been fine, too. If I were doing it again, I probably would have used one layer of 1708 in place of one of the layers of CSM, just for the extra strength. I also found 1708 easier to work with over large expanses, so it tended to lay flatter and smoother.
 
Last edited:

hanslanda

Seaman
Joined
Jul 9, 2019
Messages
56
I used 1/2” plywood, with a coating of CSM on the underside and two layers of CSM on top, followed by 6 oz. woven. It’s plenty sturdy, although I bet 5/8” plywood would have been fine, too. If I were doing it again, I probably would have used one layer of 1708 in place of one of the layers of CSM, just for the extra strength. I also found 1708 easier to work with over large expanses, so it tended to lay flatter and smoother.

Very nice i think i'm going to do the same. 1/2" with csm underlayer, topside a layer of 1708 and a layer of csm. due to my work on the stringers ive added around 1/4" of height to the stringers. It sounds dumb but i dont want the deck much thicker than standard because the bow section sits on top of it and i dont want to effect how the bow sits on-top of the deck being its probably already going to be 1/4" higher.
 

hanslanda

Seaman
Joined
Jul 9, 2019
Messages
56
Well boys it's been some time but another update for the masses. I'll try to get some pictures shortly but I've just been tied up. Had a wedding this spring and I needed some 80+ degree weather for the foaming fun.

_Completed since last visit_

-Transom is fully tabbed into hull
-Transom support wings are glassed and tabbed in nicely
-Stringers are fully glassed up
-Stringer foam has been re-poured and cured

_Next up_

-Seal stringers back up (from foam pour holes)
-Cut deck wood
-Glass underside of deck wood
-Tab/Screw/Staple deck down onto stringers/hull
-Pour foam for deck voids
-Glass top of deck

_Questions_

The original construction had PL glued the deck down onto the stringers, using staples everywhere to secure the deck to the stringers, and screwing it into areas where there is wood embedded into the stringers. I rebuilt all the embedded wood so I could re-screw the deck in the 6 spots it will work but how do yall feel about the PL glue and staples?
 

todhunter

Canoeist
Joined
Sep 15, 2020
Messages
1,311
I'm guessing staples were used originally as it's a quick way to fasten together a boat. My deck was stapled together and a TON of the staples had missed the stringer completely. Mine did not have any adhesive holding the deck to the stringers, though.

I rebuilt mine with PB between the stringers and deck, and a screw going into a cleat about every 6 inches. My cleats are attached to the stringers with PB and SS #10 hardware. Never worked with PL before, so I can't comment there.
 

JASinIL2006

Vice Admiral
Joined
Feb 10, 2012
Messages
5,674
I attached my deck with peanut butter and stainless steel screws (treating the holes with 5200 before inserting the screws). My deck had been stapled, too. That surely was a time- and cost-saving measure by the builder.

I think screws would be much stronger than staples, although a bit more work to install.
 

88 Capri (2022 SOTY)

Master Chief Petty Officer
Joined
Aug 25, 2019
Messages
819
I'm guessing staples were used originally as it's a quick way to fasten together a boat. My deck was stapled together and a TON of the staples had missed the stringer completely. Mine did not have any adhesive holding the deck to the stringers, though.

I rebuilt mine with PB between the stringers and deck, and a screw going into a cleat about every 6 inches. My cleats are attached to the stringers with PB and SS #10 hardware. Never worked with PL before, so I can't comment there.
In regards to PL I asked the the same question and Scott D. said it takes a couple of weeks to "gas off" and if I'm not mistaken should not be sealed up till then.
 

hanslanda

Seaman
Joined
Jul 9, 2019
Messages
56
Hey all,
I was sadly struck with Covid last year during prime-glassing time for Wisconsin. If that weren't bad enough I followed up with a Knee injury from motorcross about 3 weeks after I cleared Covid. Needless to say my summer was pretty shot and I was very unhappy with the lack of continuing progress I made last year.

That been said, a few things were accomplished, and I figured I'd share them, as well as a question for masses.

UPDATES:

1) Boat has been flipped over for painting.
I figured now was as good a time as ever, and since flipping can be a delicate process, I opted to do this before the deck was in (less weight). I built a solid structure, as well as ferrying wheels to move it about pretty painlessly. No cracking or crazy noises during the process so I believe it went well. Going to be doing a prime, and several coats of grey with topcoat.

2) Interior - About the only thing you can do without a heated garage in Wisconsin winters is interior work (and I have plenty of it). So I learned how to sow boat seats, got a machine at a decent price, and have been sowing away at making new seating. I purchased captain/co-captain seats as those are a bit trickier, and based my color scheme off of them for the rest of the interior. So far I have these two complete, with the front main seat in progress. That will only leave the side cusions all the way around the boat, and the main rear bench/rest.


I reattached the transom picture here, it does not include the supporting wings I built for it, but essentially imagine (2) 45 degree pieces of wood that start about 3/4 the way up the transom, which connect to the side of the stringer area.

Question: I built this transom for a newer motor I planned on putting onto the boat, the original was a V4 Evinrude 88, but I acquired a V6 150 Evinrude (boat tag specified a max engine size of 155). Do you think a transom of this size will have any issues handling a motor that's essentially 80-100lbs heavier? Transom specifications seem to be a bit of voodoo magic online, with varying specs and statements.
 

Attachments

  • 65093488031__C8F0FED7-85DD-4606-8CB1-6E77C2A45B53.jpg
    65093488031__C8F0FED7-85DD-4606-8CB1-6E77C2A45B53.jpg
    897.4 KB · Views: 11
  • IMG_5916.jpg
    IMG_5916.jpg
    669.6 KB · Views: 10
  • IMG_5936.jpg
    IMG_5936.jpg
    670.6 KB · Views: 11
  • image0.jpeg
    image0.jpeg
    780.1 KB · Views: 10

tpenfield

Moderator
Staff member
Joined
Jul 18, 2011
Messages
18,042
The seat cushions look good. What sewing machine did you get?
 

hanslanda

Seaman
Joined
Jul 9, 2019
Messages
56
The seat cushions look good. What sewing machine did you get?
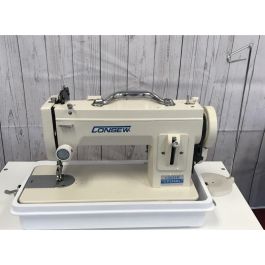
Thank you friend. I used a Consew 206RB. I can get through 6+ layers of vinyl no problem.

I definitely recommend it for its durability (solid casting/cam design). I personally don't know how well a singer-industrial would do, but I've heard they are still sheet metal stampings and aren't very "industrial". This thing will only do straight-stich patterns, but I was told its perfect for upholstery-work.


For materials and a general knowledge-source, I would recommend sail-rite. They have pretty much everything you could need to get going. Not to mention I learned everything from their youtube videos(they have a lot). Sail-rite also has their own machine for around $800. It may be better for this type of work out of the gate, but I really felt dropping $800 on something that I might not use again to be a bit much.
 
Last edited:

tpenfield

Moderator
Staff member
Joined
Jul 18, 2011
Messages
18,042
Thank you friend. I used a Consew 206RB. I can get through 6+ layers of vinyl no problem.

I definitely recommend it for its durability (solid casting/cam design).
Yes, I have the Consew 206RB-4. I bought it used of $500 a few years ago. It is probably second best to the Juki 1541 or 1508 machines. I also switched it over to a servo (DC) motor and did a 3:1 pulley reduction. I can slow it down to do a single stitch about every 3 seconds if I want to. It really helps in some of the tight situations. I like the fact that you can vary the stitch length up to 10mm, although I typically run at 5 mm and 7 mm for top-stitching.

I'm currently doing my third set of boat seats. . . still learning a few tricks and techniques.
 

88 Capri (2022 SOTY)

Master Chief Petty Officer
Joined
Aug 25, 2019
Messages
819
Thank you friend. I used a Consew 206RB. I can get through 6+ layers of vinyl no problem.

I definitely recommend it for its durability (solid casting/cam design). I personally don't know how well a singer-industrial would do, but I've heard they are still sheet metal stampings and aren't very "industrial". This thing will only do straight-stich patterns, but I was told its perfect for upholstery-work.


For materials and a general knowledge-source, I would recommend sail-rite. They have pretty much everything you could need to get going. Not to mention I learned everything from their youtube videos(they have a lot). Sail-rite also has their own machine for around $800. It may be better for this type of work out of the gate, but I really felt dropping $800 on something that I might not use again to be a bit much.
Thank you for this information, this step is definitely in my future!
The work you did came out gorgeous!
 

todhunter

Canoeist
Joined
Sep 15, 2020
Messages
1,311
Agree with the above - looks nice. I paid someone to do my upholstery, but if there is a next time I think I'll buy a machine and do my own.
 

hanslanda

Seaman
Joined
Jul 9, 2019
Messages
56
Thanks for the kind comments everyone!

I will say for those looking to do it in the future, having the old upholstery to use as templates makes the process much more painless, given you keep the pattern previously used. Seam rip apart all of the sections, take note of how far in the stitching was to the actual pattern and make cardboard pieces as templates. For left and right seats the process becomes as easy as flipping the carboard over and using the other side. You just need to mark them clearly so you know which is which :)
 

hanslanda

Seaman
Joined
Jul 9, 2019
Messages
56
Hey guys, just had one question:

I reattached the transom picture above, it does not include the supporting wings I built for it, but essentially imagine (2) 45 degree pieces of wood that start about 3/4 the way up the transom, which connect to the side of the stringer area.

Question: I built this transom for a newer motor I planned on putting onto the boat, the original was a V4 Evinrude 88, but I acquired a V6 150 Evinrude (boat tag specified a max engine size of 155). Do you think a transom of this size will have any issues handling a motor that's essentially 80-100lbs heavier? Transom specifications seem to be a bit of voodoo magic online, with varying specs and statements. I'm essentially going from a V4 to a V6 but the power is within the tag specification.
 

hanslanda

Seaman
Joined
Jul 9, 2019
Messages
56
Just a tad bit more information:

The old motor was a Johnson 88 SPL; weighing in at about 288lbs.

The new motor is an Evinrude Intruder 150(non-FICHT) weighing in at 370lbs.

So a total overall increase in weight of 82lbs.
 
Top