Time to re-upholster - Formula 330 SS

tpenfield

Moderator
Staff member
Joined
Jul 18, 2011
Messages
18,040
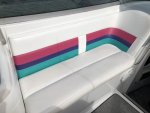
I'm still up in the air about the vinyl color scheme. I can get 2 colors pretty close, but not the third. I did put an inquiry into the place that Formula Boats referred me to that bought out their old vinyl stock. They are sending me samples of the 'pink' and the 'teal/green'. The purple is an easy match.

So, I may be in a position to go with a more exact original color scheme, or still change it up a bit. :noidea: I just don't want to get too far away from the boat's exterior color scheme (which matches the interior) and open up that can of worms :rolleyes:
 

Scott Danforth

Grumpy Vintage Moderator still playing with boats
Staff member
Joined
Jul 23, 2011
Messages
49,574
Only way to contain the worms once you open the can is a much larger can....

Im in the same boat with a completely new exterior color scheme
 

tpenfield

Moderator
Staff member
Joined
Jul 18, 2011
Messages
18,040
More practice . . .

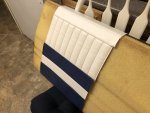
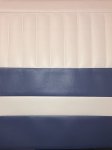
I made a second panel to get some more practice in before trying to make the panels for real. Thankfully, I have not ordered the material yet, so this is all on spare vinyl.

IMG_3461.JPG
The real vinyl will have a 1/4" foam backing, so I think it will give the channeling section more of an 'inset' within the panel.

I've got the sizing of the stripes about right, as they line up pretty well with the indentations in the foam.

I just have to figure out a few things on the end bands.

Here is the basic panel design.

IMG_3462.JPG
 

tpenfield

Moderator
Staff member
Joined
Jul 18, 2011
Messages
18,040
More practice . . .

I am starting to work on making corner pieces, both from a pattern cutting and stitching perspective.

IMG_3465.JPG

I made this last night, but quickly realized I need to accommodate the seat back taper, so another, more complete test pattern is in the works. I'm hoping the foam backed vinyl will make for tighter seams, as the seams seem a bit loose, but I have the thread tension fairly high and the stitches seemed to be balanced in the material top/bottom.

As far as stitching length, I am using 3.5-4mm for the seams and 5-6mm for the top stitching. Sound about right ??? :noidea:

The existing seat covers were more in the 3mm & 5mm range.
 

alldodge

Moderator
Staff member
Joined
Mar 8, 2009
Messages
42,064
Looks great and when using the real stuff will look even better, I'm thinking
 

tpenfield

Moderator
Staff member
Joined
Jul 18, 2011
Messages
18,040
Update - Seat Backs

I have been practicing making the end sections of the seat backs using a similar approach to the existing seats. In doing so, I am finding the curves are a bit difficult to get just right.

Soooo, I 'think' I have come up with a different approach that is more in my skill set and hopefully will look just as good. I figure that I will go with a more 'banded' ends to the seat backs, rather than try to wrap the fabric around the ends.

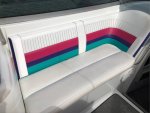
Here are a couple of pictures showing the existing seat and a mock-up of what I think it will look like, based on my design.

Current Seat
Click image for larger version  Name:	IMG_3152Bcopy.jpg Views:	1 Size:	106.0 KB ID:	10811135
.
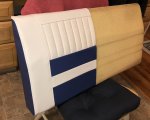
Here is what I am thinking in terms of the ends of the seat backs . . . make them 'banded' like and endcap, and maybe add some color to them.
.
Mock-up
Click image for larger version  Name:	IMG_3152-2Dcopy.jpg Views:	1 Size:	119.3 KB ID:	10811136
.
Curving the pleated section may be a bit tricky, but I'll figure something out :noidea: :)


I just got to see if I can make a sample of this sort of 'end cap' easier than the wrap-around style.
 
Last edited:

tpenfield

Moderator
Staff member
Joined
Jul 18, 2011
Messages
18,040
Making progress . . .

I started out the day thinking that I am a failure at curved pieces. Well, I was. . . but now I am getting the hang of it.

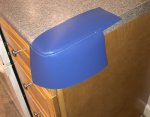
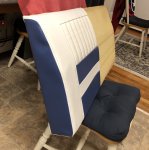
Here is may latest practice attempt trying out the 'banded' ends rather than curved/wrapped. I think this will work. :)
.
Click image for larger version  Name:	IMG_3468.JPG Views:	1 Size:	192.0 KB ID:	10811213
.
Click image for larger version  Name:	IMG_3467.JPG Views:	1 Size:	224.6 KB ID:	10811214 .
.
I have a set of top stitch walking feet on order so that I can hold the stitching at a consistent distance from the seam. I am starting to run out of vinyl to practice on. . . but I could always grab a couple of yards locally.
 

tpenfield

Moderator
Staff member
Joined
Jul 18, 2011
Messages
18,040
I think I got the 'curved' channeling piece figured out . . .
.
IMG_3470.JPG
.
I just made some angled stitching on each 'channel', starting at the inside of the curve. I'll need only 1 piece like this on the port side settee. The rest are all straight.

I'll be ordering material over the next week or so. Still waiting for a couple of samples of the Formula original colors to arrive. Also hoping the servo motor arrives soon. I'm getting better at managing the clutch motor, but it is still no fun.
 

alldodge

Moderator
Staff member
Joined
Mar 8, 2009
Messages
42,064
Looking real good, wish you were closer I'd let you practice on my stuff :rolleyes:
 

tpenfield

Moderator
Staff member
Joined
Jul 18, 2011
Messages
18,040
Thanks guys . . . I had not realized how much of a difference the machine makes. Last time I did vinyl, I used the Admiral's regular machine and the results were nowhere near as nice.

Walking foot + Compound feed . . . its a winner !!! :)
 

tpenfield

Moderator
Staff member
Joined
Jul 18, 2011
Messages
18,040
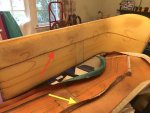
I keep finding 'surprises' as I remove the old seat covers. This is the curved backrest to the port settee.
.
IMG_3473.JPG
.
It has an 'anchor' (yellow arrow) that goes through the middle of the seat foam (red arrow), much like the seat bases have. I was a bit surprised to find an anchoring strip on a seat back. Since the backrest is fairly thin, I figure that has something to do with why it is there.

My challenge will not only be sewing the anchoring material to the new panel, but also to staple the anchor strip to the backing.
 

tpenfield

Moderator
Staff member
Joined
Jul 18, 2011
Messages
18,040
Quick Update . . .

I am waiting to get a couple of color samples from a place that has the Formula original colors (vinyl) to see that/if they match the original covers. Then it will be ordering time for the material and related supplies.

I'll be doing canvas work as well. I have a mooring cover to re-make and about 8 zippers to replace on the bimini and its storage cover.

I think I'll do the canvas work first to get some time on the sewing machine before I dig into the vinyl.

Also have to buy some 1/2" exterior plywood to re-build the seat bases . . . probably going to be about 3 4'x8' sheets worth of plywood.

I was going to soak the cut plywood pieces with a wood sealer, or perhaps just a thinned polyurethane to keep the moisture out.

Thoughts / Recommendations on a wood sealer that I can get locally (HD or Lowes) :noidea:

T.I.A for any thoughts on a wood sealer.
 

Scott Danforth

Grumpy Vintage Moderator still playing with boats
Staff member
Joined
Jul 23, 2011
Messages
49,574
A favorite on iBoats is Woodonglass old timers wood formula

there is always the WEST system epoxy too.
 

tpenfield

Moderator
Staff member
Joined
Jul 18, 2011
Messages
18,040
OTWS - is 2 pts Mineral Spirits + 1 pt Linseed oil + 1 pt polyurethane (right?)

Does it solidify/dry or remain tacky for a period of time? Also, I will need to apply some upholstery adhesive to it (like contact cement or 3M 77) in order to hold the foam in place. Is it know to work OK with adhesives applied to the treated surface?
 
Top