Thought I'd show off my new build

Efini Motorsport

Petty Officer 2nd Class
Joined
Feb 21, 2018
Messages
108
I've got an HGE manifold on there now and ordered one Sierra 3" riser to see what I can do. I've got a set of elbows I can cut down if needed tor I'll order a heavy wall aluminum pipe. I'm going to use reinforced silicone couplers as they'll hold up a lot better than rubber, I can get them with different sizes on each end if needed, and they're blue. One of our customers is a kellog marine dealer so I can order whatever I need at cost. If it doesn't fit return shipping is only a few bucks. Most online places are ridiculously expensive if I need to return parts. Progress will slow down but it's not going to stop.
 

Lou C

Supreme Mariner
Joined
Nov 10, 2002
Messages
11,872
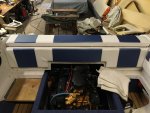
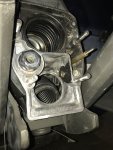
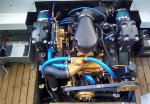
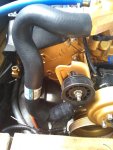
The 90* Volvo style 4"-->3.5" adapters were specially designed for the Vortec engines to prevent reversion where the vacuum in the exhaust system can pull water up the exhaust. This and a pair of check valves that screw into the exhaust elbows to allow air in (but not out) eliminated the exhaust reversion issues with the Vortec 4.3s. You might want to go this way even though it will cost more to protect that nice new engine! If you look at the older engines pre vortec they had the same manifolds and elbows but because reversion was not an issue, they did not have these 90* adapters, they used ones just like on the V8 models with a gentle (not sharp) down-turn to them. When the Vortecs came out they had to change the exhaust due to the reversion issue. If you still have the rubber flappers in the Y pipe you would not need the check valves for the exhaust elbows, Volvo added these because they got rid of the flappers. OMC kept the flappers till the end of their production (1998) but Volvo got rid of the flappers in '99 and added the check valves to compensate, they may be a better solution actually.
late model OMC 4.3 V6 exhaust, no check valves, flappers in the Y pipe....
http://www.crowleymarine.com/johnson-evinrude/parts/56844.cfm?mdl=LJ9E1S

late model Volvo Penta 4.3 exhaust, check valves, no flappers in Y pipe....
http://www.volvopentastore.com/Exha...on_id.199128326--store_id.366--view_id.791178

The manifolds and elbows are all the same basically, as are the 90* adapter pieces and hoses, the only difference is the check valves and flappers. I was able to get all the Volvo parts and did not need the check valves because this is a pre-vortec engine and I still have the flappers in the Y pipe.

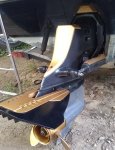
Sounds like you're trying to make Merc parts work. I thought of this but while it might have been a bit cheaper, the Volvo stuff fit perfect like factory. The issue was adapting the 4" Merc elbow outlets to the 3.5" OMC Y pipe. The new exhaust also runs nice n cool, cooler than the bat wings because the cooling ports are much bigger.
 
Last edited:

Efini Motorsport

Petty Officer 2nd Class
Joined
Feb 21, 2018
Messages
108
I'm only using the merc stuff because it is all I've been able to find that MIGHT work. I can get volvo stuff for much cheaper but I haven't been able to find the right info to cross reference. I do still have the flappers in the y-pipe and will be using 90 degree elbows. To adapt from 4" to 3.5" I'll be using silicone adapter hoses as it's much cheaper to get those and and an elbow that's all one size. Those volvo elbows look like they may fix my clearance issue between the elbow and the power steering hose fitting though. I just got a Sierra brand riser that is much more compact than and thing else I've been able to find and it has two sharp bends, one 180 and one 90. It is also much shorter in height and length than the merc or volvo parts. I'm trying to keep everything as low as possible to keep the engine cover lower. I'm modifying the shifter and throttle bracket to drop them down a few inches too.
 

Lou C

Supreme Mariner
Joined
Nov 10, 2002
Messages
11,872
Keep in mind that when those boats were still being built, what they came with from OMC with the 4.3 was identical to the Volvo stuff. That's why mine fit perfect with no foolin' around or fabbing. The late style OMC center riser manifolds and elbows are identical to what Volvo used, and they both used the same exact parts except for the flapper/check valve issue in the joint venture era (1994-1998). Same part #s same parts. So you know that they will fit, any OMC 4.3 powered boat after 1990 came with them after they quit using the bat wings. Which by the way I also had 3 sets on my engine and because I was changing them every 5/7 seasons (salt water) I never had a water intrusion issue.

All you need is the OMC/Volvo Barr marine V6 exhaust kit, the Volvo 90* 4"--3.5" adapters and the hoses which fit perfect (and are labeled to fit on a specific way to prevent leaks)….
 

Efini Motorsport

Petty Officer 2nd Class
Joined
Feb 21, 2018
Messages
108
It's been a while so I want to add some updates. Boat still isn't in the water and short of a miracle I doubt it will be this year. Round 2 of the exhaust will be in tomorrow. The first riser I bought was too tall, good thing I only paid $50 for it. I'll know tomorrow if I'll be able to use the manifold I bought or not. It's not all bad though. I was out on a job for a customer to pattern for his boat cushions today and saw two 4.3 Merc engines sitting in his garage. I asked about them and he said they were blown and just let him know when I wanted to pick them up. Both are vortec motors, one carb'd one TBI. I'm going to pick them up in the next few days. Worst case I'll have a few extra starters and alternators but best case I can use the merc front accessory setup with the alternator, ps pump, tensioner and thermostat housing. Aside form figuring out my exhaust I've been stumped on how to mount the alternator to the power steering (and used to be) ac bracket. I would have to weld brackets on and figure out a tensioner. If the merc setup works it solves all those problems at once. The last issue is getting a shift interrupt to work. I'm going to see if I can use a hybrid merc/omc setup but need to wait to get all the parts. In the mean time I've got some other small stuff done. Covered a few more panels, removed some of the stripes and stickers and started wet sanding and buffing the hull to put the new ones on. I guess on the plus side I'll have plenty of time to do everything just right for next season. I'll have some more pics this weekend. Cosmetically it's starting to look real nice.
 

Efini Motorsport

Petty Officer 2nd Class
Joined
Feb 21, 2018
Messages
108
Finally got a few pics. The merc stuff I picked up worked perfectly and solved about 5 fitment problems I was trying to deal with. Got everything blasted down repainted and installed and will have more pics this weekend. I'm lso picking up the new exhaust manifold tomorrow so fingers crossed those issues will be solved too. Tonight I finally built the upper engine cover and may get it covered this weekend. I need to install it to fit the rest of the seats then pull it back out to finish the engine stuff. I had to rebuild a small part of the outdrive where the shift linkage goes through the housing. It's all smoothed out and primed now, hoping to paint the gimbal housing and outdrive this weekend or next so I can reinstall it for the last time. Had some four legged help last weekend.
 

Attachments

  • photo298785.jpg
    photo298785.jpg
    782.9 KB · Views: 0
  • photo298786.jpg
    photo298786.jpg
    839.9 KB · Views: 0
  • photo298787.jpg
    photo298787.jpg
    766.2 KB · Views: 0

Efini Motorsport

Petty Officer 2nd Class
Joined
Feb 21, 2018
Messages
108
Holy crap was it a busy summer. No chance of making it in the water this year but I did finally get more work done on the boat. I'll be reinstalling the out drive this weekend as I think I finally figure out my engine alignment issue. It will be on just in time to cover it for the winter. either over the winter or early next spring I'll finish the last of the to do list. It's not near as long as it was. I still need to:
Get the computer tuned
Plumb hard lines from fuel pump to filter and a return
I'm going to do some rewiring for the fuse blocks and switch panels to clean them up
Add the LED lighting
Redo the gauge panel to add a 9" android touch screen and finish the stereo system
Cut and cover new cabin cushions
Hook up trim tabs
Lay down foam flooring over fuel tank cover
Compound and wax hull and remove stripes
Put on new Four Winns stickers and boat name
Here's some pics from the work last weekend. I've only got two cushions left to sew up and cover.
 

Attachments

  • photo302234.jpg
    photo302234.jpg
    727.9 KB · Views: 0
  • photo302235.jpg
    photo302235.jpg
    1.2 MB · Views: 0
  • photo302236.jpg
    photo302236.jpg
    1.3 MB · Views: 0
  • photo302237.jpg
    photo302237.jpg
    1.1 MB · Views: 0
  • photo302238.jpg
    photo302238.jpg
    1.5 MB · Views: 0

Efini Motorsport

Petty Officer 2nd Class
Joined
Feb 21, 2018
Messages
108
Well I'm back at it again and determined to be in this year. I'm pretty damn close already. A few weekends ago I sent the computer out to get tuned. I sent it out in the morning and that afternoon put the new starter in. I cranked it over (FINALLY) and had a horrible clunk when it was cranking. Pulled the drive and still had the clunk. Pulled the engine back out of the boat and pulled the oil pan, checked bearing, mic'd the crank, checked pistons, everything I could think of and couldn't find the noise. It only clunked with the plug in when it was making compression. After 8 hours and being pretty pissed off I couldn't find the source of the noise I happened to lean against the flywheel to pick up a wrench. Wouldn't you know it the flywheel was loose. It turned out the coupler was bottoming out on the crank snout before it tightened against the flywheel. I shimmed between the coupler and flywheel tightened it all up and no more knock. Cost me $2.50 to fix it then I decided to spen about another $100 to change out all the engine hardware to stainless. You know, since it was out and all. It did give me a chance to run the ducting for the vent fan, hook up the trim tabs, clean up some wiring and clean out the engine compartment. As soon as I can get my buddy back over here with the tow truck I can put the engine back in. I got most of the new silicone hoses for the cooling and exhaust system, computer is back, alternator is figured out, cockpit LEDs are run, and new gauge panel is mostly done. Once the engine is back in I can get the drive on and test run the motor. I'm tired of not getting the boat in last year. This year I may actually beat him in though. On the plus plus side I have officially "'Went Overboard". Finally got the boat name put on as well as the new stripes and Four Winns decals.The parts I've started buffing out look great. Still a ways to go on that too.Click image for larger version  Name:	IMG_20190601_120846270 crop.jpg Views:	1 Size:	489.8 KB ID:	10750162Click image for larger version  Name:	IMG_20190601_120855320 crop.jpg Views:	1 Size:	709.6 KB ID:	10750163
 
Last edited by a moderator:

Efini Motorsport

Petty Officer 2nd Class
Joined
Feb 21, 2018
Messages
108
It's getting there. The engine is back in and with a little luck I'll have it started for the first time this weekend. I've got the last of the parts and a free weekend. I should have some good news and a ton of pics this weekend
 

Efini Motorsport

Petty Officer 2nd Class
Joined
Feb 21, 2018
Messages
108
IT"S ALIVE!!!! After two full days of work Went Overboard lives. After a slight hiccup of no spark I got the engine fired up and running and everything seems to run smooth. I ran it for a few minutes until it started to come up to temp. I don't have the lower exhaust couplers in place, they'll be in later this week. The last big thing (I think) is getting the shifter and shift interrupt sorted out. The shift cable needs to be adjusted and I'm making my own ESA to work with the computer. Aside from that I've got to put the interior back in as well as the rest of the teak foam flooring. The new helm/gauges/radio should be installed on Thursday. Just got to weld the brackets for the radio on. I'm using a double DIN Android head unit for radio, navigation, OBD interface, etc. There's still a long list of things to finish but most of them will be quick to cross off. Here's some more pics. .
IMG_20190614_213300209.jpg
 

Attachments

  • IMG_20190614_213300209.jpg
    IMG_20190614_213300209.jpg
    795.6 KB · Views: 0
  • IMG_20190615_183356835.jpg
    IMG_20190615_183356835.jpg
    803 KB · Views: 0
  • IMG_20190615_182555730_HDR.jpg
    IMG_20190615_182555730_HDR.jpg
    1 MB · Views: 0
  • IMG_20190615_182611317_HDR.jpg
    IMG_20190615_182611317_HDR.jpg
    977.3 KB · Views: 0
  • IMG_20190615_183341021.jpg
    IMG_20190615_183341021.jpg
    1.1 MB · Views: 0
  • IMG_20190615_123216116.jpg
    IMG_20190615_123216116.jpg
    1.6 MB · Views: 0
  • IMG_20190615_123216116.jpg
    IMG_20190615_123216116.jpg
    1.6 MB · Views: 0

Efini Motorsport

Petty Officer 2nd Class
Joined
Feb 21, 2018
Messages
108
Got one of the last two big things done tonight. The dash panel gauges and radio is all ready to get wired into the boat. IMG_20190618_201005527_HDR.jpgIMG_20190618_212242272.jpg
 

Attachments

  • IMG_20190618_211815956.jpg
    IMG_20190618_211815956.jpg
    847.3 KB · Views: 0

Efini Motorsport

Petty Officer 2nd Class
Joined
Feb 21, 2018
Messages
108
Next step is the shift cable adjust and interrupt. After that it's just put a few things back together and button up a few last little details.
 

Efini Motorsport

Petty Officer 2nd Class
Joined
Feb 21, 2018
Messages
108
My boss does the sewing, i just get everything laid out for him. If it wasn't for the fact that i work at an upholstery shop and we do a lot of work for other Marina's i never would have been able to do all i did. A lot of the parts I've used were free or at least cheaper because of it
 
Top