Stringer repair

bjf66

Chief Petty Officer
Joined
Dec 6, 2016
Messages
406
No Title

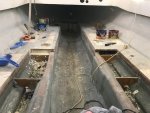
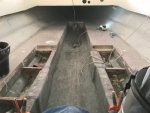
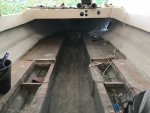
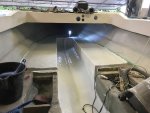
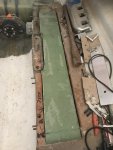
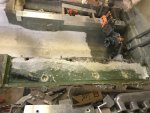
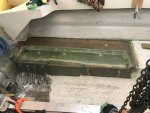
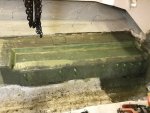
- ripped out the ballast tank that would of been leaked as previous owner put a skim of lamination which had delaminated, so ground that out
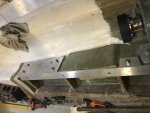
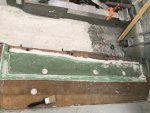
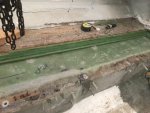
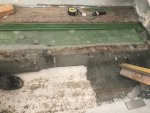
- Made a box up between stringers up front, and foamed that, foamed the rest of hull except where I need to make engine mounts left this open for now
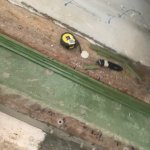
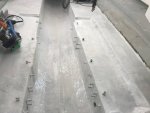
- ground all floor decking with 40 grit grinding wheel, in weekend to take off old coating
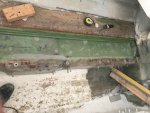
- cleaned and laminated new front deck with 600 CSM, and 600 grm fabric, looks cleaner now

- looking like can flowcote floor and front deck this week
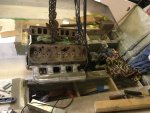
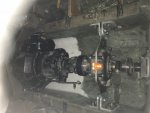
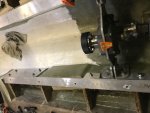
- purchased some 80x80x10mm aluminium angle to make the mounts for the parrallel drop box drive
- made up a 69.8mm Dia x 3.8mm washer to fit into spigot between both female companion flanges in between surface drive and parrallel drop box
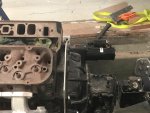
- then can modify the aluminium engine mid-plate
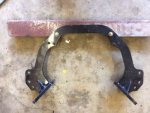
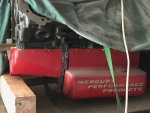
- picked up mercruiser aluminium engine mount which if it works is going to save a lot of time fabricating mounts up
 

Attachments

  • photo279329.jpg
    photo279329.jpg
    39.8 KB · Views: 1
  • photo279330.jpg
    photo279330.jpg
    98 KB · Views: 1
  • photo279331.jpg
    photo279331.jpg
    81.9 KB · Views: 1
  • photo279332.jpg
    photo279332.jpg
    84.2 KB · Views: 1

bjf66

Chief Petty Officer
Joined
Dec 6, 2016
Messages
406
No Title

put down the first coat of flowcote, decided to go with boring white
was a little surprised how slippery it was
ended up using roller top apply
Needs another coats, but certainly tidies up the floor/deck
will need to put a stipple finish with large nap roller or sprinkle something over the flowcote to give deck some texture

any ideas???
 

Attachments

  • photo279478.jpg
    photo279478.jpg
    81 KB · Views: 0

Baylinerchuck

Commander
Joined
Jul 29, 2016
Messages
2,726
Pulverized walnut shells works really nice as an anti slip medium. I?ve seen it mixed with gelcoat.
 

bjf66

Chief Petty Officer
Joined
Dec 6, 2016
Messages
406
No Title

engine mount arrived this afternoon, fitted good under the Mercury alum. sump nicely measures 22" so will have to trim the side of the mount up so it fits within the 21" stringer, but all good
 

Attachments

  • photo279495.jpg
    photo279495.jpg
    108.3 KB · Views: 0

bjf66

Chief Petty Officer
Joined
Dec 6, 2016
Messages
406
No Title

fabricating engine mounts from 8-10mm aluminium plate
set heads on motor so I could trim the 6mm alum mid-plate to fabricate the mid plate mounts, and ensure plenty of clearance around water cooled manifolds
Need to organise the fabricated plates to be welded
 

Attachments

  • photo280828.jpg
    photo280828.jpg
    88.6 KB · Views: 0
  • photo280829.jpg
    photo280829.jpg
    95.5 KB · Views: 0

bjf66

Chief Petty Officer
Joined
Dec 6, 2016
Messages
406
No Title

- have the rear mounting plates for drop box completed, had to epoxy the stainless 12mm threaded rod into stringer
- CCW starter turned up today, decided on smaller light weight reduction starter (9lbs)
- looking at the flywheels and whether I should run aluminium (12lb) or steel (23lb)
- waiting on the extruded 100x100x10mm alum angle so can finish the front mounts and weld the centre belhousing mount
 

Attachments

  • photo281160.jpg
    photo281160.jpg
    91.3 KB · Views: 0
  • photo281161.jpg
    photo281161.jpg
    77.7 KB · Views: 0

bjf66

Chief Petty Officer
Joined
Dec 6, 2016
Messages
406
No Title

ADVISE NEEDED

Need some advise on attaching the deck to hull
I can see this has been riveted in places,

whats the best and preferred method of attachment?
Or do you glass from inside, as want to be sure its water tight and wont leak?
 

Attachments

  • photo281162.jpg
    photo281162.jpg
    65.5 KB · Views: 0

Scott Danforth

Grumpy Vintage Moderator still playing with boats
Staff member
Joined
Jul 23, 2011
Messages
47,589
regarding the flywheel. aluminum should be for racing only. you can loose low-speed manors around the dock with aluminum. also, the ring gears can come loose on the aluminum flywheels, usually with catastrophic results

regarding the cap to hull. 3M 4200 and screws (or rivets) are all that is needed. the screws hold in the rub-rail channel as well
 

bjf66

Chief Petty Officer
Joined
Dec 6, 2016
Messages
406
Scott
thanks for quick response
So you just load the 4200 into the joint and the rivets
 

Scott Danforth

Grumpy Vintage Moderator still playing with boats
Staff member
Joined
Jul 23, 2011
Messages
47,589
a caulk tube of it, hit the edge of the hull, lower the cap onto the boat (over the edge you just put a bead on), squeeze more in the gap, screw it together (mounting the rub rail channel as you go), wipe-off the excess that oozes out. install rub rail into the channel
 

bjf66

Chief Petty Officer
Joined
Dec 6, 2016
Messages
406
No Title

Need to finish trailer, and refit bunks

What is everyone using for the Bunks?
 

Attachments

  • photo281263.JPG
    photo281263.JPG
    124.8 KB · Views: 0
  • photo281264.JPG
    photo281264.JPG
    128.3 KB · Views: 0

bjf66

Chief Petty Officer
Joined
Dec 6, 2016
Messages
406
No Title

been travelling for few weeks, so glad to get into boat in weekend
started working on port side stringer
measured up and cut stringer rails for engine, decided to reinforce where engine will be bolted
Used 100x100x10mm, and will weld the 100mmx10mm plate to the angle
Have used 12mm stainless steel threaded rod, and epoxied inside stringer with 600oz fabric which will hold washer/nut,
used syringe to inject epoxy into hole before putting thread rod through
Will use 4* 10mm stainless bolts positioned vertically, which will hold angle plate onto stringer. Will epoxy into hole 3*10mm nuts into each hole

managed to pick up 2* 7.4 litre Chev Mercruiser heater exchangers for the price of one, managed to get the 2* sea water pumps as well
should be in position to glue the port side floor down tomorrow and then fill cavity with foam, then add 2oz CSM, 600 grm fabric *2 layers should seal floor
 

Attachments

  • photo282112.jpg
    photo282112.jpg
    83 KB · Views: 0
  • photo282113.jpg
    photo282113.jpg
    81.6 KB · Views: 0

bjf66

Chief Petty Officer
Joined
Dec 6, 2016
Messages
406
No Title

Glued the port side 13mm Gurit floor down which was glassed previously with 2 layers of 2oz CSM and 17oz biaxle cloth
glued 3 layers of the gurit strips to the floor, these were stepped back, and then latter ground down to a nice smooth radius fillet
filled the gaps with PB
cut the 50mm holes for pouring in foam (GP 330)
cleaned up the floor
glassed with 2oz and 17oz biaxle cloth
Looks okay
Port side done

have to go for a week to Korea, not looking forward to that it will be - 12 C

Will Attach the starboard side over Christmas
Then finish flocote floor with 2 coats
 

Attachments

  • photo282264.jpg
    photo282264.jpg
    68.6 KB · Views: 0
  • photo282265.jpg
    photo282265.jpg
    104.2 KB · Views: 0
  • photo282266.jpg
    photo282266.jpg
    88.2 KB · Views: 0
  • photo282267.jpg
    photo282267.jpg
    104.7 KB · Views: 0

bjf66

Chief Petty Officer
Joined
Dec 6, 2016
Messages
406
picked up nice Gil stainless steel sea strainer today, so looks like I have now the key components for the internal cooling system
 

bjf66

Chief Petty Officer
Joined
Dec 6, 2016
Messages
406
started on starboard floor today
ground floor
glued gurit floor piece in (this had 2oz + 17oz multi weave cloth * 2 layers on each side)
foamed under floor in cavities
filled gaps with PB
cut out the 2oz and 17 oz multi weave cloth that will be glassed over floor new/old and down stringer tomorrow
 

Attachments

  • photo283124.jpg
    photo283124.jpg
    108.5 KB · Views: 0
  • photo283125.jpg
    photo283125.jpg
    96.4 KB · Views: 0
  • photo283126.jpg
    photo283126.jpg
    101.1 KB · Views: 0
  • photo283127.jpg
    photo283127.jpg
    97.2 KB · Views: 0

bjf66

Chief Petty Officer
Joined
Dec 6, 2016
Messages
406
glassed starboard floor
light sanding and then flocote in weekend
 

Attachments

  • photo283172.jpg
    photo283172.jpg
    99.4 KB · Views: 0

bjf66

Chief Petty Officer
Joined
Dec 6, 2016
Messages
406
all set to do the flocote today but 42 C, so ground floors and ready for tomorrow for coating
 

bjf66

Chief Petty Officer
Joined
Dec 6, 2016
Messages
406
nice and cool today 19C
flocoted the starboard floor
Now total floor has one coat
certainly tidies things up
glad majority of cutting, glassing and sanding is behind me now
happy to move on to the engineering side
 

Attachments

  • photo283222.jpg
    photo283222.jpg
    74 KB · Views: 0
Top