Stringer encapsulation.( Air pockets.)

Lectro88

Petty Officer 1st Class
Joined
Oct 24, 2020
Messages
302
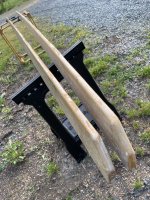
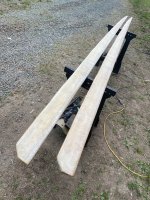
This is the set of stringers that I worked on over the winter that you all may remember.
I covered them with several layers of epoxy first of all.
Then I started adding I forgot 6-8 oz cloth.
Then I added csm to really hold a thick layer of epoxy.
I did the tops and sides leaving the bottom untouched as I still had some hull contour to match or get a little closer.
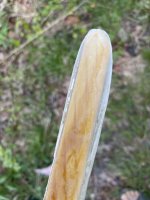
The bottom corners are not squared but slightly sanded round.
Anyway the cloth kept slipping back up creating pockets.
I have fought this 3-4 days.
The cloth 3-1/2” widths.
I’ve tried rolling it. After epoxy is tacky.
I’ve tried working it or milking it back down with rubber gloves.
On the 2nd stringer. I epoxied and rolled the cloth on a table fully saturating and did all the above methods to no avail.
I’m thinking of getting my round router out or sanding these round.
But there’s so many layers of epoxy not sure if it’s worth the trouble.
And I’ve dawn washed these boards and sanded the snags smooth. For a 2nd layer.
The reason for this is to keep water away from the wood and not depend on the tabbing.
To create a really strong barrier. And I mostly have succeeded.
But these pockets are not to my approval.
I have spent 4-6 months on these, not constantly, but 20-30 hours easy.


What would you do.
Let it go or sand it and get it right.
Or just add another layer and call it done.
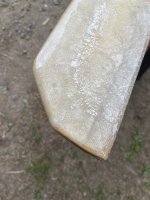
F87EDA2E-7970-419E-8506-94906591E3C9.jpeg

3AC7E505-B887-4530-B361-7DF858339DF4.jpeg

6B8BC7EF-BD1B-4849-8503-B168636D4167.jpeg

AFCC801F-65D9-4405-8DF0-74FA05BCF0CF.jpeg

F5496BAC-AEFC-4664-B847-18F9129C640E.jpeg

C7E6FD48-BCA6-4414-8043-B1FAF42AF214.jpeg

Thanks in advance
 
Last edited:

fatlenny

Petty Officer 3rd Class
Joined
Oct 8, 2021
Messages
85
keep in mind that I'm a professional jack of no trades, but in my opinion, what you have done will make the parts last 40 years or more. The resin you soaked into the wood prior to adding the fiberglass mat is way more than what they did at the factory of my project boat better than 50 years ago and my main stringer looks like it may have been "ok" 5 years ago. again I am no pro, but if the air pockets really are a problem why cant you try drilling a small hole in the fiberglass mat and fill any voids with resin via a syringe?
 

Lectro88

Petty Officer 1st Class
Joined
Oct 24, 2020
Messages
302
keep in mind that I'm a professional jack of no trades, but in my opinion, what you have done will make the parts last 40 years or more. The resin you soaked into the wood prior to adding the fiberglass mat is way more than what they did at the factory of my project boat better than 50 years ago and my main stringer looks like it may have been "ok" 5 years ago. again I am no pro, but if the air pockets really are a problem why cant you try drilling a small hole in the fiberglass mat and fill any voids with resin via a syringe?
I tried the syringe thing back in the winter.
Great idea… but ultimate FAIL
AND so many pockets it would take days and again in this application it just doesn’t work.

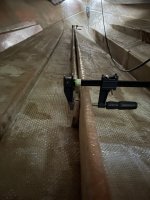
The original stringer you see that my new is clamped to lasted 52 years.
And it really isn’t that bad now.

Being a perfectionist Sucks.
 

froggy1150

Master Chief Petty Officer
Joined
Nov 3, 2017
Messages
803
Pockets can hold water. Try this on a spot and see if you like how it turns out. I got some bags of 1/4" loose chopped glass to add to my peanut butter for strength. Grind out pocket. Mix up some resin and chopped glass and put on spot.
 

todhunter

Canoeist
Joined
Sep 15, 2020
Messages
1,244
I'm not a fan of those large bubbles on the edge of the board. I'd probably sand/grind those off and re-do those small areas, personally. Or, Froggy's suggestion may work too.

Pre-wet your glass before laying it on the stringer, and pre-wet the stringer surface. When you are laying strips of glass over the edge of the board and wrapping around to the sides, start by working it down on the edge of the board first (in the center of the glass strip, starting at one end) and once adhered, gradually work the glass down to each face of the stringer, alternating sides. Then, start working down the length of the stringer. This should ensure you are pushing all air towards the edge of the glass, not back towards the center. If you're using a brush, cut the bristles straight across before use. Then you can use the brush to push/pull the glass in areas and make it tight, thus squeezing out the air.
 

kcassells

Fleet Admiral
Joined
Oct 16, 2012
Messages
8,600
The issues I found myself with solid lumbers is that are not truly cured. The glass heats up to some degree and the woods gas off. This can happen repeatedly. Very frustrating.
I would suggest patch repairs and babysit it while curing to work the air out if it starts. Other things you can do on a curve is beat/shape {hammer, pc. of wood} dry glass prior to wetting out then glass.
I agree with you and Todd.
I have cut the bristles to make a point to poke out air. I've used it also after it dried hard for the same purpose.
 

Lectro88

Petty Officer 1st Class
Joined
Oct 24, 2020
Messages
302
I'm not a fan of those large bubbles on the edge of the board. I'd probably sand/grind those off and re-do those small areas, personally. Or, Froggy's suggestion may work too.

Pre-wet your glass before laying it on the stringer, and pre-wet the stringer surface. When you are laying strips of glass over the edge of the board and wrapping around to the sides, start by working it down on the edge of the board first (in the center of the glass strip, starting at one end) and once adhered, gradually work the glass down to each face of the stringer, alternating sides. Then, start working down the length of the stringer. This should ensure you are pushing all air towards the edge of the glass, not back towards the center. If you're using a brush, cut the bristles straight across before use. Then you can use the brush to push/pull the glass in areas and make it tight, thus squeezing out the air.
I'm not a fan of any of the bubbles truthfully.
Todd I did all the techniques you listed and more.
It seems to me that I didn't have enough radius and the cloth was going to have a "memory" or minimum radius that it was follow.
And again I worked and rubbed, and rolled and dabbed and pushed back down with rubber glove on even after the epoxy started curing or was really sticky and THAT cloth just milked, crawled reformed how it wanted to.
And I reapplied epoxy and followed the previous steps to no avail.

I'm just not going to let this beat me.
100 hours or not...
I think I will round the bottom like I did the top. a 1/2' radius.
I left the bottom flat because it was or is to bed to the hull.
But I'll fill that in too for tabbing after I conquer this battle.

It will be tomorrow before I do this.
So you have time to stop me if my plan is a blunder.
That cloth just doesn't want to hold or follow that semi square corner.

Thanks for everyone's replies
 

Lectro88

Petty Officer 1st Class
Joined
Oct 24, 2020
Messages
302
The issues I found myself with solid lumbers is that are not truly cured. The glass heats up to some degree and the woods gas off. This can happen repeatedly. Very frustrating.
I would suggest patch repairs and babysit it while curing to work the air out if it starts. Other things you can do on a curve is beat/shape {hammer, pc. of wood} dry glass prior to wetting out then glass.
I agree with you and Todd.
I have cut the bristles to make a point to poke out air. I've used it also after it dried hard for the same purpose.
This lumber has been in the basement on overhead racks just under the floor where the heat from the wood heater "stays warm" 80-90 * deg. with infared gun for 2 years and spent the winter curled up next to a wood stove/heater where I slathered epoxy over the winter months.
I don't know How it could have any moisture in it.
I covered some of this in another reply.(don't mean that ugly keyboard grammer)
I bristle poked, bubble buster rolled and squeegeed the air out again with a roller and my rubber gloves, milking the air out.
And tacky enough it should have stayed in place.
And I stuck with these boards 2 days on this. this wasn't a slap it on and let it be.
the surface was sealed with epoxy, 2 coats, washed the day before, lighty scuffed or 120 grit. knocked the slick gloss/shine off.
Pre applied epoxy to the board,. layed cloth on table covered it with epoxy rolled it in til transparent and transferred that to the pretreated epoxy board.
And hovered over it working and working and working it.
Almost like the cloth was starched... but its not.
I chose this cloth because it was soft and should be easy to work with,.
Out of all my collection of fiberglass., And I could supply some dealers with glass... lol. no shortage here.
I have some 4 oz That might do better. But I figured it was too fine., maybe not.
I'm not going to let this beat me., but I am bitting my tongue to not use (&$#@) these kinds of words.

I could understand this if it was my first attempt.,
but I didn't start playing with fiberglass and epoxy yesterday.
very frustrating to babysit it and get this kind of result.
 
Last edited:

Lectro88

Petty Officer 1st Class
Joined
Oct 24, 2020
Messages
302
Maybe in addition to the lack of a radius.
The 3-1/2” widths of cloth that short distance and back to back turns is not enough area to “hold” itself in place so it crawls.
If the cloth went up the side and even better wrapped around the top, I bet I wouldn’t be having such trouble.
Another leaning curve or CIRCLE.
 

kcassells

Fleet Admiral
Joined
Oct 16, 2012
Messages
8,600
So BTW if it's the bottom of the wood that you are bedding to the hull it doesn't need to be glassed. Just very well wetted out. If your glassing fails and bedding fails when you tab them in then you way more problems in regards to fab and install.
This isn't even a conversation about overkill or I want to do it this way. It's simply not required. The tops and sides on the other hand are a complete other conversation. Sorry I missed your comment earlier.
Ask the moderators to keep your posts to 1 thread instead of multiple. Starts to get silly to follow. :]
 

Lectro88

Petty Officer 1st Class
Joined
Oct 24, 2020
Messages
302
So BTW
Sorry I missed your comment earlier.
Ask the moderators to keep your posts to 1 thread instead of multiple. Starts to get silly to follow. :]

Not a big deal.

I started this specific topic hoping to get more traffic.
As a lot are not interested in flipping through 5 pages of a restoration covering all topics.

Thank you
As always.
 

todhunter

Canoeist
Joined
Sep 15, 2020
Messages
1,244
On my stringers, the tightest radius i could do on an outside corner with 1708 was 1/4". 3/8" worked better / was easier. 1/8" gave me voids. The length of the cloth going down the side of the stringers beyond the radius plays a role too. Too short and the part bending around the edges will peel the flat glass up off the side of the stringer. I found this out the hard way when capping stringers in the boat.
 

Lectro88

Petty Officer 1st Class
Joined
Oct 24, 2020
Messages
302
On my stringers, the tightest radius i could do on an outside corner with 1708 was 1/4". 3/8" worked better / was easier. 1/8" gave me voids. The length of the cloth going down the side of the stringers beyond the radius plays a role too. Too short and the part bending around the edges will peel the flat glass up off the side of the stringer. I found this out the hard way when capping stringers in the boat.
10/4

Thanks
 

Lectro88

Petty Officer 1st Class
Joined
Oct 24, 2020
Messages
302
Another Question.

Rather than start a different thread, but along the same lines..
of epoxy coating and Moisture....
I am coating plywood sheets currently and the weather has nose dived... last 3-4 days.
I have 2 raw or untreated sheets(BCX) thats been out on the stands waiting for this overcast and rain to pass.
these sheets have not been "rained" on but covered snd I fear sucking up moisture like a sponge.
Its 63F. and 86% humidity, may make 75 but dreary overcast.

Should I make sure they Bake in 2-3 days of sun at 80-90 degree temps to really dry out before I proceed or is it ok to slather the epoxy on when there's a break and no risk of water falling.
I don't want my flooring rotting under a coat of epoxy if that's a thing.

Thanks in advance.
sorry for the newB type question but this is some new avenues for me.
 
Last edited:

JASinIL2006

Vice Admiral
Joined
Feb 10, 2012
Messages
5,548
I personally would want to dry them in the sun for several days before applying epoxy or you risk encapsulating any moisture inside the wood.
 

Lectro88

Petty Officer 1st Class
Joined
Oct 24, 2020
Messages
302
I personally would want to dry them in the sun for several days before applying epoxy or you risk encapsulating any moisture inside the wood.
That’s kind of what I was thinking.
And I appreciate your reply.

Thank you.
 
Top