Starting restoration on '73 18' SS

vintage2

Seaman Apprentice
Joined
Apr 4, 2012
Messages
32
Hi everyone,

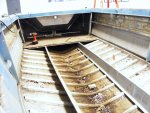
Well I have started the teardown on my spring purchase. Have been reading the forum for some time but have not posted anything since spring last year.

A few questions. My floor was 1/2" but since I am 250 Lbs thought 3/4" CDX replacement encased in epoxy would be better. Am I right? What about rivet holes lining up on everything? Does it matter? I am also timid about pulling the transom. How much trouble is it to remove after all those screws have been removed. Does the sealant make it tuff?

If weather improves today as forcast I might try water testing it either in my driveway by filling with a hose or taking it to the local creek (1 mile away). Anything I should look for other than leaks?

I'll post more pics as the project progresses.
 

Attachments

  • DSCF3105.jpg
    DSCF3105.jpg
    143.9 KB · Views: 0
  • DSCF3108.jpg
    DSCF3108.jpg
    141.9 KB · Views: 0
  • Starcraft Boat 034.jpg
    Starcraft Boat 034.jpg
    120.3 KB · Views: 0
  • Starcraft Boat 360.jpg
    Starcraft Boat 360.jpg
    91.4 KB · Views: 0
  • Starcraft Boat 365 - Copy.jpg
    Starcraft Boat 365 - Copy.jpg
    97.4 KB · Views: 0

dozerII

Admiral
Joined
Oct 25, 2009
Messages
6,527
Re: Starting restoration on '73 18' SS

Great boat Vintage, and weclome to the Starmada. :welcome: You will find that the outer edges of the consuls were a little lower than the gunwals. If you go with 3/4 ply you can raise them up flush with the gunwals , this will stop the water from the windshield running right into the boat. Once you have all the screws and bolts out of the transom they come out pretty eazy. You will also have to remove the corner caps, make a short cut in the aluminum gunwal top next to the rubrail so you can bend it up to get the transom out, don't be afraid of it it is an easy job.
 

GA_Boater

Honorary Moderator Emeritus
Joined
May 24, 2011
Messages
49,038
Re: Starting restoration on '73 18' SS

Good looking SS, Vintage. Good advice from Dozer. I don't know about the CDX but someone will come along on that. Welcome to the drydock and good first tin post with pics. It soothes the Starmada savage beast.
 

InMotion

Commander
Joined
Nov 3, 2011
Messages
2,080
Re: Starting restoration on '73 18' SS

Hey Vintage,

Nice project you have yourself there! In addition to what DII suggested, if you are templating your side panels from the originals, remember to adjust for the additional floor height... it will make a difference when you go to fit them back in OR if you make new ones from the old ones.

Nice to see it underway and some progress pics!

Jim.
 

jasoutside

Supreme Mariner
Joined
Dec 20, 2009
Messages
13,269
Re: Starting restoration on '73 18' SS

Just wanted to sign on to your project here and say welcome!
 

vintage2

Seaman Apprentice
Joined
Apr 4, 2012
Messages
32
Re: Starting restoration on '73 18' SS

Thanks for the suggestions guys. This forum has given me many ideas and the ones you added are great! Will post progress and more pics in near future.

Chuck
 

jetterbug

Petty Officer 2nd Class
Joined
Jul 12, 2011
Messages
133
Re: Starting restoration on '73 18' SS

Welcome! Been gone for awhile but back at it! Nice start!
 

STARCRAFT16SS

Petty Officer 1st Class
Joined
Mar 25, 2008
Messages
344
Re: Starting restoration on '73 18' SS

Sounds like someone has a plan to have their boat ready by boating season...
temps been around 0 to 10 degrees...
no boating fun here right now and no heated garage....:D
I did not worry about lining up the new rivets in the deck
with the old holes in the ribs...I did put extra/more rivets
than the original deck had...I tend to over-engineer things...
...when looking for leaks...look closely at the base of the bow.
.at the bottom of the V..where the aluminum comes together..
that's where my boat had a small leak...the old factory sealant
had a gap in it...I filled it in with JB Weld..but people here seem to prefer
Gluvit to seal the inside of their boats...I have never tried Gluvit
don't know which way is best...
 

Attachments

  • 2009 09 16 GARRETT AND JEFF FISHING G RESIZED.JPG
    2009 09 16 GARRETT AND JEFF FISHING G RESIZED.JPG
    80.5 KB · Views: 0
  • 2011 08 20 MY BOAT AT NIGHT A RESIZED 800X600.jpg
    2011 08 20 MY BOAT AT NIGHT A RESIZED 800X600.jpg
    41.8 KB · Views: 0
  • 2012 06 17 FATHERS DAY JEFFS BOAT S RESIZED.jpg
    2012 06 17 FATHERS DAY JEFFS BOAT S RESIZED.jpg
    115.3 KB · Views: 0

vintage2

Seaman Apprentice
Joined
Apr 4, 2012
Messages
32
Re: Starting restoration on '73 18' SS

Looks like the weather has put a temporary halt to my water test (snowing). On sweeping out the boat after floor removal I did find a couple of rather large screws through the hull just off the keel. I don't know why they are there except probably to stop a leak. I plan to remove them and weld the holes shut.

Chuck
 

GA_Boater

Honorary Moderator Emeritus
Joined
May 24, 2011
Messages
49,038
Re: Starting restoration on '73 18' SS

It seems that POs like to put screws in AL boats. Jasoutside had a bilge pump mounted and screwed right through the bottom on one of his. A PO used wood screws to seal old fish finder transducer holes on my transom. Since a wood screw has a smooth upper shank and nothing to bite on thin AL, he used about half a tube of sillycone to keep the screw in place. You might find more, vintage.
 

jasoutside

Supreme Mariner
Joined
Dec 20, 2009
Messages
13,269
Re: Starting restoration on '73 18' SS

P1040747.jpg
 

bunker108

Chief Petty Officer
Joined
Jun 26, 2011
Messages
482
Re: Starting restoration on '73 18' SS

I loved my 1973 18' SS. It was easy and alot of fun to work on. Good luck on your project. Looks like you candidate. I will check back in on this one!
 

vintage2

Seaman Apprentice
Joined
Apr 4, 2012
Messages
32
Re: Starting restoration on '73 18' SS

Boy, my screws aren't as bad as jasoutside's but they have to come out! The weather turned nice on Saturday (mid 50's & sunny) so I got the water test completed. No leaks except one between the transom and outboard mount board probably coming from the outboard mounting hole. Going to replace it all anyway. I hope to remove the transom in the next day or two. My garage isn't heated but I sparing use a turbo heater which does a nice job if you can stand the fumes. Have to be careful with paint and glue removers tho. Here's some new pics.
Starcraft Boat 013.JPGStarcraft Boat 009.JPGStarcraft Boat 011.JPG
 

Attachments

  • Starcraft Boat 001.JPG
    Starcraft Boat 001.JPG
    82 KB · Views: 0

InMotion

Commander
Joined
Nov 3, 2011
Messages
2,080
Re: Starting restoration on '73 18' SS

My garage isn't heated but I sparing use a turbo heater which does a nice job if you can stand the fumes. Have to be careful with paint and glue removers tho.

Ya... with pretty much anything that burns it will create a toxic cloud. I use an electric oil heater. It was 10F this morning and the garage is at 50C with the unit on Medium. I leave it on --- never turn it off and it costs about 45 bucks a month to heat. Safer and non toxic.... but just my thoughts there. Just be careful as you may/may not know with paint removers and fumes!!

Glad to see you are making some more progress there!!! Enjoy the warm weather while it lasts.

Jim
 

cj8mule

Senior Chief Petty Officer
Joined
Apr 7, 2012
Messages
660
Re: Starting restoration on '73 18' SS

Great looking SS Vintage!

A few questions. My floor was 1/2" but since I am 250 Lbs thought 3/4" CDX replacement encased in epoxy would be better. Am I right? What about rivet holes lining up on everything? Does it matter? I am also timid about pulling the transom. How much trouble is it to remove after all those screws have been removed. Does the sealant make it tuff?

I'm around 210 Lbs and would recommend using at least 5/8". I did my first SS floor with 1/2" birch and it will give a little. The 2nd SS got 5/8" and is very solid.

Even though you didn't find any leaking rivits, I'd recommend using something like Gluvit or Coat it to seal them up.

Have some fun and welcome to the Starmada!
 

vintage2

Seaman Apprentice
Joined
Apr 4, 2012
Messages
32
Re: Starting restoration on '73 18' SS

Well, after much trepidation I attacked my transom. What was I worried about? Just like you guys said the top pieces came right out and the bottom piece with a little coaxing from a small wrecking bar (and a block of wood) didn't take long. Thank heaven for battery powered drills and dremels. The screws only took a few minutes and stubborn bolts less than an hour! I am leaning toward the 5/8" floor to save weight but give support. Will definitely seal all rivets before putting floor back. I don't plan on removing the mid-line rub rail slot (Solid rivets) but am going to remove the gunwall rub rail and holder. Opinions please. Also, why the plate under the motor support plywood? Starcraft Boat 009.JPGStarcraft Boat 013.JPG
 

GA_Boater

Honorary Moderator Emeritus
Joined
May 24, 2011
Messages
49,038
Re: Starting restoration on '73 18' SS

Good job, vintage. not a hard one at all.

My theory about the ply under the motor claps - I think it's for minimizing scratches went the dealer mounts the motor. Most times they rot or delaminate, at least on the old tinnies we're working on. Some use an aluminum plate, some use a poly cutting board, some use new ply and some guys just skip it all together.

I used 5/8" for my flooring. No flex at all. Much more solid than the 1/2" I pulled out (well the good parts of 1/2").
 
Top