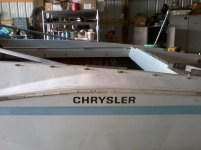
Rub Rail Restoration??

76SeaRay

Lieutenant Junior Grade
Joined
Aug 24, 2017
Messages
1,071
My rub rail is obviously tired after 45 years or so and I need to gelcoat the deck above the rub rail. So, I have been contemplating restoration approaches.

1) Try to recondition the current aluminum rail, find a new vinyl insert and just mask then gelcoat up to the edge of the rub rail.
2) Pull the existing rub rail off, recondition it, find a new vinyl insert, then gelcoat to the center of the rub rail line and reinstall the existing rail with new insert..
3) Buy new rub rail and gelcoat to the center line of the rub rail before putting the new rub rail on.

Now for the problem. My current rub rail runs all the way around the boat with no joints except at the back of the transom. That makes the current rail something in the neighborhood of 52 feet since this is a 22 foot boat. I don't find full length new rub rail anywhere near that length and if I did, there would be really no feasible way to ship it. I have found rub rail insert in 50 foot lengths but again runs short and would have to splice it (would have to buy two rolls and waste almost half of it).

Suggestion on a plan of action here? What do most people do in this situation? Is it common to use short lengths with joints? Any good way to recondition the existing aluminum rail?
 

alldodge

Moderator
Staff member
Joined
Mar 8, 2009
Messages
42,054
Would need to see what you have to give an informed opinion
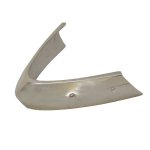
Could also get/make a nose piece, something like this
 

Attachments

  • unnamed.jpg
    unnamed.jpg
    18.3 KB · Views: 2

76SeaRay

Lieutenant Junior Grade
Joined
Aug 24, 2017
Messages
1,071
I will post a pic or two after I get home from work today. I do have a powder coater near me that has a curing oven that is 30 x 10 x 9 so could probably have the existing one blasted and powder coated in one piece. Although I had thought about splitting it at the nose and using something like the splice you show.

I also saw a set of led port and starboard running lights that could be used as a splice in the insert (spendy) as they mount on the rub rail. Maybe run the insert back about 3 to 4 feet back on each side of the bow and splice it with the lights. Use a full piece to run all the rest of the way around the back of the boat and up to the "running light splice". I would still waste a lot of insert.
 

Scott Danforth

Grumpy Vintage Moderator still playing with boats
Staff member
Joined
Jul 23, 2011
Messages
49,538
what I did on my 33 year old boat

pull vinyl out of rub rail. roll up into a bucket and soak with 303 protectant
pull aluminum extrusions off, sand and paint them with imron

gel the exterior

re-install aluminum extrusions and seal with 3M UV-4000
re-install vinyl
 

76SeaRay

Lieutenant Junior Grade
Joined
Aug 24, 2017
Messages
1,071
Thanks for the info. Taco told me they only had 50ft and 250ft in the insert that fits my current rub rail. My current insert is actually falling apart with deterioration due to sun exposure.
 

alldodge

Moderator
Staff member
Joined
Mar 8, 2009
Messages
42,054
There may be other manufactures, it was just one of the first I looked at
 

Scott Danforth

Grumpy Vintage Moderator still playing with boats
Staff member
Joined
Jul 23, 2011
Messages
49,538
Thanks for the info. Taco told me they only had 50ft and 250ft in the insert that fits my current rub rail. My current insert is actually falling apart with deterioration due to sun exposure.
check Ebay. some on-line suppliers buy the 250 foot roll and then cut it into two 75' and two 50' and double their money.
 

gm280

Supreme Mariner
Joined
Jun 26, 2011
Messages
14,604
You could always install some clever bow section part so your insert needs are a lot shorter to purchase. By now I figured you've already seen the prices for insert. That stuff has to be made out of gold for the cost. As for the rub rail itself, I removed my rub-rail and had to straighten it out and refurbish it and then polish it. And it came out like new. So a little elbow grease and some patience can make it look great again. And that even goes for painting the rail as well. I heck of a lot easier to work off the hull...at least in my situation.
 

76SeaRay

Lieutenant Junior Grade
Joined
Aug 24, 2017
Messages
1,071
Thanks all... Looks like I will pull mine off and attempt to restore it by polishing, paint, or powder coat.. I will check EBay but it looks like I could go with a 50ft roll centered at the stern so when inserted all the way around, the ends stop about 18 inches short on each side of the bow. West Marine is supposed to also sell it by the foot (50ft max length though) so I could get about 4ft to finish around the nose. That means a splice on each side but looks like I could use the rub rail led nav lights to cover the splices... Otherwise just center the 50ft on the bow and run a splice piece across the transom. I do like the idea of the rub rail nav lights as one less thing sticking up on the deck.
 

76SeaRay

Lieutenant Junior Grade
Joined
Aug 24, 2017
Messages
1,071
So, I decided to pull the rail off. What is the best way to re-attach the rail, replace the rivets or use screws?
 

alldodge

Moderator
Staff member
Joined
Mar 8, 2009
Messages
42,054
Rivets 1/4 inch, screws will be unable to handle the vibration unless maybe their used with lock nuts

IMO that is
 

dingbat

Supreme Mariner
Joined
Nov 20, 2001
Messages
16,073
How was the rail secured in the first place?

I’ve removed the run rail on three different boats for one reason or another. All three boats had hull and cap construction.

All three used generous amounts of 5200 to seal the joint and screw holes. Used stainless sheet metal screws to secure the connection and hold the rub rail in place.
 

gm280

Supreme Mariner
Joined
Jun 26, 2011
Messages
14,604
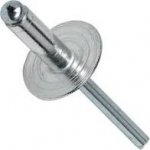
Don't know how your rub-rail was initially installed. But I used large head rivets to reinstall my rub-rail. The large head portion was to the inside of the hull for my setup. Have a look and see if they will work for yours as well. Once popped in place, very solid.

large head rivets.jpg

However, I also used a clamp to hold the rub-rail tightly against the hull before popping the rivet. And then moved to the next hole. Just an idea...
 

76SeaRay

Lieutenant Junior Grade
Joined
Aug 24, 2017
Messages
1,071
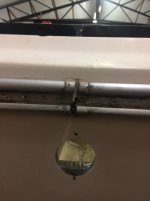
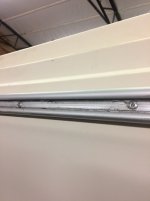
Thanks, the original is attached with rivets. The head of the rivet is to the outside of the rail. Quite frankly I haven't looked at the construction but pretty certain it is hull and cap. Attached are a couple of pictures, one from the aft joint and the other from the starboard rail.

Stern Rail Joint.jpg

Starboard Rail.jpg
 

alldodge

Moderator
Staff member
Joined
Mar 8, 2009
Messages
42,054
Looks like similar rail which I removed. Rivets to hold rail on, and under the rail there are probably more rivets holding the top on
 

Attachments

  • Photo686.jpg
    Photo686.jpg
    82.2 KB · Views: 6

76SeaRay

Lieutenant Junior Grade
Joined
Aug 24, 2017
Messages
1,071
Does look that way. I will check tonight to see if there are backing washers on the rivets to keep them from pulling out. Although, backing washers might not be a good idea. One might want the rivets to pull out if the rub rail comes down on top of a dock in a crazy wake to avoid major damage. Backing washers might take a chunk out of the fiberglass in that event.
 

76SeaRay

Lieutenant Junior Grade
Joined
Aug 24, 2017
Messages
1,071
I was just looking at semi-rigid rail on the Taco site. Are these a good or bad idea?
 

alldodge

Moderator
Staff member
Joined
Mar 8, 2009
Messages
42,054
Unable to say, first thought is it shouldn't matter so long as its firm enough to secure the rivet

Hope another has thought
 

archbuilder

Vice Admiral
Joined
Sep 12, 2009
Messages
5,697
You can still find the aluminium rails, but they are pricey and the shipping is usually really high (because they ship freight). You can also get a lot of the inserts, more so than the aluminum part. The semi-rigid is probally the cheapest option if you can't save your aluminum. I looked at it but opted for the aluminum because I really wanted to keep the original look.
 
Top