Rotten 1982 Beachcraft

Beachcraft170E

Seaman Apprentice
Joined
Jul 8, 2021
Messages
37
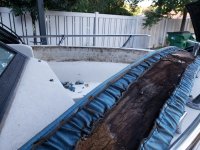
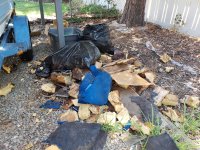
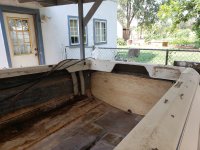
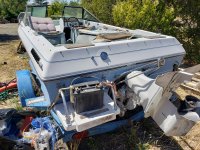
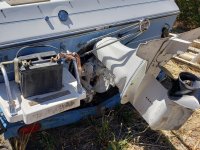
Just over a year ago some friends of mine bought a piece of property that the previous owners had abandoned all kinds of junk. One of those junks was this old boat. The previous owners had left the title (thankfully), and my friends gave it to me knowing my obsessive nature and love of projects. They were mostly happy to have one less eyesore.

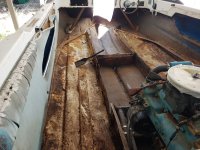
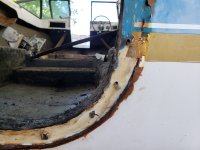
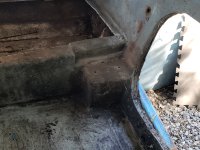
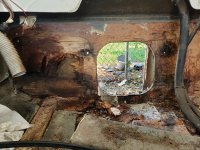
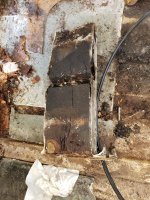
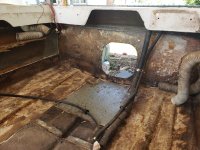
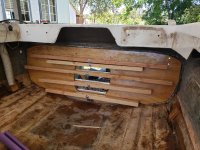
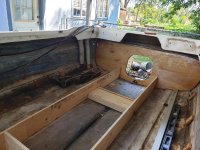
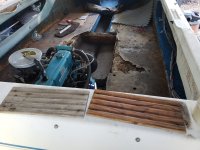
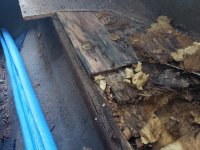
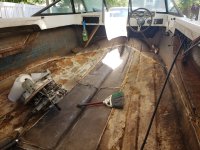
I took it home, thinking it could use some upholstery and carpet. Silly, naive me. Soon I found myself going through the usual steps of ignorance, denial, grief, sweat, itching, cussing, and poverty. As I emptied and explored it, it just got more and more rotten. At first naive me thought it was reasonably ok. As I dug in, literally, it appeared as though the boat was constructed of fiberglass
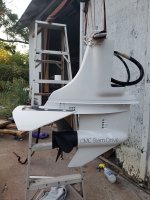
,dried up brisket, and some space aged powdered wood material. Even as I found it was rotten through and through, I was in love and determined to see it through. Ive been lurking and reading for a year. I thought about bringing all of you along for the build process, but I didn't want to feel like I was doing stuff for the sake of updating everyone. So as I near getting ready to put her in the water for the first time in 10 years, I thought I would catch you up.

This site is amazing, and the participants are amazingly helpful, especially when they give out advice you don't want to hear, but should definitely listen to.20210605_122616.jpg
 

Attachments

  • 20210608_144603.jpg
    20210608_144603.jpg
    4.9 MB · Views: 38
  • 20210612_164811.jpg
    20210612_164811.jpg
    4.3 MB · Views: 40
  • 20210612_165156.jpg
    20210612_165156.jpg
    2 MB · Views: 36

Beachcraft170E

Seaman Apprentice
Joined
Jul 8, 2021
Messages
37
I spent the first week cleaning it out and getting it running. I couldn't believe how clean it was under the valve covers. I threw some parts at it, nothing that wouldn't have needed replacing anyway. Coil, cap, rotor, points, plugs etc. Once it fired up, it sounded healthy. 😁
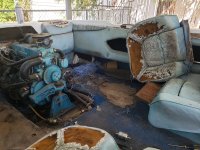
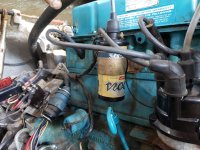
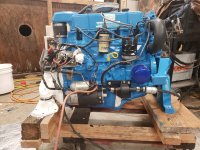
Fortunately the p.o. had drained the block before letting it sit.
Once I knew the motor was good I started deconstruction, measuring, photographing, and keeping as many important parts intact as possible.
 

Attachments

  • 20210627_160651.jpg
    20210627_160651.jpg
    1.6 MB · Views: 15
  • 20210629_182628.jpg
    20210629_182628.jpg
    1.8 MB · Views: 16
  • 20210709_190501.jpg
    20210709_190501.jpg
    5.1 MB · Views: 16

Beachcraft170E

Seaman Apprentice
Joined
Jul 8, 2021
Messages
37
In disassembling this boat, it is amazing to see how little concern was given to prevention of rot. The foam was poured into holes, and then leveled off with the floor and carpeted over. The stringers were kind of overlapped pieces of 1/2" ply, glassed only on the bilge side. I stupidly worry about any possible point where a couple of hydrogen atoms are hanging out, hoping to hook up with an oxygen atom to ruin my boat and render all of my sleepless nights pointless.
 

Baylinerchuck

Commander
Joined
Jul 29, 2016
Messages
2,726
I love the beginning of this story and your sarcastic, whit in writing it. It looks like a fun project. Is that a 2.3L Ford with an OMC outdrive? Tell me more, tell me more!!
 

Beachcraft170E

Seaman Apprentice
Joined
Jul 8, 2021
Messages
37
It is the 3.0 OMC with the Stringer 400 outdrive. When I picked it up, and really until my buddy helped me pull the motor and pointed out that the skeg was about 5-inches shorter than optimal, I hadn't even noticed the custom grind job the PO had put on it. Sweet. Gotta love custom one-off stuff. Thankfully I have friends who know how to do things and one of them was able to heli-arc a bit of aluminum to it. I assume the empty Coors can I found was indicative of the owner's choice of beverage maybe the reason he left the outdrive down for the first portion of it's trip home.
 

Attachments

  • 20220731_064549.jpg
    20220731_064549.jpg
    1.5 MB · Views: 25
  • 20210720_073808.jpg
    20210720_073808.jpg
    3.8 MB · Views: 24
  • Resized_20210720_075132.jpeg
    Resized_20210720_075132.jpeg
    568.3 KB · Views: 24

Beachcraft170E

Seaman Apprentice
Joined
Jul 8, 2021
Messages
37
When we were pulling the motor we couldn't get the steering rod out of the intermediate gear case. There was a flathead screw down inside that was not coming loose and I was not going to take a chance of camming out the slot. There would have been no way to get pliers or vise grips on it, and those screw extractor things have never been kind to me. So ultimately I detached the intermediate g.c. from the engine, and left it in the boat while I did the rest of the disassembly and demo. Eventually I got an old school impact torque driver and it worked like a charm. Also super duper handy for the sketchy lower unit drain screw. What a great little tool to have!
 

Attachments

  • 20220731_074249.jpg
    20220731_074249.jpg
    1.8 MB · Views: 12
  • 20210720_150631.jpg
    20210720_150631.jpg
    4.8 MB · Views: 13

Baylinerchuck

Commander
Joined
Jul 29, 2016
Messages
2,726
It is the 3.0 OMC with the Stringer 400 outdrive. When I picked it up, and really until my buddy helped me pull the motor and pointed out that the skeg was about 5-inches shorter than optimal, I hadn't even noticed the custom grind job the PO had put on it. Sweet. Gotta love custom one-off stuff. Thankfully I have friends who know how to do things and one of them was able to heli-arc a bit of aluminum to it. I assume the empty Coors can I found was indicative of the owner's choice of beverage maybe the reason he left the outdrive down for the first portion of it's trip home.
Keelguard makes a stainless skeg guard that slips over the skeg And would be an easier repair. It looks like you have enough meat left for this to work. I had a nice chunk taken out of my skeg, so chose this method of getting it back to the stock length. It would be much safer than running the risk of heat warping that OMC drive. Parts for those things are pretty rare at this point. 715846BC-7936-42EC-B94C-650EFC513694.jpeg
 

Beachcraft170E

Seaman Apprentice
Joined
Jul 8, 2021
Messages
37
I hear you on worrying about overheating it. My buddy is a master fabricator though, and he knew I was concerned about that. He's grown up with everything fast; his dad used to build racing boats before he went to work building for Keith Black. It was in good hands. 👍
 

Attachments

  • 20210922_185112.jpg
    20210922_185112.jpg
    1.2 MB · Views: 17
  • 20220717_201657.jpg
    20220717_201657.jpg
    1.8 MB · Views: 18

Beachcraft170E

Seaman Apprentice
Joined
Jul 8, 2021
Messages
37
Thank you. He's amazing. He races on the salt flats with a roadster he built. It's gone 239mph with a sub 300ci hemi.
 

Beachcraft170E

Seaman Apprentice
Joined
Jul 8, 2021
Messages
37
Disassembly and demolition. Normally I love demolition; take a big hammer and break stuff under the guise of being productive. This wasn't as much fun. I still enjoyed it though. Which is saying something because bringing this gal back to my place in June made for a bunch of hot times. 😳 
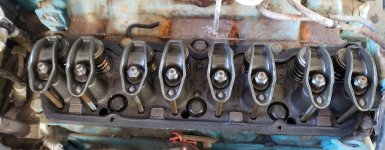
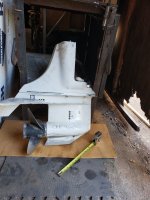
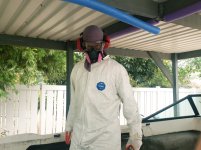
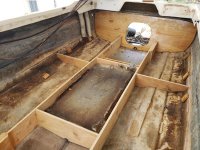
May-Oct it is a bell curve of heat here in Nor Cal, with the edges of the curve at 90, hitting an apex of about 112-115 in July and August. Needless to say, dressing up like the dude from Breaking Bad to go grind out fiberglass in 107 degrees was nothing but good times.
 

Attachments

  • 20211002_170128.jpg
    20211002_170128.jpg
    39.8 KB · Views: 16
  • 20210625_192430.jpg
    20210625_192430.jpg
    4.6 MB · Views: 16
  • 20210711_110305.jpg
    20210711_110305.jpg
    5.5 MB · Views: 18
  • 20210713_125236.jpg
    20210713_125236.jpg
    4.6 MB · Views: 18
  • Resized_20210725_071604.jpeg
    Resized_20210725_071604.jpeg
    1.3 MB · Views: 18

Beachcraft170E

Seaman Apprentice
Joined
Jul 8, 2021
Messages
37
As I was demo-ing the boat, I was deciding what to do...what woods, epoxy or polyester. Ultimately I went with ACX and epoxy. Thankfully last year ACX quality became amazing, as you can tell by the fact that it suddenly cost $114 a holy sheet. Fortunately, by the time i realized i needed more than what i first thought, the price had come down to exorbitant gouging, so that was better.

Initially I read that epoxy is so amazing and is the best, strongest, adhesivy-est etc, etc, so my opinion may have already been ushered along. Then I read multiple people saying, "your boat was made of polyester, polyester is more than fine for it now!" Which also makes crazy sense. The downside of epoxy is the cost and waiting for it to cure. However, cost wise, though poly is about 40 % what epoxy costs, by the time I added the hazmat charges for poly and the added cost of more fiberglass with poly (1708 vs 17oz biaxial), and that the extra 08 of csm in the 1708 was going to suck up more resin, it was kind of a moot point. I was able to get a good price on 17oz biaxial, though in a narrower width (like 32")

Overall I think I used about 40 yds of 32" wide 17 oz biaxial, and I used about 12.5 gallons of epoxy. That was giving all the pieces of wood that went into the boat 3 coats of epoxy, plus whatever the glass took. I also used about a gallon of poly and a few yds of csm to do some repairs i was going to gelcoat ( like fixing the rad Kraco stereo cave in the dash. Jeeze...the hole was big enough for grandma's console stereo!)
 

Attachments

  • 20210719_195858.jpg
    20210719_195858.jpg
    4.4 MB · Views: 17
  • 20210720_073607.jpg
    20210720_073607.jpg
    4.9 MB · Views: 14
  • 20210727_201702.jpg
    20210727_201702.jpg
    4.3 MB · Views: 17
  • 20210718_102727.jpg
    20210718_102727.jpg
    3.6 MB · Views: 16
Last edited:

Baylinerchuck

Commander
Joined
Jul 29, 2016
Messages
2,726
I did my entire build with polyester resin, so it’s nice to see an epoxy build. The poly layups caused me to do some serious ventilation in my attached garage so my wife and kids didn’t get fumed out. I hear epoxy is my easier on the scent glands.
 

Beachcraft170E

Seaman Apprentice
Joined
Jul 8, 2021
Messages
37
Epoxy definitely isn't as much of a respiratory issue, but it is a sensitizer and caution should be taken, especially with the dust. I did like working with poly, as the speed suits my hyperactivity, but I would have needed help with the bigger layups, for sure.
I did my entire build with polyester resin, so it’s nice to see an epoxy build. The poly layups caused me to do some serious ventilation in my attached garage so my wife and kids didn’t get fumed out. I hear epoxy is my easier on the scent glands.
 

Beachcraft170E

Seaman Apprentice
Joined
Jul 8, 2021
Messages
37
I tried to leave as much of the design elements intact until i could get everything out of the way. Things like the motor mounts, bulkheads, stringers etc. Then tried to cut them out to be able to replicate them. I also remade the wood trim around the navigation light, but used ipe instead of teak.

The transom was surprisingly rotten. As were the motor mounts. That is sarcasm, of course. Rot was not a surprise at all by this point. The forward mount was in no way adhered to the hull. Maybe at some point, but not when I cut it out. To get the less rotten portions of the transom off, I used the circular saw set to a safe depth and a big old timber framing chisel or slick. That and a flap wheel on a 4 1/2 angle grinder.
 

Attachments

  • 20210704_174146.jpg
    20210704_174146.jpg
    2.9 MB · Views: 17
  • 20210718_102540.jpg
    20210718_102540.jpg
    3.7 MB · Views: 15
  • 20210718_125941.jpg
    20210718_125941.jpg
    5.3 MB · Views: 17
  • 20210718_125959.jpg
    20210718_125959.jpg
    2.5 MB · Views: 18

Beachcraft170E

Seaman Apprentice
Joined
Jul 8, 2021
Messages
37
Once I got over the fear of turning my transom into a hashtag symbol, and removed everything, I got it good and clean and made a cardboard template. I made it so it was held off the bottom a 1/4" or so left a wide swath around the drain plug. I clamped the new transom into place and marked my rough cutout. The original transom was 3/4" ply, so that's what I went with. It got 3 coats of epoxy on all side and any exposed voids were filled. I cut close to the transom opening mark with a jigsaw, and then clamped it into place on the hull and used a pattern following bit in the laminate trimmer to match the openings. Later I rounded the edges of the opening over so that everything could be faired out with epoxy p

Because I have several alphabet disorders like ADD, ADHD, and OCD, and now an irrational fear of water intrusion for the tow bar, and big U-bolt things that penetrate the transom... I went to stupid lengths to insure water had less of a chance of doing the deed. I drilled the holes in the wood oversize and filled them with epoxy pb. I used a bunch of 2x4 on edge as clamps across the transom width, as well as the occasion purpose made clamp. It was about a year ago, but I want to say it took about 2 quarts of resin to bed it out. I used a notched trowel and gave it a fat coat of resin
 

Attachments

  • 20210725_153537.jpg
    20210725_153537.jpg
    5.2 MB · Views: 16
  • 20210720_150650.jpg
    20210720_150650.jpg
    4.8 MB · Views: 14
  • 20210725_184910.jpg
    20210725_184910.jpg
    4.7 MB · Views: 15
  • 20210801_131255.jpg
    20210801_131255.jpg
    2 MB · Views: 17
  • 20210803_145046.jpg
    20210803_145046.jpg
    5.3 MB · Views: 17

Beachcraft170E

Seaman Apprentice
Joined
Jul 8, 2021
Messages
37
It really feels good when you start putting wood back in. Very nice work.
That it does! It was also a little nerve-wracking. Up to that point it was demolition. Breaking stuff is always easy. Putting new stuff in boat was new to me. I would have to say that most of the steps i worried about were not all that bad. The extra working time with epoxy was helpful here.
 

Beachcraft170E

Seaman Apprentice
Joined
Jul 8, 2021
Messages
37
In cleaning out the boat, I found this old beer can and decided we should keep it aboard. One for me, and one for my homies.
 

Attachments

  • 20210625_192447.jpg
    20210625_192447.jpg
    2.9 MB · Views: 19
  • 20210627_180136.jpg
    20210627_180136.jpg
    3.9 MB · Views: 19
  • 20220306_184555.jpg
    20220306_184555.jpg
    8.9 MB · Views: 20

Beachcraft170E

Seaman Apprentice
Joined
Jul 8, 2021
Messages
37
The original stringers were 1/2", but I made mine out of 3/4" ACX. To stretch my 8ft sheet of plywood to 12 ish feet, I biscuit jointed the pieces together to get a good alignment,, and then lap joints to cover that seam. Motor mounts also had to be incorporated into the stringers. The top edge got a round over and the bottom got shaped with a rasp to more closely match the curve of the hull.
 

Attachments

  • 20210727_183744.jpg
    20210727_183744.jpg
    4.5 MB · Views: 14
  • 20210731_121533.jpg
    20210731_121533.jpg
    4.5 MB · Views: 14
  • 20210801_063638.jpg
    20210801_063638.jpg
    4.1 MB · Views: 14
  • 20210801_064133.jpg
    20210801_064133.jpg
    4 MB · Views: 14
  • 20210801_103712.jpg
    20210801_103712.jpg
    4.7 MB · Views: 15
Top