Recovering Boat Seats

08TahoeQ4

Recruit
Joined
Aug 2, 2022
Messages
4
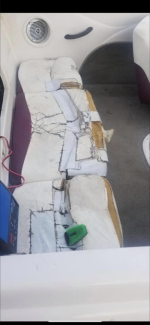
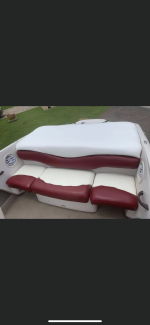
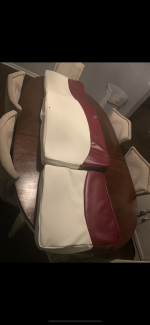
We purchased a super old boat 2008 Tahoe and we had AWFUL seats and the engine had several things wrong with it but it was so cheap we couldn’t pass it up! My husband worked on the engine to get it running and I didn’t want to sit on a crunchy tore up seat! We got quotes that were as much as or double the amount we paid for the boat! The quotes ranged between $3-6k and naturally I didn’t have that to sink into my little project. I decided to take matters into my own hands and see if I could somehow throw together something to make it better. I just happened to get lucky and to be successful! I am VERY inexperienced but I figured there may be families like ours who don’t have disposable income or need to polish a turd as we did. I wanted to offer my help recovering seats! I’m a full time nursing student looking to gain more experience and help pay for my schooling and books. If anyone would like to chat and allow me to help them I would absolutely love to help. I changed the design for our seats to resemble the original however I didn’t know how to recreate the exact likeness and I will be upfront and only help within my skillset as I had two captains chairs I ordered on overtons because I felt it was too difficult for a beginner! Lol. Attached are pictures of our boat seats before and after! So feel free to ask any questions! 959FE273-D3F5-4ACA-BA68-6B19C01F14DF.png
 

Attachments

  • 18E42D0D-23FB-492E-8B4C-E4102F096B10.png
    18E42D0D-23FB-492E-8B4C-E4102F096B10.png
    5.8 MB · Views: 35
  • 8CC07C56-438B-4115-8624-2F047D7AD2AF.png
    8CC07C56-438B-4115-8624-2F047D7AD2AF.png
    2.3 MB · Views: 36
  • DC1F978E-3D45-4886-B7C5-F3C607E8E7D6.png
    DC1F978E-3D45-4886-B7C5-F3C607E8E7D6.png
    4.5 MB · Views: 36
  • 5CCE3B3B-09AF-4DCA-A4D8-96CE7C22F199.jpeg
    5CCE3B3B-09AF-4DCA-A4D8-96CE7C22F199.jpeg
    781.4 KB · Views: 34

Scott Danforth

Grumpy Vintage Moderator still playing with boats
Staff member
Joined
Jul 23, 2011
Messages
49,975
On a typical new boat, the upholstery is about $6-8k. Some larger 42-55 foot center console boats, the OEMs pay $20-$30k for deck, cabin and upper station. There is a lot of labor that goes into upholstery

Kudos for doing the work yourself. Vinyl, foam, thread and staples will cost about $1k for the typical 19 foot boat.
 

08TahoeQ4

Recruit
Joined
Aug 2, 2022
Messages
4
I was actually really impressed with them after all, I bought my sewing machine to do the project and had never done anything like it! My husband laughed at me when I got home with the supplies to get started! The first seat was MISERABLE lol but once I completed the first one the other two were smooth sailing! The engine cover was no easy task, my grandma told me to give that up! Her comment made me more determined than ever to complete the task! I knew I didn’t have the skillset for the two captains chairs so it was worth it to buy those online lol! I was lucky enough to be able to save 90% of the foam from the original seats and only replaced 2/3 of the seat bottoms. I modified the original design pattern to save me from a struggle and frustration. I believe after all was said and done I still spent less than $1000 including ordering the captains seats so I was thrilled and VERY proud lol I figured I would have to hang it up and eat crow lol. I know I would have been thrilled to have found someone offering help when I was needing it. I want to do more seats to gain experience and build like a portfolio so I figured this would be the best way as my project is finally done!
 

Chris1956

Supreme Mariner
Joined
Mar 25, 2004
Messages
28,000
I think you did the correct thing. Captains chairs, back-to-back seats and others are pretty complicated, compared to their relatively cheap purchase costs. This is because they are mass produced, and very common in design.

The cushions that you did were pretty simple, but custom sized. They would have been expensive to have them professionally done, due to labor.

I would have done them a bit different. I would have made them a single color, so they would be simpler yet. They do not look as good as two color, but there is no seam between the two colors, and that is hard to get to look smooth, for us amateurs.

I would have used cording between the top and sides of the cushions. it adds some complexity, but gives a sharp transition between top and sides. if you are stapling the bottom edge to plywood or plastic, it is easier to get the seems straight, versus a cushion with vinyl on all sides. Cording adds 2 layers of vinyl, so the machine needs to be up to it.

Finally, make sure to use nylon coat thread and stainless steel staples.

Very nice job, IMO.
 

tpenfield

Moderator
Staff member
Joined
Jul 18, 2011
Messages
18,104
I've done the seating in the 3 power boats that I've owned. If you have experience using a sewing machine it certainly helps. There are lots of folks who do this for a living or a side job.

I did my first boat using the Admiral's home machine . . . pretty much a nightmare, but I struggled through it. When I did my 2 more recent boats I got a machine that is made for upholstery and leather ( a Consew 206RB ). The right machine makes a huge difference.

Forum rules prohibit solicitation, so you won't be offering your services on the forums in general, but frequently folks in the same situation (duct tape boat seats) may be asking questions or seeking advice.
 

08TahoeQ4

Recruit
Joined
Aug 2, 2022
Messages
4
I think you did the correct thing. Captains chairs, back-to-back seats and others are pretty complicated, compared to their relatively cheap purchase costs. This is because they are mass produced, and very common in design.

The cushions that you did were pretty simple, but custom sized. They would have been expensive to have them professionally done, due to labor.

I would have done them a bit different. I would have made them a single color, so they would be simpler yet. They do not look as good as two color, but there is no seam between the two colors, and that is hard to get to look smooth, for us amateurs.

I would have used cording between the top and sides of the cushions. it adds some complexity, but gives a sharp transition between top and sides. if you are stapling the bottom edge to plywood or plastic, it is easier to get the seems straight, versus a cushion with vinyl on all sides. Cording adds 2 layers of vinyl, so the machine needs to be up to it.

Finally, make sure to use nylon coat thread and stainless steel staples.

Very nice job, IMO.
The original seats were two colors. If you look at the pictures of the “before seats” that were tore up, the burgundy was at the rear edge of the seats.I chose to simplify the design but keep the 2 colors so it would resemble the original design and have a more professional look. I also chose the two color design because the height of the foam was 2 different levels and that required two pieces to be sewn together to allow different heights. I believe the foam cushions front pieces were 4in and the back were 3in. In order to suit what was already present and to simplify the design, I chose a pattern I felt comfortable to attempt to create as I had absolutely zero experience ever sewing anything. lol. I considered welting/piping and would have LOVED to have been able to do that, however I know my discount sewing machine wouldn’t be capable of that. I remember my dad needing my great grandmother’s antique industrial singer for a boat he restored back 2 back seats with piping/welting when I was a child. I sat with him hours helping him with that project as a child so I knew my machine was not up to that task but I certainly would have loved that! I learned from my mistakes during the project. The transition would have been smoother had I not taken the shortcut on the anchor pieces between the red/white it was previously one continuous piece. When I designed my own I used scrap pieces of vinyl that were strips to tether/anchor the transition between colors and came to understand the solid piece pulls the seam down creating even tension and the strips weren’t as effective. I wouldn’t make that mistake again. That wasn’t a good choice. I can remember selecting a specific thread that was designed for heavy duty and UV but I’m uncertain about if it was coated but I was picky about the materials I used for my project. I have considered going back to correct my errors but it’s been three years and I can’t convince myself to tear it apart until I have an actual reason. Lol. I do kick myself in the butt for not following the original pattern better. Had I not taken shortcuts they would have came out so much better but I was working a full time job as a car salesman 70+ hrs a week sometimes not getting a day off for 2 weeks so I wanted it to look nice, save money, and I had such limited time to mess with it.
 

08TahoeQ4

Recruit
Joined
Aug 2, 2022
Messages
4
I've done the seating in the 3 power boats that I've owned. If you have experience using a sewing machine it certainly helps. There are lots of folks who do this for a living or a side job.

I did my first boat using the Admiral's home machine . . . pretty much a nightmare, but I struggled through it. When I did my 2 more recent boats I got a machine that is made for upholstery and leather ( a Consew 206RB ). The right machine makes a huge difference.

Forum rules prohibit solicitation, so you won't be offering your services on the forums in general, but frequently folks in the same situation (duct tape boat seats) may be asking questions or seeking advice.
This boat was a complete nightmare when we bought it. We broke down in the St. John’s river when doing the water test and the seller had to call a friend to put his boat in and come get us out of the river and I had hope it was an easy fix (it wasn’t, haha) and we thought we could just easily repair the seats and have a nice boat for CHEAP! We previously had a skeeter bass boat with an outboard and I wanted something better for wakeboarding and bringing people with us. This was a bigger boat that could accommodate us bringing friends. I was blown away by the cost of someone recovering the seats for us. I bought everything INCLUDING a new sewing machine for under $300 to DIY it! I figured it was worth the risk! I was able to save about 90% of the foam which everyone told us ALL needed replacement. That was the biggest expense in the quotes. The captain’s chairs were around $200 brand new online I think they were $170/ea at the time. I struggled with the first seat and the two smaller ones were smooth sailing lol the large engine cover almost got me! I did the pull and stretch on it and it was hell! But in the end I think I can really help someone else needing guidance and tips on what to do and the don’t dos! Lol
 

Wildey

Petty Officer 1st Class
Joined
Nov 24, 2021
Messages
202
Good job !
I DIY everything I can. Might not look as perfect, but it's always 100% functional. And, I save all that $$$$ for gas.
 

airshot

Vice Admiral
Joined
Jul 22, 2008
Messages
5,230
Looks good, you should be proud.... always enjoy looking at the fruits of labor when somone tackles a project !!
 

tpenfield

Moderator
Staff member
Joined
Jul 18, 2011
Messages
18,104
$3-6K are not actually bad prices. . . . maybe $6K is a little high. Upholstery work is quite labor intensive, so usually materials are about 15% of the cost. You mentioned spending $300, so it would equate to about $4,500 done by a shop.

I try to use the best materials, since the labor is most of the job, be it effort (DIY) or cost (shop). You don't want to have to do it over in a few years, because you 'saved' on the materials.

Also, use the best type of thread for outdoor application - PTFE
 

Chris1956

Supreme Mariner
Joined
Mar 25, 2004
Messages
28,000
Yeah, that is why I use nylon coat thread, or polyester outdoor thread. They hold up for years.

Carpet thread is another possibility, but not all machines can handle it.
 
Top