RE: Issues with Mercruiser 5.0 LX 4 Barrel Carb

BusinessConnected

Seaman Apprentice
Joined
Jan 17, 2023
Messages
40
Do you have spark when it doesn't fire, test with a spark gap tester off the coil and at the plugs
I've changed the Ignition Module today and no difference.
I've bought a Spark Plug Light/Tester from Amazon and I can see a Flickering Light off Spark Plugs and Coil when cranking.

(It's not super strong... but its there... Not sure how bright these lights are supposed to be etc).

I'm beginning to get at the end of my tether again.. Hopefully Trailer will be repaired by tomorrow and I have options to take it somewhere else..

(Or maybe just straight to an Auction House to Sell Instead).
 

Scott06

Admiral
Joined
Apr 20, 2014
Messages
6,440
I've changed the Ignition Module today and no difference.
I've bought a Spark Plug Light/Tester from Amazon and I can see a Flickering Light off Spark Plugs and Coil when cranking.

(It's not super strong... but its there... Not sure how bright these lights are supposed to be etc).

I'm beginning to get at the end of my tether again.. Hopefully Trailer will be repaired by tomorrow and I have options to take it somewhere else..

(Or maybe just straight to an Auction House to Sell Instead).
should be a blue/white spark should jump 3/8" or more. Try it out on a good running engine so you can see what it should look like for comparison.

IF spark is ok confirm it by dumping some fuel down the carb. If sufficient spark is there any gas dumped it should fire for a sec or two.

If it does fire when you have gas thinking you may have an issue with intermittent loss of fuel supply.

If it doesn't fire it is ignition based - maybe voltage drop due to loose or corroded connection to positive side of coil creating weak spark? Have you ohm'ed out the coil and replaced trigger sensor in distributor?

Frustrating for sure just gotta break it down to loosing fuel or spark when it happens... You had good compression on engine correct (not that that would be intermittent) ?
 

stresspoint

Lieutenant Junior Grade
Joined
Sep 19, 2022
Messages
1,045
I've changed the Ignition Module today and no difference.
I've bought a Spark Plug Light/Tester from Amazon and I can see a Flickering Light off Spark Plugs and Coil when cranking.

(It's not super strong... but its there... Not sure how bright these lights are supposed to be etc).

I'm beginning to get at the end of my tether again.. Hopefully Trailer will be repaired by tomorrow and I have options to take it somewhere else..

(Or maybe just straight to an Auction House to Sell Instead).
the spark tester is to check the distance of the spark jump , you should be seeing at the very least 5mm jump when cranking , any less and its hit and miss that the motor will fire up.
it should also be consistent across 8 cylinders.

check the ground to the distributor or better still , run a temporary ground strait from the battery.

check the tether switch , it may have a dirty connector.

check the ignition switch wiring .

? are you sure the motor is cranking over fast enough to fire up. those motors have to spin fairly quick to fire up if they are flooded or have weak spark.( FYI , weak spark and slow cranking can go hand in hand ).
 
Last edited:

BusinessConnected

Seaman Apprentice
Joined
Jan 17, 2023
Messages
40
I've got a decent spark across each Point from the Distributor. Can see a 5mm Spark or Longer from each one with a test lead.

I've tried with a different Ignition Coil and Ground Lead to Negative Terminal of Battery no change.

I've charged the battery up to Full across both Batteries and have them running together now so should have good CCA etc.

When it's cranking you can certainly hear it sort of trying to start and chug a little.. but it never actually starts properly... just that sort of combustion chug and that's it.

I'm going to try the Fuel Side of things now instead..

Ignition Sensor is all new, as is Rotor, Distributor Cap, Ignition Coil..
However this issue is exactly the same sort of problem I was experiencing before I went down the whole Head Gasket/Intake Redo etc.. So It has to be something that's separate to these issues.
 

stresspoint

Lieutenant Junior Grade
Joined
Sep 19, 2022
Messages
1,045
firing order . start again , remove the distributor , set TDC compression #1 cylinder. set #1 lead to the most forward pin on the distributor cap.
follow the firing order embossed on the intake manifold (#1 is the most forward cylinder).
i like to mark the dizzy base and a pin punch on the intake exactly where #1 is then rotate the dizzy about 3 mm so as the dizzy is now @ 10 degrees there about to aid starting , then use a timing light with the purple wire grounded ( Mercruiser dizzy).

i can see you are getting frustrated with this thing so feel free to PM if you want with a phone number and i can walk you through over a call .
 

BusinessConnected

Seaman Apprentice
Joined
Jan 17, 2023
Messages
40
firing order . start again , remove the distributor , set TDC compression #1 cylinder. set #1 lead to the most forward pin on the distributor cap.
follow the firing order embossed on the intake manifold (#1 is the most forward cylinder).
i like to mark the dizzy base and a pin punch on the intake exactly where #1 is then rotate the dizzy about 3 mm so as the dizzy is now @ 10 degrees there about to aid starting , then use a timing light with the purple wire grounded ( Mercruiser dizzy).

i can see you are getting frustrated with this thing so feel free to PM if you want with a phone number and i can walk you through over a call .

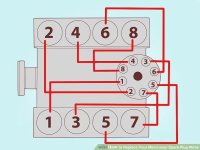
So I've got the timing on the Block listed as
18436572

As such I've been following the attached diagram when lining up the Spark Plug Leads etc..
Does this appear to be the correct process?

I have a vague recollection of the Rotor Cap/Spark Plug Leads previously being installed off centre per se.. so perhaps my issue is getting my Top Dead Centre Alignment worked out in conjunction with the Rotor/Cap etc.
 

Attachments

  • Spark.jpg
    Spark.jpg
    49 KB · Views: 1
Last edited:

Scott Danforth

Grumpy Vintage Moderator still playing with boats
Staff member
Joined
Jul 23, 2011
Messages
49,574
So I've got the timing on the Block listed as
18436572

As such I've been following the attached diagram when lining up the Spark Plug Leads etc..
Does this appear to be the correct process?

I have a vague recollection of the Rotor Cap/Spark Plug Leads previously being installed off centre per se.. so perhaps my issue is getting my Top Dead Centre Alignment worked out in conjunction with the Rotor/Cap etc.
first, that is the firing order

second, you need to know where cylinder #1 is. if you need to restab the dizzy, now is your time

pull the plugs, put your finger over cylinder #2, when you turn the motor over and you get a PFFFFFTTTTT vs a pfft, stop. then slowly bump the starter until the timing marks align. now cylinder #1 is at TDC. (note, if you use cylinder #1, as all the manual tell you, you will be past TDC when your brain finally triggers your one finger to release the remote starter switch. using cylinder #2 means that you are coming up on cylinder #1)

Now with the distributor cap off. what ever direction the rotor is pointing is where the wire for cylinder #1 should be.

if you want or need your #1 dizzy tower to match the pretty picture you posted, then you need to make sure the dizzy i installed correctly
 

BusinessConnected

Seaman Apprentice
Joined
Jan 17, 2023
Messages
40
first, that is the firing order

second, you need to know where cylinder #1 is. if you need to restab the dizzy, now is your time

pull the plugs, put your finger over cylinder #2, when you turn the motor over and you get a PFFFFFTTTTT vs a pfft, stop. then slowly bump the starter until the timing marks align. now cylinder #1 is at TDC. (note, if you use cylinder #1, as all the manual tell you, you will be past TDC when your brain finally triggers your one finger to release the remote starter switch. using cylinder #2 means that you are coming up on cylinder #1)

Now with the distributor cap off. what ever direction the rotor is pointing is where the wire for cylinder #1 should be.

if you want or need your #1 dizzy tower to match the pretty picture you posted, then you need to make sure the dizzy i installed correctly

I think I may have worked out where my issue lies.
(Bear in mind it's 10pm at night in Melbourne, Australia)

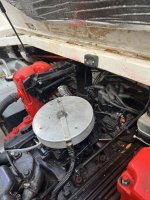
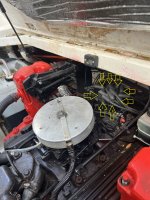
Picture below show's my original Disty Cabling Setup when I got the Boat and it was running (before all the Overheating/Destroyed Riser Dramas etc).

Basically what this show's is that I believe my Front Most Point is actually Cylinder 5... and it then rotates around based on that.. (based on the direction of the way the leads are heading etc).

When I've had the Disty Out when doing Intake Manifold Gaskets/Head Gaskets etc.. it was stored and re-installed with Rotor in same position based on pictures... so I believe it should be in the same spot.

I'm hoping what this means if I head out tomorrow morning when local Noise Laws Dictate (9am on Saturdays) in approximately 11 Hours time... and move some Leads to the correct locations, I might be a better chance of starting.
 

Attachments

  • 20230121_042639751_iOS.jpg
    20230121_042639751_iOS.jpg
    2.1 MB · Views: 8

Scott Danforth

Grumpy Vintage Moderator still playing with boats
Staff member
Joined
Jul 23, 2011
Messages
49,574
just get the motor to TDC on cylinder #1. pull the cap, wire cylinder #1 to the tower the rotor is pointed to.
 

stresspoint

Lieutenant Junior Grade
Joined
Sep 19, 2022
Messages
1,045

use this link , remove the rocker cover and make sure the valves on # 1 cylinder are closed when the piston is TDC , as Scott said ,its a good time to re stab the dizzy ( NOTE: work the oil pump drive till the rotor is where it should be)

while you have the rocker covers removed , re set the lash on all the rockers , this being wrong can also make a SB chev not start.

ha ha , its 10 PM in Perth WA ATM .
 
Last edited:

Lou C

Supreme Mariner
Joined
Nov 10, 2002
Messages
12,676
And make sure your plug wires are in the correct position on the distributor cap!
9:08 AM Friday in Long Island NY…
 

BusinessConnected

Seaman Apprentice
Joined
Jan 17, 2023
Messages
40
I think I'm unfortunately at the end of where I can take this thing..
There's a pretty significant coating of Milky Residue in the Rocker Covers now.. That wasn't there when I pulled the engine apart to redo Head Gasket etc.. I'm not sure if that can accrue purely from sitting in the Air a bit... uncovered for a while or whether its a sign of Water Leakage throughout the Block.

(Boat was never fully exposed to rain etc... Purely just any condensation under a Canvas/Rubber Tarp and then Engine Bay Cover etc.. So should have been minimal).

I don't have the talent to adjust Lash etc..
I've lost my entire Summer to this thing... from December Holidays through to March..
 

Scott Danforth

Grumpy Vintage Moderator still playing with boats
Staff member
Joined
Jul 23, 2011
Messages
49,574
Drain and pressure test cooling system. If it holds 15 psi, look at exhaust. Do an acetone test on the manifolds.

Also, if your base timing is to advanced you can get reversion at idle
 

BusinessConnected

Seaman Apprentice
Joined
Jan 17, 2023
Messages
40
Drain and pressure test cooling system. If it holds 15 psi, look at exhaust. Do an acetone test on the manifolds.

Also, if your base timing is to advanced you can get reversion at idle
I have another look today, fiddled a little with position of Disty Cap and I just never seem to be able to get enough of a combustion to actually crank and start properly... Just sort of puffs etc of it wanting too.. and a decent smell of petrol etc..

I don't believe it's Fuel/Spark related... unless I have a potentially bad Spark Plugs or Leads..
(As these were both New Genuine after I'd rebuilt Head/Intake Gasket etc).

Just a bit bizarre to me that I could get a start/run for 20-30 minutes and now can't get anything at all.
I definitely have Spark from Rotor/Cap as I tested each Point with a Short Lead and Sparked a good cm in distance to the Risers.
 

dubs283

Vice Admiral
Joined
Jul 27, 2005
Messages
5,322
Again, is the firing order correct? Have you verified TDC #1? Have you checked that timing is at least close to correct while cranking?

You say you don't have the talent to adjust valve lash but you had the heads off and re installed. How did you adjust lash at that time?
 

Lou C

Supreme Mariner
Joined
Nov 10, 2002
Messages
12,676
Doing the hydraulic lifter preload adjustment on an SBC is actually easier than setting mechanical valve clearances.
 

BusinessConnected

Seaman Apprentice
Joined
Jan 17, 2023
Messages
40
Again, is the firing order correct? Have you verified TDC #1? Have you checked that timing is at least close to correct while cranking?

You say you don't have the talent to adjust valve lash but you had the heads off and re installed. How did you adjust lash at that time?
I basically took photo's of what I had to begin with.. and re-installed with Bolts at around the same depth/levels etc..

I didn't do Valve Clearances etc as I just took the Heads Themselves off and re-install as they were.
 

Scott06

Admiral
Joined
Apr 20, 2014
Messages
6,440
I basically took photo's of what I had to begin with.. and re-installed with Bolts at around the same depth/levels etc..

I didn't do Valve Clearances etc as I just took the Heads Themselves off and re-install as they were.
How did you set the nuts on the rocker arms just torque to a value? Reason guys are asking is if over tightened they can cause the valves to not close fully and loose compression. Compression+ spark (at right time)+ fuel= combustion....
 
Top