Question On Changing Stringer Location

Joined
Sep 23, 2021
Messages
25
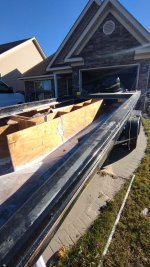
Glassing today!!! If anyone is still following this thread, looking for tips, make sure you label and separate EVERYTHING. Aft stringer, bow stringer, and each bulkhead placement (I labeled them 1-4). Also, as I'm prepping glass today, label each piece of glass with a sharpie. Ex: A1 (aft stringer layer 1) ,A2 (aft layer 2) or whatever works .

Also, sand down any PB/putty bumps and bubbles before trying to glass. Seems obvious, but ya never know. Got a little sanding to do today, and then I'll start glassing!
 

Attachments

  • IMG_20211026_101043587.jpg
    IMG_20211026_101043587.jpg
    1.3 MB · Views: 16
Joined
Sep 23, 2021
Messages
25
In the stringer nearest in the picture is that a seam in the middle?
Yes. I butted them up together perfectly, and laid some putty on top of where they met. It is slightly uneven across the top, but the plan is to to come back and level it out with my jigsaw after I glass it, as the stringers are too tall and have made the deck curve an extra 1/5". Also, I have some glass that is draped over the top, not much, but It kept sliding, so I draped it with plans of coming back and cutting it off when I trim and level the top with my jigsaw.

I made the mistake of wedging the new stringers under the lip of the old deck. I thought about leaving it that way and just having a deck where any water runs to the drains on the edges, but I think I may scratch that idea.
 

88 Capri (2022 SOTY)

Master Chief Petty Officer
Joined
Aug 25, 2019
Messages
819
Yes. I butted them up together perfectly, and laid some putty on top of where they met. It is slightly uneven across the top, but the plan is to to come back and level it out with my jigsaw after I glass it, as the stringers are too tall and have made the deck curve an extra 1/5". Also, I have some glass that is draped over the top, not much, but It kept sliding, so I draped it with plans of coming back and cutting it off when I trim and level the top with my jigsaw.

I made the mistake of wedging the new stringers under the lip of the old deck. I thought about leaving it that way and just having a deck where any water runs to the drains on the edges, but I think I may scratch that idea.
I wanted to mention that you should add a piece of wood over the seam maybe overlapping (sister) 6" on each side (possibly longer) because that seam will be a weak point. My stringers weren't nearly that tall and I was told that it is recommended.
 

todhunter

Canoeist
Joined
Sep 15, 2020
Messages
1,311
Be aware that fiberglass annihilates jigsaw blades. Have several spare blades on-hand. I tried your method of cutting stringer height after bedding them and found it much more difficult than getting them right before putting them in. I ended up with some wavy spots across the top when looking down the length - nothing that some PB couldn't take care of though.

I agree with 88 Capri - I would sister those stringer joints.
 
Joined
Sep 23, 2021
Messages
25
I wanted to mention that you should add a piece of wood over the seam maybe overlapping (sister) 6" on each side (possibly longer) because that seam will be a weak point. My stringers weren't nearly that tall and I was told that it is recommended.
Got plenty of ply laying around. I'll do that! Thanks
 
Joined
Sep 23, 2021
Messages
25
Be aware that fiberglass annihilates jigsaw blades. Have several spare blades on-hand. I tried your method of cutting stringer height after bedding them and found it much more difficult than getting them right before putting them in. I ended up with some wavy spots across the top when looking down the length - nothing that some PB couldn't take care of though.

I agree with 88 Capri - I would sister those stringer joints.
Thanks! PB on top or bottom?
 

todhunter

Canoeist
Joined
Sep 15, 2020
Messages
1,311
Thanks! PB on top or bottom?
PB between the top of the stringer and bottom of the decking. I had one really bad spot on one of the stringers that form the bilge, so I filled it with PB before I wrapped glass around the top to fully encapsulate the stringer.

4-png.332879
 

88 Capri (2022 SOTY)

Master Chief Petty Officer
Joined
Aug 25, 2019
Messages
819
PB between the top of the stringer and bottom of the decking. I had one really bad spot on one of the stringers that form the bilge, so I filled it with PB before I wrapped glass around the top to fully encapsulate the stringer.

4-png.332879
A side note but I see the advantage with champhering the edges for cloth! I wish I would have known that!
 

todhunter

Canoeist
Joined
Sep 15, 2020
Messages
1,311
Oh yeah, I routered all the edges so the cloth would lay down smooth. Even with a 3/8" radius router bit on both sides of a 3/4" sheet of plywood, I had to work to get the 1708 to lay down completely.
 
Joined
Sep 23, 2021
Messages
25
Update to any first timers, or anyone watching this thread.

Been glassing for a couple days.

1) Plan on buying an entire roll of glass, and at LEAST 5 gal of unwaxed resin. I've got the first layer of glass down and I've used about 3 gallons and 5 rollers so far. Also, before using the bubble roller, as I laid the glass, I used my resin roller to smooth it out first, just to introduce a little more resin to the bond, then came back with the aluminum bubble roller.

2) After trial and error, honestly I wouldn't let the glass hang over the top. I found when I came back to trim it off, it caused the glass to come loose off the stringer across the top in some places. Not a HUGE deal for me, as I plan on wetting out some thin strips to lay across the top, and can introduce some more resin in those places, but, in retrospect, spare yourself the headache. Lay your initial glass right up to the top and just continue to work it as long as you can without tearing the cloth until it's straight with the top of the stringer.

3) *insert homer "DOH!"* ANY kind of moisture is bad. Even morning condensation. Lol. And a dry towel doesn't always help. Let the sun hit your work for a good bit before laying anything.

4) The chemical reaction between the hardner and the resin causes heat. Remember that when you are changing out rollers or re-using mixing cups. It gets hot!!!
 
Last edited by a moderator:
Joined
Sep 23, 2021
Messages
25
*Sigh* It's coming. Slowly but surely between work and cold or rainy days. Been cold here lately, making it a little difficult for the layups to cure. Don't want to over-catalyze. I'll post pics soon. I've got the first layer of glass down over almost everything! Been using csm since I got a deal on a roll, so I'm planning on doing maybe 4 layers total.
 
Joined
Sep 23, 2021
Messages
25
Hey guys! Sorry for the Hiatus!! Winter was brutal here, and our boat doesn't fit in the garage!! Got 2 layers on the new stringers, about to finally lay a 3rd. Had to grind out a few air pockets, but so far so good. Stringer doesn't move at all, but gonna lay more glass just to be safe. Got 2lb pour foam to fill it with, and then it'll be deck time. Pics to follow soon.
 
Joined
Sep 23, 2021
Messages
25
There was an air pocket towards the bow on the port side. Actually, there were a few, and I sanded them all out and re-glassed. Unfortunately I didn't take pics.
 
Joined
Sep 23, 2021
Messages
25
For any first timers:
*This is for a 16ft 1986 Deck boat*
A) I have/had no clue what I was doing. I used the forum for pointers. Here's a list of supplies and tips in no particular order.

1) haven't laid the deck yet, however, so far, I've gone through about 7 gallons of polyester resin.

2) I've used approx 10 4" foam rollers.

3) Stringers are roughly 21" tall, because I've 86'd the ski locker. That being said, the waterline comes up almost a full foot. The pics reflect about 3 gal. Pourable foam. I'm gonna need roughly 5 more gallons to feel comfortable

4) COVER YOUR S**T. I live in the southeast. Overnight, going from winter to spring, it gets very humid and moist, and, speaking from experience, that can ruin the previous days glass layup. If this is gonna be more than a day project ( it will be) Find a canopy and tarp, or portable shed. Anything really to cover your work from condensation and moisture.

5) 2 hands are better than 1. If you have someone wetting out your glass, while you lay it up and roll it. It cuts your time in half.

5.a) double up on gloves. However many you can wear at a time. Both ppl.
5.b) if working by yourself, be INSIDE your boat with ALL your tool and materials within a turns reach.

6) if your deckboat doesn't have bulkheads, and you plan on getting rid of the ski locker like I did, measure and add bulkheads.

7) up to you, but I used 4 layers of csm. Apply a layer at a time, above 55° outdoors, as close as possible time-wise, with NON-WAX poly resin.

If possible, depending on your boat, find a good 3 to 4 day stretch of no rain, above 55°, days to do this if you want to do this is one setting.
7.a) Water of any kind=bad
7.b) any colder than 55 and you'll have to add extra catalyst, which may throw your supplies off.

I think that's all the stuff I wish someone had told me before I started this project lol
 
Top