Project Fuggly - No Longer Fuggly And Splashed!!!!!!

archbuilder

Vice Admiral
Joined
Sep 12, 2009
Messages
5,697
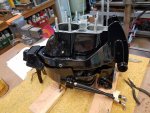
This is the sequence of how I put the different bellows on and yes it took 4 tries before I got everything on and where I could get to clamps to tighten it up....my fingers are still sore!

20180501_185320.jpg20180501_185323.jpg20180501_193128.jpg20180501_191453.jpg
 

archbuilder

Vice Admiral
Joined
Sep 12, 2009
Messages
5,697
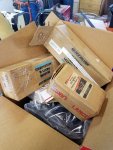
More parts......rebuilding the tilt / trim rams tomorrow.

20180502_173520.jpg And the beast assembled....4 times lol!

20180502_184845.jpg I also picked up a ton of wire, connectors, wire loom and other electrical items including a new alternator. I took mine to the alternator shop and the guy ask me if I got it off the Titanic! He hooked me up with a new internally regulated one.
 

archbuilder

Vice Admiral
Joined
Sep 12, 2009
Messages
5,697
Oh I also had new windshields made, laminated glass like the originals. I also had the side windows done in laminated glass, the originals were plexi. The side windows were the same price either way so I went with the glass, a bit heavier but not likely to scratch.
 

archbuilder

Vice Admiral
Joined
Sep 12, 2009
Messages
5,697
3rd time there were left over parts:facepalm:.....hinge pin washers / shims ......but only a 30 minute or so fix.
 

mickyryan

Rear Admiral
Joined
Apr 18, 2016
Messages
4,214
wonder when mercrury got rid of that big c clip holding the gimble bearing in , neat job man loved all the pics , after you are done i would be afraid to take it on the water it looks more like a museum piece :), hats off to ya!
 

archbuilder

Vice Admiral
Joined
Sep 12, 2009
Messages
5,697
I think the 69 might have been the last year for the snap ring, but not totally sure about that. You can't grease this bearing like the newer ones. The replacement is pretty much a sealed bearing, the old one was kind of sealed.....

And we have to get her wet Micky, that is the fun part! hopefully soon!
 

GA_Boater

Honorary Moderator Emeritus
Joined
May 24, 2011
Messages
49,038
3rd time there were left over parts:facepalm:.....hinge pin washers / shims ......but only a 30 minute or so fix.

Arch - You didn't have to admit that! ;)

Got a general idea how long before the splash? Not tryin' to pin you down cuz we all know stuff happens.
 

kcassells

Fleet Admiral
Joined
Oct 16, 2012
Messages
8,720
Arch....Thank you for the thread. You are always the "Gentleman" builder. Lookin good!
 

archbuilder

Vice Admiral
Joined
Sep 12, 2009
Messages
5,697
Thanks for the complement Kcassells!

Today I rebuilt the trim / tilt rams. I found a pretty good video on YouTube about them. He showed breaking them down, but not really the putting back together part. I used a full kit, including the seals, pressure tube and new valve body. I wouldn't try to reuse the valve body, but you can get a kit without it. I wish the video would have shown how to install the valve body....Mercrusier's instructions were detailed except for the valve body. You have the ram the body goes in a vice, vertical position for this operation. Valve goes on the very top. The directions are something like this:
  1. Hold valve body upright and carefully remove the bolt nut and lower washer that are holding it together (its shipped with a bolt washers and nut that secure the springs and check valves)
    1. B find the TINY spring and check ball, that we didn't mention, that falls out the bottom. Do this while trying to keep the other springs and check balls in the top from falling out. Once you find said tiny spring and ball, try to figure out which of the 6 holes it fell out of. Reinsert spring and check ball, proceed on to next step.
    2. Place sealing washer under tiny spring, check ball and valve body. Install over stud on ram.
    3. Install lock nut and torque to 8-10 ft lbs.


I added step 1.B by the way.....second one was easier after I figured out to hold it sideways, place the sealing washer on it, with the bolt still in it, then slide it over the stud. Sorry I didn't get a lot of shots, it was just an oily mess. I was trying not to hose my phone.
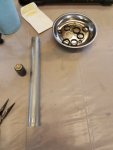
Click image for larger version  Name:	20180505_101342.jpg Views:	1 Size:	409.5 KB ID:	10567482 Here are the new parts, valve body on the left.
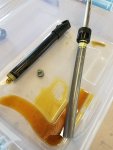
Click image for larger version  Name:	20180505_101734.jpg Views:	1 Size:	422.1 KB ID:	10567483 This is they cylinder partially disassembled. It comes apart fairly easily.
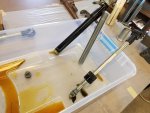
Click image for larger version  Name:	20180505_102008.jpg Views:	1 Size:	513.9 KB ID:	10567484 You can see the valve body in this one at the end of the ram.
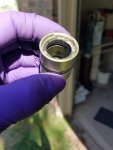
Click image for larger version  Name:	20180505_103536.jpg Views:	1 Size:	424.3 KB ID:	10567485
This part seals the cylinder where the ram and body slide. Both of them were fairly nasty. There are two o-rings inside the body that seal the assembly from the outside elements. The outer O-ring on both cylinders was toast.
 
Last edited:

archbuilder

Vice Admiral
Joined
Sep 12, 2009
Messages
5,697
20180505_112010.jpg Starting to get the new parts back on. Sorry didn't get much of the assembly.

20180505_155443.jpg
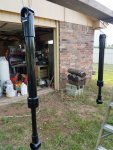
All back together and ready for paint. The first one took an hour or so. Second one was about 20 minutes. Guess we will see what happens when we hook them up! Time to prep for paint next.
 

GA_Boater

Honorary Moderator Emeritus
Joined
May 24, 2011
Messages
49,038
And with your 3rd, 4th and 5th hands hold all the springs in place while you scratch an itch on the side of your nose with your 6th hand.

The missing part of the instructions. Anyone can do it now. :eek:
 

sphelps

Supreme Mariner
Joined
Nov 16, 2011
Messages
11,462
If I were to try and take apart and put back together something like that I’m sure it would either work backwards or not at all !
Hats off to ya !!
btw, I used the Kylon plastic paint on the MFG steering wheel . So far has held up really well !
 

archbuilder

Vice Admiral
Joined
Sep 12, 2009
Messages
5,697
Sam I would say its 50 / 50 if these work! Hopefully they do, but I am not going to hold my breath!

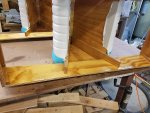
I did some sanding on the epoxy on the insides of the seats tonight. Mainly just to clean things up some and put a coat of spar varnish over it. I'm hoping to put one more coat on the outside and wrap up the finish on the seat frames. I am also thinking tomorrow will be a good day to shoot paint on the rams......get some things organized and move on to the next thing....which I am not sure what that is at the moment!

20180505_201817.jpg
 

Baylinerchuck

Commander
Joined
Jul 29, 2016
Messages
2,726
Awesome pictures of all this work Arch. Glad to see it moving along.....fingers crossed for a June splash!!!
 

archbuilder

Vice Admiral
Joined
Sep 12, 2009
Messages
5,697
image_289875.jpg Thanks Chuck!

I totally ran out of gas today for some reason, but I did get some urethane sprayed on the rams. I have a fiend coming on Wednesday to help install the rub rail...and then I need to head to the saw mill for the logs from the lake.....but I am hoping maybe getting in the glass if the rub rail goes smooth.
 
Last edited:
Top