PlayDoh’s 16 SS resto underway

PlayD0h

Petty Officer 1st Class
Joined
Apr 23, 2009
Messages
326
I’m going to be cutting the top flanges of the original since there cracked badly. I might go with something a bit stronger than just welded on angle. I think they designed this a bit wrong. The top flanges should be longer and wider. The through wood and hull bottom are certainly where most of the force is directed. The mid flange that only goes through the transom metal is fairly useless in terms of support.
 

Watermann

Starmada Splash of the Year 2014
Joined
Jan 12, 2013
Messages
13,753
Welds look great to me, I can't make welds look that good using my new wire feed flux core welder.
 

PlayD0h

Petty Officer 1st Class
Joined
Apr 23, 2009
Messages
326
Welds look great to me, I can't make welds look that good using my new wire feed flux core welder.

Thanks bud. I can use all the encouragement I can get.
I cut some EPS sheets today after whipping up a hot-wire cutter. I used an old computer power supply, using the 12v rail (5v made for slow cutting), and some 24 gauge SS wire. The wire is used and sold for those vaporizers. 24 or 26 gauge, can’t remember which.
I ran the heating wire through my table saw blade opening and just grabbed a scrap piece of wood to prop up the other end and give it tension. Table saw guide makes it’s easy as pie. Stinks but way easier than cutting the crap with a knife.
 

Attachments

  • photo311853.jpg
    photo311853.jpg
    221.3 KB · Views: 1
  • photo311854.jpg
    photo311854.jpg
    390.6 KB · Views: 1
  • photo311855.jpg
    photo311855.jpg
    459.1 KB · Views: 1

PlayD0h

Petty Officer 1st Class
Joined
Apr 23, 2009
Messages
326
Congrats on the welder. If your like I was after getting a welder you’ll be looking for things to weld, and salvaging steel at every opportunity.
 

PlayD0h

Petty Officer 1st Class
Joined
Apr 23, 2009
Messages
326
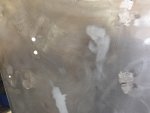
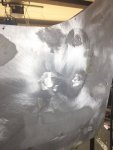
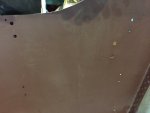
So it’s crunch time and I’ll be working steady on the boat for the rest of the month. I’ve been waiting to fill the transom holes with welds before I button down the deck, but I’ve changed my plans a bit.

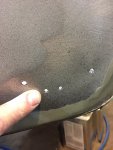
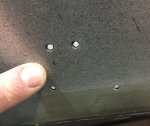
I’m going to use rivets below the transom wood, where it’s only the aluminum sheet.

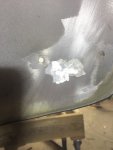
I can use the holes to mount a transducer block (stern saver). That way I can screw transducers into the hdpe block rather than the transom.

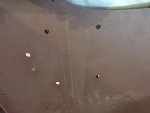
I’m also considering if just epoxying over the other holes is an option. I think I’ll try to weld one and decide after that. The risk of warping is my biggest concern. I hate trying to flatten aluminum, and it never just shapes like steel. One wrong move and it stretches, and shrinking aluminum without welding is voodoo witchcraft I think.

ive asked on a couple welding forums and got mixed advice. Some with aluminum boat welding experience suggest I not weld, and some tell me they do it all the time. One even owning a boat repair business gave me his method.

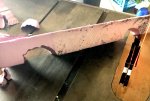
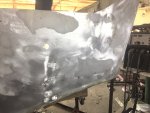
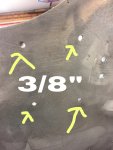
Welding thin aluminum is not easy. Too hot for too long and it drops out or burns away. The line is razor thin as it takes a fraction of a second to go from good to bad. I can fill even 3/8” holes on practice pieces taken from the boat, but I’m not sure if I’ll get a warp on the real deal.

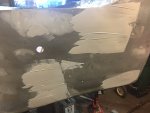
I bought $60 worth of SS and Aluminum thick plates to clamp to the area and soak up the heat and keep things flat. Yet the area will be shrunk regardless. The trick is to peen the weld with hammer on dolly strike(s) right after welding. I can practice this on loose pieces, and my clamped pieces stay flat, but who knows how the actual transom will act.

My plans on spending the $650 for the $1200 welder and avoid paying the $300-$500 for getting someone to weld it for me, has gone astray. I’m now $1300 in on the welder. Yet I plan on doing quite a bit with it, so no regrets so far.

So on the immediate to do list is,
rivet below transom wood holes
rivet transom shelf
fit transom wood and drill holes. My 3/4” aluminum plate will double as my drill guide for that task.
Over drill holes and epoxy holes.
Cut notches and fit EPS sheets for under deck.
Test fit deck wood, and mark exact marks for ‘doublers’, then screw, glue and seal them.
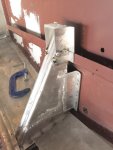
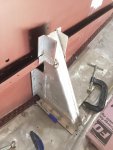
Test fit knee brace and mark out the transom wood flanges to be welded. Then weld the flanges.
5200 butter, bolt and rivet outter hull bottom knee brace support plate.
Gluvit those bolts and rivets and a half dozen others not done already.
Drill, rivet and seal deck wood down
redrill transom wood holes through epoxy.

By then I should have the seats and vinyl decking, so that will get me close to the finish line, or at least to where the boat will be usable.

Sheesh, that’s quite the list. I’ll have to go full out DozerII mode, lol.
 

Watermann

Starmada Splash of the Year 2014
Joined
Jan 12, 2013
Messages
13,753
Quite a substantial list of to-dos, a blitz is always the way to get things done and taking days off working from sun up to sun down is fun and a great way to get it knocked out.
 

PlayD0h

Petty Officer 1st Class
Joined
Apr 23, 2009
Messages
326
Progress!
here is my hot wire cutter in action on the EPS foam. The domahicky is from a toaster oven, it’s a handle hook thing to lift out a tray.
Cheap PC PSU (power supply), 12v + & - wires to vaporizer SS wire 26 gauge.
 

Attachments

  • photo312298.jpg
    photo312298.jpg
    280.4 KB · Views: 3
  • photo312299.jpg
    photo312299.jpg
    233.9 KB · Views: 7
  • photo312300.jpg
    photo312300.jpg
    298.3 KB · Views: 3

PlayD0h

Petty Officer 1st Class
Joined
Apr 23, 2009
Messages
326
Welding all done, and skimmed over with Marine Tex. I ran out of argon right after starting but I got through 3 holes before I realized what was wrong. There’s 3 top right that aren’t pretty but sound.
 

Attachments

  • photo312301.jpg
    photo312301.jpg
    220.3 KB · Views: 1
  • photo312302.jpg
    photo312302.jpg
    306.1 KB · Views: 1
  • photo312303.jpg
    photo312303.jpg
    341.3 KB · Views: 1
  • photo312304.jpg
    photo312304.jpg
    485.2 KB · Views: 1
  • photo312305.jpg
    photo312305.jpg
    266.4 KB · Views: 1

PlayD0h

Petty Officer 1st Class
Joined
Apr 23, 2009
Messages
326
Holes before
 

Attachments

  • photo312306.jpg
    photo312306.jpg
    1.5 MB · Views: 1
  • photo312307.jpg
    photo312307.jpg
    1.7 MB · Views: 1
  • photo312308.jpg
    photo312308.jpg
    1.6 MB · Views: 1
  • photo312309.jpg
    photo312309.jpg
    2 MB · Views: 1
  • photo312310.jpg
    photo312310.jpg
    1.5 MB · Views: 1
  • photo312311.jpg
    photo312311.jpg
    243.9 KB · Views: 1
  • photo312312.jpg
    photo312312.jpg
    1.7 MB · Views: 1
  • photo312313.jpg
    photo312313.jpg
    683.9 KB · Views: 1
  • photo312314.jpg
    photo312314.jpg
    1.8 MB · Views: 1

PlayD0h

Petty Officer 1st Class
Joined
Apr 23, 2009
Messages
326
Marine tex’d Welds, and pic of some EPS getting fitted
 

Attachments

  • photo312315.jpg
    photo312315.jpg
    1.2 MB · Views: 2
  • photo312316.jpg
    photo312316.jpg
    2 MB · Views: 2
  • photo312317.jpg
    photo312317.jpg
    1.3 MB · Views: 2

classiccat

"Captain" + Starmada Splash Of The Year 2020
Joined
Dec 20, 2010
Messages
3,405
Nice progress! I'm still trying to dial-in my hot wire cutter ...using a 12V battery charger. Smoked both my B (5th) and E (6th) guitar strings :lol:. They pop as soon as they start to get red hot. You don't seem to be having that problem!

fetch
 

PlayD0h

Petty Officer 1st Class
Joined
Apr 23, 2009
Messages
326
Nice progress! I'm still trying to dial-in my hot wire cutter ...using a 12V battery charger. Smoked both my B (5th) and E (6th) guitar strings :lol:. They pop as soon as they start to get red hot. You don't seem to be having that problem!

fetch

I’ve read people using guitar strings, yet if your having trouble I’d hit one of those vape shops. There all over the place here. I think SS wire was $5-$10. I tried nichrome but i only had a 28 gauge or something and it broke after a couple cuts. Kanthal would work also which is cheaper. Get 26 or 24 gauge. You can gut nichrome wire from a hairdryer.
You don’t want more than 2 amps, so depending on your charger that might not work. A trickle charger or one that will stay at 2 amps could work. The length of the heating wire is the variable you can control without building a circuit or using a pot resistor. Start long and try that.
You could also rape a transformer from an old appliance or find an old computer and gut it’s psu. Actually you wouldn’t even need to remove the psu, just cut or unplug the 20-24 pin. Yellow is 12v+, black - you can find the pin-out online. 5v might work ok for you depending on what your cutting.
You could get a PSU / old PC from the landfill, where they take electronics, or a recycler. Probably a shop that sells used PCs would give you one for a song. Used PC sales are usually a side deal for IT contractors.
Let me know where you live and I can help you source stuff if you need. You could use a PSU and not ruin it, but I’d only use an older PC.
 

PlayD0h

Petty Officer 1st Class
Joined
Apr 23, 2009
Messages
326
You could try hooking you charger to a long extension cord, and your heater wires to the other end. That might soak up enough power to drop your amps and not pop the wire.
 

classiccat

"Captain" + Starmada Splash Of The Year 2020
Joined
Dec 20, 2010
Messages
3,405
Thanks for the offer! I ordered some 26 gauge SSfrom amazon...not too spendy. I have an industrial 5v power supply but only rated to 3A...15W is t going to cut it (hehe).... way too slow. Shooting for something in the 30-40W range. My 12V charger maxes out at 10A but as long as you know what resistance to shoot for (and the wire has high thermal stability!) you can dial in the correct length using power equations. Power = Current x Voltage = Current^2 x Resistance (twinkle twinkle little star power equals I squared R :lol:)
 

PlayD0h

Petty Officer 1st Class
Joined
Apr 23, 2009
Messages
326
Thanks for the offer! I ordered some 26 gauge SSfrom amazon...not too spendy. I have an industrial 5v power supply but only rated to 3A...15W is t going to cut it (hehe).... way too slow. Shooting for something in the 30-40W range. My 12V charger maxes out at 10A but as long as you know what resistance to shoot for (and the wire has high thermal stability!) you can dial in the correct length using power equations. Power = Current x Voltage = Current^2 x Resistance (twinkle twinkle little star power equals I squared R :lol:)

The wire gauge is another variable to consider, and material. Nichrome heats was easier. Then there’s twisting the wires (Clapton in the vape world). Put 2 or more pieces in the chuck of a drill and hold the other ends. Power up and the wires will twist up perfectly. That will modify resistance and the thermal factor.

A non-glowing wire cuts much more accurately and cleanly than glowing unless your using a table saw type jig. I had to cut some right angle cuts with a knife and compared to the nauseating smell of burnt plastic it wasn’t the hassle it was before, lol.
Do it outside Facing the wind, and where a respirator. You’ll still get some whiffs of it but it’s so much better than indoors, and no mask.

My handheld jig works perfectly for rib notches but for cutting the 6” wide strips on an angle isn’t easy to do perfectly. I should have cut the couple I did free hand on the table saw. The concern I have for this EPS the very small broken pieces that will clog the rib channel drains and or end up out the drain. I don’t want to bilge pump out chips of EPS in to a lake.
Wire cutting makes EPS granulating very less likely. I though of using spray foam to secure the strips and pieces together and in place. My concern about that is the toxicity factor. I don’t plan on pumping or draining out water, but things happen and will happen in time. I think about if I would drink from a spray-foamed cup. Or would I let my kids do it.
It sounds like you know what your doing and Ohms law, so I’m certain you’ll get it done. Your ‘ my battery charger and guitar string’ didn’t paint a picture of your knowledge, lol.
My buddy said his work uses a commercial hot wire cutter for EPS but theirs cost $5000. I asked him if they want another one to call me, lol.
 

PlayD0h

Petty Officer 1st Class
Joined
Apr 23, 2009
Messages
326
So my 26 gauge SS at 10” is just over 2 ohms. My 250 Watt PSU puts 16 A on the 12v rail.
 

PlayD0h

Petty Officer 1st Class
Joined
Apr 23, 2009
Messages
326
Tack welded top tabs on knee brace while transom wood was in place. Removed the wood to avoid it burning.
 

Attachments

  • photo312549.jpg
    photo312549.jpg
    202.7 KB · Views: 2
  • photo312550.jpg
    photo312550.jpg
    217.7 KB · Views: 2

Watermann

Starmada Splash of the Year 2014
Joined
Jan 12, 2013
Messages
13,753
No problems there with your re-worked knee brace taking the load :encouragement:
 

PlayD0h

Petty Officer 1st Class
Joined
Apr 23, 2009
Messages
326
What pedestal height do most of you use? I found some 15” on sale and wonder if I should snag them. Or with 2 kids (7 & 9) if I should be using adjustable pedestals.

Also im looking at drain tubes, and the place that seems to be good only has Brass, SS or plastic. I think the ones I took out were SS since I remember having to use decent force to split them with a chisel to get them out. If they were aluminum I’d think they’d cut much easier.
 
Top