Pinion gear timing to driven gears in B3 upper housing

homelite

Petty Officer 2nd Class
Joined
Aug 13, 2002
Messages
158
Hello. I pulled my driveshaft out and replaced the pinion seal and yoke. In reading my Seloc manual which covers so many models, I am confused so I want to ask... Is the pinion timed at all with the 2 driven gears? Is there a special way to install it? I don't think so but I wanted to ask. Also, do you really torque the castle nut to 200 ft lbs? That seems really tight. I indexed it with paint before removing and it didn't seem near that tight to remove. My special wrench for that large castle nut does not have the 1/2 drive square hole in it for a torque wrench either. Is a couple taps with the hammer and about a 1/16" past my index marks good? My S/N is
OW923460.. Thanks in advance!
 

dubs283

Vice Admiral
Joined
Jul 27, 2005
Messages
5,322
With the rear cover of the driveshaft housing removed you will see the shift linkage, shift shaft and yoke assembly along with the brass shift races on both gears. The brass races are offset to ensure proper shifting and smooth/balanced operation of the driveshaft, clutch and gearset under a load

Both brass races have a (+) and (-) stamped into them 180 degrees apart. You must align one gear at (+) and one gear at (-) both aligned with the cast hash marks at the top/bottom of the housing. This will ensure proper shifting/balance. If the marks are not aligned the gearset can wobble, not shift proper and cause premature wear

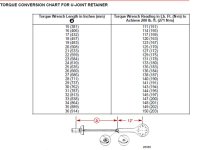
Yes the retainer is torqued to 200 lb/ft. There is a chart in the oem manual used to determine what value the torque wrench needs to be set to ensure the 200 lb/ft value based on the length of the torque wrench being used. This is of course using the proper oem retainer wrench

Can't say as to using a hammer on the retainer wrench to tighten because I've never done it that way but have repaired many drives where the retainer was very loose.
 

Scott06

Admiral
Joined
Apr 20, 2014
Messages
6,425
Hello. I pulled my driveshaft out and replaced the pinion seal and yoke. In reading my Seloc manual which covers so many models, I am confused so I want to ask... Is the pinion timed at all with the 2 driven gears? Is there a special way to install it? I don't think so but I wanted to ask. Also, do you really torque the castle nut to 200 ft lbs? That seems really tight. I indexed it with paint before removing and it didn't seem near that tight to remove. My special wrench for that large castle nut does not have the 1/2 drive square hole in it for a torque wrench either. Is a couple taps with the hammer and about a 1/16" past my index marks good? My S/N is
OW923460.. Thanks in advance!
I think Dubs has steered you straight but do yourself a huge favor and get a factory Merc manual. The level of detail is incredible vs the Selco or Clymer stuff. Not sure what number manual you will need but I think I pd like $35-50 each on Ebay for used ones for my 5.0 and Alpha Gen 2 manuals.

The parts and the drives are too expensive to mess up with wrong info or not having the correct wrench to torque the big castle nut.
 

dubs283

Vice Admiral
Joined
Jul 27, 2005
Messages
5,322
That chart is for the gear case (lower/propshaft) retainer/carrier.

OP is reassembling the driveshaft housing (upper). The retainer wrench/tool in question has a handle, approx length is 12 inches center to center
 

alldodge

Moderator
Staff member
Joined
Mar 8, 2009
Messages
42,054
That chart is for the gear case (lower/propshaft) retainer/carrier.

OP is reassembling the driveshaft housing (upper). The retainer wrench/tool in question has a handle, approx length is 12 inches center to center
Thanks, I changed to correct one
 

homelite

Petty Officer 2nd Class
Joined
Aug 13, 2002
Messages
158
Thanks all for the pointers. I finally got a chance to get back to this. Do I have to remove the shift cam to see the marks properly from the back? Is it ok plus or minus a tooth or that critical to get spot on? It's hard to tell with the shift cam blocking your straight on view....
 

04fxdwgi25

Chief Petty Officer
Joined
Mar 25, 2022
Messages
537
Do you need the actual Mercruiser Bravo drive rebuild manual? I have Manual 28 in PDF if you need it. Has a full rebuild section in it and bet it is 100 time more complete than the Seloc manual.
 

homelite

Petty Officer 2nd Class
Joined
Aug 13, 2002
Messages
158
Do you need the actual Mercruiser Bravo drive rebuild manual? I have Manual 28 in PDF if you need it. Has a full rebuild section in it and bet it is 100 time more complete than the Seloc manual.
I have a 2000 Bravo manual I found online. It seems the same as my 2007 as far as the build. I'm just looking for an answer to the question I posted. Per the book, they install the pinion before the shift cam I guess so you can see the index plus and minus easier. I had no reason to take that part apart but do I have to to properly get the pinion in properly? Thats the question!
 

alldodge

Moderator
Staff member
Joined
Mar 8, 2009
Messages
42,054
It's best to remove shift cam to align the marks. Once drive shaft is installed, then reinstall shift cam.
 

homelite

Petty Officer 2nd Class
Joined
Aug 13, 2002
Messages
158
It's best to remove shift cam to align the marks. Once drive shaft is installed, then reinstall shift cam.
Yep. Thats what I did. Just ordered O rings and seals to reinstall it all. Thanks.
 

homelite

Petty Officer 2nd Class
Joined
Aug 13, 2002
Messages
158
With the rear cover of the driveshaft housing removed you will see the shift linkage, shift shaft and yoke assembly along with the brass shift races on both gears. The brass races are offset to ensure proper shifting and smooth/balanced operation of the driveshaft, clutch and gearset under a load

Both brass races have a (+) and (-) stamped into them 180 degrees apart. You must align one gear at (+) and one gear at (-) both aligned with the cast hash marks at the top/bottom of the housing. This will ensure proper shifting/balance. If the marks are not aligned the gearset can wobble, not shift proper and cause premature wear

Yes the retainer is torqued to 200 lb/ft. There is a chart in the oem manual used to determine what value the torque wrench needs to be set to ensure the 200 lb/ft value based on the length of the torque wrench being used. This is of course using the proper oem retainer wrench

Can't say as to using a hammer on the retainer wrench to tighten because I've never done it that way but have repaired many drives where the retainer was very loose.
Thanks dubs and get it. question though... I have the alignment marks perfect with the hash marks with the plus and minus opposite each other. But when I install the pinion gear, i tried 3 times and i can't get them perfect. I can get one perfect and the other looks like maybe it's off 1 tooth?? Is this just a guide for installing the pinion or with the pinion in and tight, do they have to be perfectly straight with the hash marks? Thanks
 

dubs283

Vice Admiral
Joined
Jul 27, 2005
Messages
5,322
Being off a tooth won't affect anything. Just make sure after the drive gear/u joint bearing assembly is installed and before you install the rear cover the gearset rotates smooth and the +/- lines are offset and as close as can be to even with the marks on the housing after the entire assembly has been rotated a number of times by hand
 

homelite

Petty Officer 2nd Class
Joined
Aug 13, 2002
Messages
158
Being off a tooth won't affect anything. Just make sure after the drive gear/u joint bearing assembly is installed and before you install the rear cover the gearset rotates smooth and the +/- lines are offset and as close as can be to even with the marks on the housing after the entire assembly has been rotated a number of times by hand
Thanks. Got it. I flipped the plus and minus top to bottom and bottom to top. I was able to get it spot on. All done and back on boat. Thanks!
 
Top