Overhauling my 1988 MerCruiser 4.3 ltr. engine

Rivergator

Petty Officer 1st Class
Joined
May 7, 2013
Messages
224
or what's left of it!
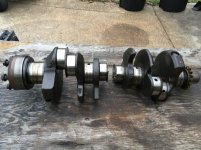
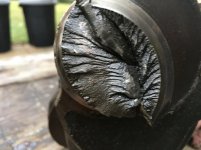
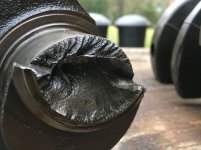
no kidding, Lou! Thanks Rick now I know what that thing is. As promised here are more detailed pictures of the broken crank. Could it just be a material defect or fatigue? Also I noticed now that the crank is out that there is about a 1/4 of an inch of longitudinal play in the cam shaft. With the timing chain gear removed I can move the cam shaft forth and back by about a 1/4 of an inch, but no lateral play. That seems to be solid. Is that normal?
 

Attachments

  • crank03.jpg
    crank03.jpg
    147.4 KB · Views: 16
  • crank04.jpg
    crank04.jpg
    95.2 KB · Views: 15
  • crank05.jpg
    crank05.jpg
    105.6 KB · Views: 96

kvkon

Seaman
Joined
Aug 6, 2006
Messages
64
no kidding, Lou! Thanks Rick now I know what that thing is. As promised here are more detailed pictures of the broken crank. Could it just be a material defect or fatigue? Also I noticed now that the crank is out that there is about a 1/4 of an inch of longitudinal play in the cam shaft. With the timing chain gear removed I can move the cam shaft forth and back by about a 1/4 of an inch, but no lateral play. That seems to be solid. Is that normal?
Certainly has the appearance of what a torsional vibration failure should look like. Couple of things bother me about this. 1) If it's related to the damper usually the nose end of the crank breaks off. 2) Torsional vibration failures require long term operation at the correct rpm to set up the torsional vibrations. Electric motors and stationary constant speed engines are the most susceptible to these failures. You've got an interesting one on your hands. Any chance you can find a later model 4.3 vortec with balance shaft to drop in?
 

Howard Sterndrive

Rear Admiral
Joined
Nov 5, 2008
Messages
4,603
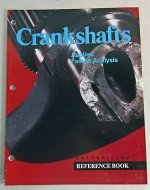
That crank broke from overload in my opinion. It was a victim , not the cause. The $64K question we ask is: Did it break where it's inherently weak (i.e.at a stress riser like a change in diameter like a journal edge) ? If yes, then it broke where you'd expect it to break in overload. That fracture is all woody and rough meaning it broke all at once and it's at the weakest part of the crank. I think the boat hit something or had a hydraulic lock. This book is a great reference.
 

Attachments

  • Caterpillar-Reference-Principles-of-Applied-Failure-Analysis-Crankshafts.jpg
    Caterpillar-Reference-Principles-of-Applied-Failure-Analysis-Crankshafts.jpg
    26.9 KB · Views: 6
Last edited:

Scott Danforth

Grumpy Vintage Moderator still playing with boats
Staff member
Joined
Jul 23, 2011
Messages
49,574
nice beach marks

crank05-jpg.330038
 

Rivergator

Petty Officer 1st Class
Joined
May 7, 2013
Messages
224
Thanks to Kenny Nunez, who put me in touch with Mike Reed of New Orleans, an incredible competent machine shop who just finished a replacement crank for my engine (including all matching bearings) and now the putting the engine back together will begin. Question: Do I need to put a sealant (gasket maker) on the oil pan gasket, especially on the bottom part of the timing chain cover. The whole gasket is a one piece rubber gasket, which also runs under the timing chain cover and the rear main seal ring. By the looks of the gasket I think it is a solid gasket not needing any additional sealing, but your advise is needed. Also I am pretty sure that I need a gasket maker for the front and rear of the intake manifold, because it looks like the intake manifold gaskets cover the sides only. If my assessment is correct what gasket maker do I need? And lastly, do I need to apply a sealant to the head gaskets?
 

Lou C

Supreme Mariner
Joined
Nov 10, 2002
Messages
12,679
No sealant on the HGs, I used Fel/Pro marine HGs on mine, on each side there should be 2 dowels sticking out of the block to hold the HG in place and help line up the head to the block.
A few tips, make sure that you run a thread chaser through the block cyl head bolt threads, you want to also thread the head bolts in by hand before installing the heads to make sure that each one threads in all the way. Your block was likely cleaned out by the machine shop but it does not take much grit in the bottom of one of the cooling passages to keep a head bolt from threading all the way in if its raw water cooled engine. The head bolts also must be cleaned up or replaced if too rusted and they get sealer (Merc Perfect seal, OMC gasket sealer or similar) on the threads.


For the intake, yes the "china wall" front and rear vertical ends of the block get a bead of sealant, like Permatex Ultra Grey and continue it up the cyl head by about 1/2" or so. When I did my intake gaskets I used a bit of OMC gasket sealer on the water passages front and rear, to keep the gaskets from sliding around when you drop the intake into place.


For the oil pan/timing cover, I have not had to do those but I have seen people use a bit of sealant at each corner of the pan. Might want to take a look at a Merc manual or vintage GM shop manual for more information.
 

Scott Danforth

Grumpy Vintage Moderator still playing with boats
Staff member
Joined
Jul 23, 2011
Messages
49,574
no sealant on the head gaskets
appropriate sealant on the new head bolts (GM used torque to yield bolts which are a one-time use)
a dab of RTV in the corners of the rear bearing cap where it meets the pan rail. other than that, the pan rubber is dry
 

nola mike

Vice Admiral
Joined
Apr 22, 2009
Messages
5,364
No sealant on the head gaskets.
 

Attachments

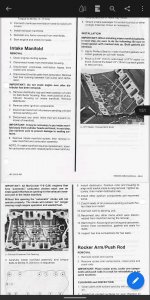
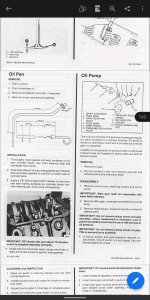
  • Screenshot_20201221-125936149.jpg
    Screenshot_20201221-125936149.jpg
    1.3 MB · Views: 10

Rivergator

Petty Officer 1st Class
Joined
May 7, 2013
Messages
224
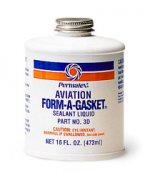
Thanks Lou and Nola. Does Permatex make an equivalent to Merc Perfect seal, OMC gasket sealer? Is Permatex "Form-A-Gasket/Sealant 2B a suitable substitute? Lou it looks like the oil pan gasket you are referring to is a split gasket. Mine is a solid one piece rubber gasket. Looking at the old gasket I don't see any remnants of any sealer. Also the bottom of timing chain cover and the rear seal ring don't show any signs of sealant. Were there 2 different types of oil pan gaskets used on that engine or is mine a superior improved after market design?
 
Last edited:

Scott Danforth

Grumpy Vintage Moderator still playing with boats
Staff member
Joined
Jul 23, 2011
Messages
49,574
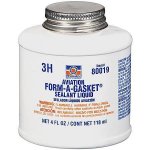
permatex #3 (Aviation)

Permatex #1 is for core plugs
Permatex #2 is for cork and paper gaskets
 

kenny nunez

Captain
Joined
Jun 20, 2017
Messages
3,290
I always used Permatex #2 black for the head bolts. The main thing as Lou said run a tap through the bolt holes.
 

Lou C

Supreme Mariner
Joined
Nov 10, 2002
Messages
12,679
OK now this is bugging me. For the intake (keep in mind this is the Pre-Vortec) on that Merc manual stuff from Nola Mike it says 40 ft lbs but in my OMC shop manual for the same engine it says 30 ft lbs. Both can't be right!
I torqued mine to 30 ft lbs.
 

nola mike

Vice Admiral
Joined
Apr 22, 2009
Messages
5,364
OK now this is bugging me. For the intake (keep in mind this is the Pre-Vortec) on that Merc manual stuff from Nola Mike it says 40 ft lbs but in my OMC shop manual for the same engine it says 30 ft lbs. Both can't be right!
I torqued mine to 30 ft lbs.
Gm probably has a third value...
 

Rivergator

Petty Officer 1st Class
Joined
May 7, 2013
Messages
224
New crank is in and properly torqued, pistons are back in and now I am waiting for my gasket sets and a few other parts to finish my engine. I have a question about the engine's serial number. I found 3 labels on one of the valve covers. One for the transom assembly, one for the engine and one for the sterndrive. The only label that I can still make out was the sterndrive. Are there any other places where I can read the serial numbers? I understand there should be a tag near the starter showing the engine S/N, but that tag is gone. I saw a bunch of numbers on the engine block, but I don't know what they are.
 

Rivergator

Petty Officer 1st Class
Joined
May 7, 2013
Messages
224
Btw, I just finished repainting everything and while I was doing the flywheel I realized how heavy that baby is and I thought, if that engine came to an abrupt stop that flywheel would just keep on going and maybe that's what broke the crank. Just a thought
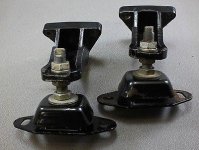
Anyway I was also wondering if anybody has a couple of front motor mounts laying around that I can buy. I am just looking for the motor mounts (bottom part of picture) not the brackets. I have those. I prefer to get the same mounts as shown in the picture.
 

Attachments

  • 1_c88032cb.jpeg
    1_c88032cb.jpeg
    27.8 KB · Views: 5

Lou C

Supreme Mariner
Joined
Nov 10, 2002
Messages
12,679
There will be a casting # at the rear of the block behind the last cylinder on the starboard side. There is also a GM serial number on the front of the block right near where the cyl head mates up, same side. The tag near the starter referred to above is a Merc serial number, not GM. The casting # is really the most important one as far as buying parts and what will work/won't work.

Before you install the cyl heads be sure to run a thread chaser through the cyl head bolts holes, make sure your cyl head bolts will thread all the way down before installing. Due to raw water cooling crud in the water jackets can prevent the bolts from going in all the way. And as you probably know you need to use gasket sealer on the threads. I used Permatex Aviation when I did mine.
 

Scott Danforth

Grumpy Vintage Moderator still playing with boats
Staff member
Joined
Jul 23, 2011
Messages
49,574
Btw, I just finished repainting everything and while I was doing the flywheel I realized how heavy that baby is and I thought, if that engine came to an abrupt stop that flywheel would just keep on going and maybe that's what broke the crank. Just a thought
Anyway I was also wondering if anybody has a couple of front motor mounts laying around that I can buy. I am just looking for the motor mounts (bottom part of picture) not the brackets. I have those. I prefer to get the same mounts as shown in the picture.
buy new mounts vs old ones.

if you upgrade to a balance shaft motor, you dont need the squishy mounts and can use the cheep mounts
 

Rivergator

Petty Officer 1st Class
Joined
May 7, 2013
Messages
224
Thanks Lou, that was good info. Also I will most certainly make sure that all the threads and holes are clean. Which one of the 2 did you use?
 

Attachments

  • Image01.jpg
    Image01.jpg
    22.9 KB · Views: 4
  • Image02.jpg
    Image02.jpg
    27.6 KB · Views: 4

Rivergator

Petty Officer 1st Class
Joined
May 7, 2013
Messages
224
Scott, do you really think that's a good plan? Swapping out the whole engine for one that has a balance shaft, just so I can get the cheep mounts instead of the squishy ones. Maybe I am missing something here.
 
Top