Overhauling my 1988 MerCruiser 4.3 ltr. engine

Scott Danforth

Grumpy Vintage Moderator still playing with boats
Staff member
Joined
Jul 23, 2011
Messages
49,585
Scott, do you really think that's a good plan? Swapping out the whole engine for one that has a balance shaft, just so I can get the cheep mounts instead of the squishy ones. Maybe I am missing something here.
your non-balance shaft motor has a broken crank

you need a new motor

why not build a balance shaft, vortec.
 

Rivergator

Petty Officer 1st Class
Joined
May 7, 2013
Messages
224
I am going to replace the intake manifold bolts, because the heads are rotten and partially stripped. I like to replace them with the same correct washerhead bolts. Can anybody tell me what strength grade these bolts are? Is it a 5 or 8 or ????
 

Rick Stephens

Admiral
Joined
Aug 13, 2013
Messages
6,118
I am going to replace the intake manifold bolts, because the heads are rotten and partially stripped. I like to replace them with the same correct washerhead bolts. Can anybody tell me what strength grade these bolts are? Is it a 5 or 8 or ????
Matters not at all. Not a high strength or torque application.
 

Rivergator

Petty Officer 1st Class
Joined
May 7, 2013
Messages
224
I will stay with standard. I was able to read the grade markings off one of the OEM bolts and they are grade 5. I also noticed that 6 of the bolts are 1 1/4" long and the other 6 are 1 1/8" long. When I took them out I thought they were all the same length except for 4 bolts that were holding the 2 engine lift brackets on either side of the intake manifold at the rear. It's not a big issue but if somebody knows what the proper bolt lengths are and where they all go it would make me that much smarter.
 

Rivergator

Petty Officer 1st Class
Joined
May 7, 2013
Messages
224
I am about to install the hydro lifters, push rods, rocker arms etc. and I have a lot of questions about the lifters. They have been sitting in the shelf now for several months and I don't know if they are empty, half full or full of oil. I know how to adjust lash and preload, but I don't know about the lifters. In order to do the preload should they be empty, full and bled or does it matter. Does anybody think it's a good idea to actually take the lifters apart to check and clean them or can they be checked and cleaned without taking them apart. My lifters are the roller type and I know they and the rods need to go back to the same valves, but since the lifters also have been held in place by a bracket to keep them running straight and in the same direction, is it critical that they go back running in the direction as they did before or does it matter if they get turned around 180 degrees. There is no reason they can't go back the same way they came out. I am only asking in case if I take them apart it will be kinda difficult to remember and keep track which way they were facing.
 

Scott Danforth

Grumpy Vintage Moderator still playing with boats
Staff member
Joined
Jul 23, 2011
Messages
49,585
Roller lifters are more forgiving than flat tappet lifters. However best to mate them back in correct holes and direction

To pre-lube lifters. Put lifter in small can of oil and actuate the plunger
 

Rivergator

Petty Officer 1st Class
Joined
May 7, 2013
Messages
224
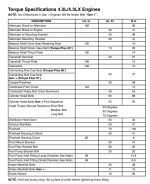
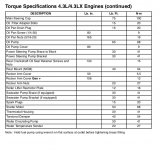
Thanks Scott for answering my questions. Please confirm that the following torque values are correct. I am getting conflicting values from different manuals and I am not sure what is right. Here is what I did:
Head bolts = 70 ft/lbs
crankshaft main bearing cap nuts = 65 ft/lbs
connecting rod cap nuts = 45 ft/lbs
intake manifold 12 bolts = 40 ft/lbs
 

Rivergator

Petty Officer 1st Class
Joined
May 7, 2013
Messages
224
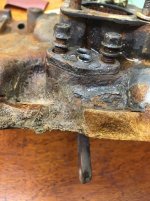
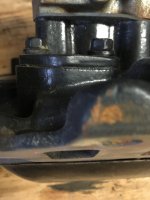
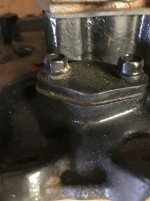
Thanks Rick for the torque specs. My intake manifold was too rotten so I found a good used one on ebay. I received it the other day with a slight difference than my old one though. Right next to the carburetor on starboard on my old manifold is this thing, looks like a probe or sensor (see picture one) but the new manifold does not have it. Instead the hole on top is capped and nothing sticks out of the bottom of the manifold (see pictures 2 and 3). Can anybody tell me what the purpose of this little gizzmo is? Thanks
 

Attachments

  • IMG_0619.jpg
    IMG_0619.jpg
    164.3 KB · Views: 10
  • IMG_0620.JPG
    IMG_0620.JPG
    1.5 MB · Views: 9
  • IMG_0621.jpg
    IMG_0621.jpg
    102.6 KB · Views: 9

Lou C

Supreme Mariner
Joined
Nov 10, 2002
Messages
12,693
That's the heat tube for the hot air heated choke (on your old one). Used on the 2bbl Rochester carb. If you have a hot air choke and want it to work install the heat tube on the new manifold.
The way it works is that there is a vacuum port in the choke housing, vacuum sucks air through that tube and it gets heated as it travels through the exhaust crossover area.
 

Scott06

Admiral
Joined
Apr 20, 2014
Messages
6,450
it is not a sensor should be a tube running in there from the two 1/4” outlets. May be corroded and only have part of the tube left ...

Its the connection for the heated choke. old chokes had a pipe in the exhaust passage in the intake manifold That supplied hot air to heated choke coil. Take the block off off the new manifold and swap the pipe off the old manifold or do you have an electric choke on your carb? If you have an electric choke you don‘t need the warm air supply.
 

Lou C

Supreme Mariner
Joined
Nov 10, 2002
Messages
12,693
yep if you go electric you then don't need the tube just keep the block off plate. I had a hot air choke like that on my '70 Ford with the 302 V8 2 bbl Autolite 2100 carb. Went into a passage on the exhaust manifold.
 

Rivergator

Petty Officer 1st Class
Joined
May 7, 2013
Messages
224
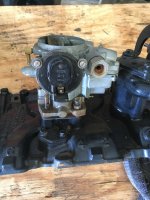
Thanks for all that great info. I learned a lot. What I neglected to mention was that the new manifold also included the carburetor (see picture). So I assume since the whole thing came as a set to leave it all alone and install the manifold without the old heating tube. Btw, the original carburetor was a MCM-175. Does anybody recognize the new carburetor on the picture here and can tell me what make and model it is.
 

Attachments

  • IMG_0622.JPG
    IMG_0622.JPG
    1.6 MB · Views: 12

kenny nunez

Captain
Joined
Jun 20, 2017
Messages
3,290
You better look inside of that carburetor, I bet it is not in good condition.
I suggest you rebuild the original one.
 

Lou C

Supreme Mariner
Joined
Nov 10, 2002
Messages
12,693
That's an electric choke model, no need for the choke heat tube but as noted you might want to evaluate the condition of both carbs, see which one is in better condition. Getting old neglected carbs clean can be very difficult, an ultrasonic cleaner might be the only way.
 

Scott06

Admiral
Joined
Apr 20, 2014
Messages
6,450
Thanks for all that great info. I learned a lot. What I neglected to mention was that the new manifold also included the carburetor (see picture). So I assume since the whole thing came as a set to leave it all alone and install the manifold without the old heating tube. Btw, the original carburetor was a MCM-175. Does anybody recognize the new carburetor on the picture here and can tell me what make and model it is.
No such carb as an MCM 175 is think that is the engine model (HP=175).

There is a carb number stamped just below the fuel inlet. That looks like a mercarb with a single (vs dual on a rochester 2 jet) mixture screws. By the looks of the hardware store scews and washers on the choke element some one has been in before.
mercrabs were on almost any engine merc made in the last 30 years so cant tell by looking at it. if you google the carb numbers you can find out what they are off. Likely they are both original to the v6 s and will work with a rebuild
 

Rivergator

Petty Officer 1st Class
Joined
May 7, 2013
Messages
224
Scott, I compared the old carb with the new one and I am happy to say that they are the same and identical. The old carb has a metal tag screwed on one of its bolts which says Mercruiser MCM175 and the number 33049565. the new carb does not have any tag on it but has the same number stamped on it. I am pretty sure the new carb needs to be gone over, but it is in a lot better shape than the old one. Btw, great observation, hawk eye, about the screws and washers on the choke and yes sir, looks like that choke has been messed with. Thanks for pointing that out.
 

Rivergator

Petty Officer 1st Class
Joined
May 7, 2013
Messages
224
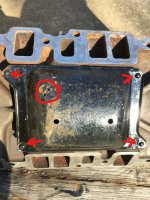
What is the purpose of the metal cover underneath the intake manifold? As I was getting the manifold ready to install I noticed a few little rust holes in that cover (see circle). Is that cover important or shall I ignore the little rust holes? I have a good spare one that I could replace this one with but I noticed that the corners are riveted (see arrows) to the bottom of the manifold. What a bummer. What shall I do?
 

Attachments

  • IIMG_0629 (1).jpg
    IIMG_0629 (1).jpg
    342.9 KB · Views: 10
Top