New purchase SX-M

i_build

Petty Officer 2nd Class
Joined
Apr 24, 2005
Messages
136
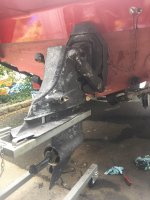
Thank you Lou, my gimbal housing flange is missing a significant amount of metal that the PO did not maintain properly as you mentioned as a common area not maintained. So I have already bought a new bellows, ground down the ridge you show in Pic 1, and designed and printed pressure test plugs that will seal off the gimbal bearing and seal off the pivot housing side Pic 3 with a spout to pour in fresh water. The thought is I would measure how much different the bellows will sit back doing this alternative method and test to see if it will hold water with movement. At least we have somewhat quantifiable results so if someone else has the same issue they may consider it. If it does leak then I switch the housing now... if it does not then I sea trial for the first time just to get an idea what all I need to fix. Of course the ideal fix is to go back to what was originally designed but finding those funds after this hurricane is not in my budget and we want to see how the new boat runs. I will post a follow up that will make this more cohesive. Thank you for your help.
 

Lou C

Supreme Mariner
Joined
Nov 10, 2002
Messages
12,569
If you're going to wind up changing the gimble housing, you will either have to pull the engine, or find a way to support it from above, because the outer housing has studs that go thru the transom and then those studs slide into the inner transom plate. That is what supports the rear of the engine in this design. If you do wind up pulling the engine I would for sure consider replacing the steering actuator and cable while it's all open back there because those jobs can be tough with the engine in place.
The corrosion there I think is because there was salt water laying inside the bellows.
My '88 Cobra has been moored in salt water in Lond Island NY for about 20 seasons and the gimble flange looks like new! No corrosion to speak of at all. But the drive has been pulled every year, I have not had a leaky bellows since about 2004 or 5 or so. That was from the previous owner.
 
Last edited:

i_build

Petty Officer 2nd Class
Joined
Apr 24, 2005
Messages
136
Yes that bellows had to have been filled with water and I have no idea why the heck they had no sacrificial anodes on the drive that probably didn't help the abuse they put this housing through. My 66 Ana Capri Mercruiser housing is in better shape... but luckily everything but that gimbal bearing area seems to be in good shape. I'm printing the part I need to cap the part of the bellows that normally gets pushed through the pivot housing tonight so tomorrow I should be able to test and see how well she at least holds the water in the bellows while manipulating the angles. Hoping it will hold but will take copious pics and video and post it afterwards. Praying it works well and I know it is really based on how much material you have left as well as the condition of what's left but I'll post more detailed pics of my situation so that others can base there own decisions on whether they are in better shape than mine or worse. Was bypassing the water heater in the boat today as it sprung a leak and my water pump kept kicking on and off ever few minutes. There's another 3-4 hundred.
 

i_build

Petty Officer 2nd Class
Joined
Apr 24, 2005
Messages
136
BTW my design that plugged the pivot housing side failed it's harder to design than expected. I basically cleaned the area of the gimble housing all the way back to the grease tube immaculate ground down the ridge in the bellows that would normally fit into the grove on the gimbal housing and pushed the bellows all the way back to where the grease tube enters the gimbal housing. The amount of rubber to metal contact is the equivalent of what would be if the Gimbal housing was undamaged with more area of contact in 70% of the circumference than normal. I know that fully tilting up will probably overextend the bellows by about 2 inches so I will test that. I do believe it will be sufficient for a water trial thank you for your help.
 

Lou C

Supreme Mariner
Joined
Nov 10, 2002
Messages
12,569
That may work because you have enough alu to support the bellows. Now I’m not sure about the Volvo bellows since I think it was changed from the original design (originally both the Cobra & Volvo used the same bellows); but on the Cobra there is one extra fold that faces down to help it flex when you tilt up. As a practical matter I try not to tilt more than half way up anyway….
 

i_build

Petty Officer 2nd Class
Joined
Apr 24, 2005
Messages
136
Yes I remembered your post and counted and there was one extra fold and I made sure that was facing down. Thanks again and I plan on pulling the drive straight after the first trial so will definitely see whether it was sufficient or not.

Just having a heck of a time trying to get the drive mounted again. Boat is level, alignment tool slides in just fine, but as soon as I get the splines engaged I go in about quarter inch an no further. That was late last night tired and impatient... so will clean the splines and shaft again... and I think I have an old shaft that I can test and use to clean the other end with... and try once again to mount it tonight. Thanks again all.
 

Lou C

Supreme Mariner
Joined
Nov 10, 2002
Messages
12,569
I'm not sure if this will work on the Volvo because there are some subtle differences between it and the OMC Cobra, but on mine what works like a charm, is sliding a long thin screwdriver in the u joint cross, when it stops from sliding in, just turn the shaft like 1/8" or so either way, and it slides right in. After I figured this trick out, no more problems getting the drive back on. All you are doing here is just making the splines on the driveshaft line up with the ones in the coupler. The drive jack really helps because you can get the height just right, anybody who maintains their own I/O boat should have one, saves time trouble and your back!
R&R the Cobra.jpg
 

i_build

Petty Officer 2nd Class
Joined
Apr 24, 2005
Messages
136
I used an extremely long flat head screw driver to reach in an clean the splines on the coupler and then using grease on the alignment tool... inserting over and over wiping the crud off of the grease... I cleaned it well and inserted the drive with hardly any effort at all. I never shifted the drive before... nor run it for a while because the original gimbal bearing sounded like it would explode... but now she started and ran quietly and shifted into forward and reverse perfectly so that seems sorted... but as I looked in at the engine... I saw the raw water pump weeping... so that's on order to be delivered tomorrow.

I will definitely get one of those jacks next time. I was using my engine hoist and it didnt keep it level but that is nice... and yes my back is killing me.
 

Lou C

Supreme Mariner
Joined
Nov 10, 2002
Messages
12,569
Stumpy’s Fab Works makes them. Not cheap but at 68 years old soon to be 69 it’s a necessity for me and has paid for itself many times over….
 

Horigan

Senior Chief Petty Officer
Joined
Jun 12, 2016
Messages
671
I made a drive cart using 2x6 and 2x4s mounted on this inexpensive Harbor Freight dolly. Get the height close and then raise/lower the bow on the trailer to dial in the exact height for drive removal/installation.
Harbor Freight Dolly
 

Lou C

Supreme Mariner
Joined
Nov 10, 2002
Messages
12,569
I made one of those almost 20 years ago, used it for a while then as I got older (lol) I could rationalize the very nice one from Stumpy's. I use my old wood one to store my spare Cobra in the garage.
 

i_build

Petty Officer 2nd Class
Joined
Apr 24, 2005
Messages
136
I look up to you I hope I do as well. I'm 55 and 2 torn discs and 1 herniated one later I am feeling the burn today. Glad you coached me on this one and I thank you for sharing you knowledge.
 

Lou C

Supreme Mariner
Joined
Nov 10, 2002
Messages
12,569
My pleasure and stay healthy! With my back I get little warning signs to stop and as long as I listen to them I go ok.
 
Top