My Starcraft

Alecapone

Seaman Apprentice
Joined
May 8, 2021
Messages
42
Quick question. How much vinyl do you think ill need? Someone posted a piece for sale on our community page. 6'×15'. It would be enough for the floor, but not sure if its quite enough to redo everything. Not the color i was hoping, but a pretty good price.

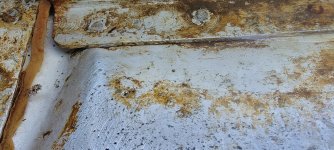
I got the inside of the hull all cleaned up. All methods of drills and angle grinders, pressure washer and west marine aluminum cleaner. Shiny! . There a bunch of missing, or poorly set rivets in the ribs. A few of the rivets got lodged under the ribs and "welded' themselves to the hull. I used a 1/4" pointing tool to pry them out. Doesnt look like they caused much corrosion.


Unfortunately, my next door neighbour moved since my first post. He works for boeing and was going to be my rivet guru. He helped me repair the transom on my alumacraft. It was cracked on both sides. We drilled holes to dead end the cracks, added bracing, then caulk. Replaced the 1"×4" with a piece of scaffold planking, which is about 2×10. Boat was rated for 5 hp, but I haveca 15hp Johnson. I just removed the decals from the motor. ;)
 

Alecapone

Seaman Apprentice
Joined
May 8, 2021
Messages
42
Went and picked up the vinyl. Its not the color I thought. Not sure what brand or color it is. Couldnt find a match from natolux. Seller did not know. Brought it home from a job installing it in condos. Looks light grey, light blue, or even green. I think its going to look great. I think I might have just enough.
 

Alecapone

Seaman Apprentice
Joined
May 8, 2021
Messages
42
Note to self(and others on the west coast). JC's is on Michigan time, and not open saturdays. I have an extensive list and want to phone in my order. If I had started this project a couple weeks sooner, I could had the mother in law stop in for me. She lives near their shop, and just drove out from michigan. At least I got my rations of vernors and faygo rock and rye.

I searched but couldn't find the answer. What thickness aluminum for the hull stiffeners? 80 90 100? Its not listed in waterman's chief resto redux. Size dimensions? I'm going to order them precut, then bend myself.

I can't tell if mine had a center wind screen. No obvious mounting holes, but the passenger side frame looks like someone filed it down with a wood rasp. This whole boat has little bends, bulges, bad qc, and other oddities.

I've found the reason I can't post photos is because my phone takes way oversized photos. I can't figure out how to easily resize. The 2 photos I posted above look like crap. I think I'm going to try a different camera
 

Alecapone

Seaman Apprentice
Joined
May 8, 2021
Messages
42
Yay! I figured out it was easier to downsize on my camera settings then the photos after the fact. I should have more photos going forward. Everybody likes photos.
 

SHSU

Lieutenant Junior+Starmada Splash Of The Year 2019
Joined
Mar 8, 2017
Messages
1,697
What with all the steel staples? I've found a few other cases of rusty attachments.

I found the same and also most of the hardware was steel and not SS. Everything will rust eventually, guess Starcraft didn't think we would be redoing hulls 50 years old.

SHSU
 

Alecapone

Seaman Apprentice
Joined
May 8, 2021
Messages
42
A few pictures with this post. Among trying to figure out what was stock, and what was not, is trying to figure out what caused damage to the transom and Starboard side of the boat. Im almost inclined to think the po back into something, or got rear ended while trailering.
I'm slightly concerned with the dent at the bottom of the transom. Looks like it got hit by the motor. It doesn't leak at all from that area though. Also The solid rivets on the knee brace look a little on the thin side.

Going to work on more clean up today. I'd like to think I'm almost to the rebuild stage, but everytime I take one thing off, it leads to the next. Good thing I have the little boat.
20220611_102409.jpg20220611_102415.jpg20220611_102359.jpg20220611_102325.jpg20220608_182202.jpg20220611_102443.jpg
 

Watermann

Starmada Splash of the Year 2014
Joined
Jan 12, 2013
Messages
13,773
I used .080 5052 Al for my hull stiffeners.

y4m7NsoOU3P6HtN0ii_T4wjXE0AgNIWJIjj6ryd6TKHsN5VfdvocE4-MPrpMJqn-DCNi3S3WAefNRM43-98HnXwMXRwjQFV_6tDG_GxRLVWwWdx_Tg9JP7qumyJTmC_CBaUQe1MLVrByORDeWQhrErqOkctnXX5ELawQvKTVJlPtUjyBcbsnrx48cV3Oc0B-Lij
 

Alecapone

Seaman Apprentice
Joined
May 8, 2021
Messages
42
Is this a corrosion hole?
Good eye! I'm not sure. I didn't notice it until the photo myself. Alot of the black specks are debris, but I know exactly which spot you are speaking. I haven't had a good day to get in there. No dry storage and Its been raining every day since my first post.. over a year ago. :/ ill update

I did get stringers and other tinys from the inards cleaned up today. Can't say enough about the quick work a wet grinder and diamond pad makes of it. Just keep the touch light or you'll go through the boat;)
 

Alecapone

Seaman Apprentice
Joined
May 8, 2021
Messages
42
Thanks guys. All your post are making this project not so daunting. I've read many of the current and past builds now. Can't imagine trying to do this in the age of chiltons and the yellow pages.

I don't have a good second set of hands for bucking the solids. Decided to ask on the Facebook local page if anyone had experience and could help. Within a couple hours I had 3 boeing employees with over a million rivets between them. Even though I live in a small rural town of 2,000 people, that was the expected result. Tons of boeing people live in the valley.
Now for some dry weather! I don't have dry storage atm.
 

Moserkr

Chief Officer + Starmada Splash Of The Year 2021
Joined
Nov 23, 2020
Messages
867
Thats awesome some guys stepped up to help with so much experience! Great idea to make it happen.
 

Alecapone

Seaman Apprentice
Joined
May 8, 2021
Messages
42
Work has slowed a bit. Mother in law drove out from Michigan in her new van. I got my self involved in building a camper. Also doing a custom green house for the Admiral. Price to pay. Overly optimistic, she came home yesterday with a new life jacket and shirt for herself to wear on the boat.

I did get the material for the hull stiffners, and dash boards. Ill get it all cut this afternoon. Still a little more prep before I start sealing and rebuilding.

I'm torn on what to do about the finish. I like the clean look of a full paint job, the beauty of raw aluminum, or the coolness of an old patina. Only part I don't like is the po tried to freshen up the puma logo and did a terrible job.

Any thoughts on painting vrs naked aluminum?
 

SHSU

Lieutenant Junior+Starmada Splash Of The Year 2019
Joined
Mar 8, 2017
Messages
1,697
Work has slowed a bit. Mother in law drove out from Michigan in her new van. I got my self involved in building a camper. Also doing a custom green house for the Admiral. Price to pay. Overly optimistic, she came home yesterday with a new life jacket and shirt for herself to wear on the boat.
We have all been there. LOL I projected the project would take 2-6 months. 2 1/2 years later we finally splashed.

I'm torn on what to do about the finish. I like the clean look of a full paint job, the beauty of raw aluminum, or the coolness of an old patina. Only part I don't like is the po tried to freshen up the puma logo and did a terrible job.

Any thoughts on painting vrs naked aluminum?
I painted, but the polished aluminum hull of @classiccat is amazing.

SHSU
 

Watermann

Starmada Splash of the Year 2014
Joined
Jan 12, 2013
Messages
13,773
I have both, bare bottom and painted above the waterline. You could do any combination and have the best of both worlds.
 

Alecapone

Seaman Apprentice
Joined
May 8, 2021
Messages
42
I have both, bare bottom and painted above the waterline. You could do any combination and have the best of both worlds.
I really like the look of your chief with the bare bottum. Im leaning towards new paint on the inside of the hull, polishing the keel, and leaving the patina on the rest. Bonus would be not scratching the paint when beaching.


I picked up a new rotating nozel for my pressure washer yesterday. Going out to see what kind of damage I can do with 4,000 psi and a zero degree water stream.
 

Alecapone

Seaman Apprentice
Joined
May 8, 2021
Messages
42
We have all been there. LOL I projected the project would take 2-6 months. 2 1/2 years later we finally splashed.


I painted, but the polished aluminum hull of @classiccat is amazing.

SHSU
It better not take me 2 and a half years! But then again, I did pick up the chief several years ago and have barely touched it.

That polished hull does look pretty sweet.
 

Watermann

Starmada Splash of the Year 2014
Joined
Jan 12, 2013
Messages
13,773
I really like the look of your chief with the bare bottum. Im leaning towards new paint on the inside of the hull, polishing the keel, and leaving the patina on the rest. Bonus would be not scratching the paint when beaching.


I picked up a new rotating nozel for my pressure washer yesterday. Going out to see what kind of damage I can do with 4,000 psi and a zero degree water stream.
My SS has the bare bottom and it looks great.

y4mqwVVVURhT6yrZwDQlBZZOTW6C8gez_ZNpZgDjW2KS7VLcqZA-BoLWmum7rKXSROUc6MJCyTF1DHiwJy46gMsXZcSbNjOgp8Dehd5nNu_sEpHUIudq35AO2-AUXZrvKHMGBeL8PU5D4ij33OVp2VTVvpEZohBmR31UJnuEv2Yt4lwDXdA1lWB6unNDZddAgwt
 

Alecapone

Seaman Apprentice
Joined
May 8, 2021
Messages
42
That boat and location are both gorgeous! Ive watched your video of cruising the chief around. Other then astetics ,one of the reasons I'm leaning bare on the bottum is I'd be less concerned when beaching.

I've been looking at power options. Finding used motor in the right range is proving tough. Everything is 60- or 90+. The local dealer has a new 60 hp yamaha which is as small as I want to go. No 70's. Semi considering a jet. When keeping it legal, is the hp of a jet measured at the engine or nozzle? Like can you use a 90/60 on a 85hp rated boat? I seen a used 65/45 merc, which might not be enough. Only reason for the jet would be river use. I'd rather have the power of a prop.


Not much progress, but the future is looking bright. Doing some cleanup today.

My transom board wasn't complete enough to use as a template. I tried to get the angles right, and bottom width best I could. Made the cuts and did a dry fit. Perfect fit! Easier going in then coming out.. a little tight.. Needs a little sanding here and there. I marked the top for the final cut.
 
Top