Monaco Project - QC

Bondo

Moderator
Staff member
Joined
Apr 17, 2002
Messages
70,657
Re: Monaco Project - QC

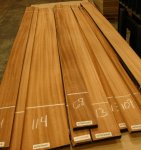
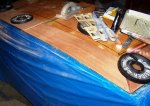
Sooooo, if I go with lines I need a shortcut method. I don't want to go with the messy job of filling with white tinted epoxy, and I don't want the cheapo look of pinstriping. This is phone cord. Whatever I use will need to be sandable . . . Thoughts? I love the idea of something off of a reel or some type of line/wire.

Ayuh,.... I'm thinkin' Bob's Idea is the Better, most certianly the cheapest way to do this...
They all involve using your router to cut a shallow groove at the area you want the white.
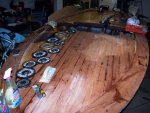
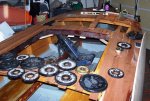
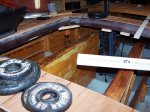
'ell once you rout the grooves, latex caulkin' in any color you want can be putty knifed in, sanded flat, 'n move on to the next step...

btw, personally, I love the ole barrel backed boats with the Black caulkin' myself....;)
 

QC

Supreme Mariner
Joined
Mar 22, 2005
Messages
22,783
Re: Monaco Project - QC

Yeah, all good ideas . . . Thanks.

I am trying to avoid the router because I suck. Also, my planks (I think veneers is actually the correct term) are only 1/8 inch thick, so any method that will require a lot of sanding could be my undoing, and is one reason I am scared of any goop that my soak into the wood and require an aggressive cut. I could lay them down slightly spaced. Do a sealer coat of epoxy and then set the white "grout" choice. That might limit the risk some.

I think I like the idea of something I can lay out between the deck planks as I place them, but ultimately might be more work. ez's idea is a good one if it is fairly white, I was actually thinking of the felt like piece that is attached to some sliding windows edges. And I have a piece of black felt stuff that would work well. I need to head to a crafts shop, make a decision and get on with it. I finished almost all of the bow's planks last night and need to decide and lay them down.

Any votes for no grooves, like these Blackbirds: http://www.blackbirdboats.com/media.html
 

HopeSheFloats

Lieutenant Commander
Joined
Jun 12, 2009
Messages
1,674
Re: Monaco Project - QC

...Any votes for no grooves...

I personally like the contrast the grooves provide, be it dark or a light color.
As to router-ing{sp/terminology?}, I would use a laminate trimmer and an edge guide, a dual sided guide would be the ticket for easing wandering worries. Double sided tape works great for holding the guide in place. Make a few practice runs on some scrap and get after it, lol easy peasy!

As to your depth concerns of sanding...use a cabinet scraper, your pull it towards you and it shaves as you go. Takes a small bite at a time and leaves it smooth enough{if desired} for final finishing...just putting this out there, not trying to add to the decision process ;)
 

fishrdan

Admiral
Joined
Jan 25, 2008
Messages
6,989
Re: Monaco Project - QC

I think the grooves make the finish product look more classy, old school craftsmanship.

I like Bob's idea of using wood strips. I've done inlays like that before and as long as you run the router in the right direction (router pushing into the guide board instead of away) and keep the guide board clear it will come out fine. But yeah, practice makes perfect.

Do you have a decent table saw? I made a bunch of inlay material with my table saw using a spring loaded guide that would keep constant tension on the strips, so the thickness was even.

What ever you use, do a test run to make sure it works. I've had ideas on different projects that sounded good in theory, but for one reason or another, ran into problems. I would be careful about trying to sand any type of plastic material as it might trap impurities and discolor,,, instead of sanding off smoothly. For string, one of my friends is a rob builder and he's had problems with air bubbles in the finish because of air being trapped in the thread fibers.

Oh yeah, if you get a bobble in a router cut, don't sweat it. If it's small use some mahogany filler, Famowood. If it's big, just cut/sand a small piece of wood that matches the grain, glue it in, (making sure the glue line is minimal) then run the router over that area again. Once you are done, no one will notice, except you... Every time you look at the boat you will look right at that F'up :D
 

Bondo

Moderator
Staff member
Joined
Apr 17, 2002
Messages
70,657
Re: Monaco Project - QC

I think the grooves make the finish product look more classy, old school craftsmanship.

Once you are done, no one will notice, except you... Every time you look at the boat you will look right at that F'up :D

Ayuh,.... I guess that's why I admire my barges from stem to stern.....:rolleyes: :D
 

Markstang

Cadet
Joined
Sep 17, 2010
Messages
29
Re: Monaco Project - QC

I am not sure if you have filled the gap yet or not. So here goes :)

To do the cuts I would have set a skill saw 1/4 inch or less and then (takes practice) cut the seams. By tracking the saw slightly sideways you get a cut wide enough to serve its purpose but not as thin as the blade.

After applying Varnish (the only method I know) or cover of your choice. The first couple coats help protect wood from workshop mistakes.

1.Put tape on each side of fill line'
2.Plow brown 5200 into the seem. 5200 has amazing expandability and compression.
3. Use a soup spoon tip to drag and convex the 5200 into the seem. The Varnish or finish of choice will fill it later.
4. Use a blade to carefully clean 5200 off tape. Better to be clean before pulling off tape.
5. Later when you apply white paint to stripes, re-apply tape again paint and pull tape angled towards cut.

The paint will not fill the convex completely and that is ok because the remaining varnish coats not only fill here but protect the paint, the varnish also also yellows the white slightly giving it a nice off white shade.
 
Last edited:

QC

Supreme Mariner
Joined
Mar 22, 2005
Messages
22,783
Re: Monaco Project - QC

I was considering the circular saw method as I want thin lines and the router bits I have are too thick (easy to solve though). Two questions Mark.

1) How do you keep the saw straight while using it "sideways"?

2) Why not use white 5200 and skip the paint?
 

QC

Supreme Mariner
Joined
Mar 22, 2005
Messages
22,783
Re: Monaco Project - QC

QC Where did you get the thin-wood veneers?
That, as you have figured out, was a lot of work . . . Oh, it's actually "African" Mahogany, aka Khaya.

http://www.edensaw.com/

attachment.php
 

Attachments

  • Mahogany resize.JPG
    Mahogany resize.JPG
    62.6 KB · Views: 0

Markstang

Cadet
Joined
Sep 17, 2010
Messages
29
Re: Monaco Project - QC

I think I can explain this in words.

The best skill saw is the 4-5 inch type (light in one hand)

Pushing the saw while focusing on the front edge to remain consistent while applying a constant to a side. This is best done by cutting a straight line first and then doing it again to make the desired width (not much more)

I do not know the size of your planks, I might assume a cut on the seam of two joining planks and then two cuts in the middle of each plank. The nice part about 5200 is that it accepts a lot of expansion and contraction.

Ok...there is a very good reason for the brown. Your cuts will not be perfect , close but not. The brown fills in the gap. But when the white is painted on the brown , it will have "exact" edges because of the taping being the equalizing factor.

So when done the brown mimics exactly the valley of the cut and is a great shade to blend with the stain...so when the white is put on the brown it eliminates any imperfection in your cut. The white line should be made to be the same width for its whole length. This width will be perfect because each one you will space by hand with tape. The art is doing it on top of the brown at a width that will almost match the brown and compliment the whole look. In reality the brown will have slight curves here and there but the white fixes that and the brown becomes part of the wood grin like look.

Note: Remember to use the spoon to curve downward into the crack of the cut on the 5200.Use the tip and hold the handle about 45 degrees up. have the first set of tape down on each side before pushing in the 5200(this helps with clean up after the spooning) If the 5200 were to be higher than the deck it would cause problems when sanding because the wood will sand easier than the 5200. I know this is a lot of taping , once for 5200 and then again later for the white for each line but it works great.
 

QC

Supreme Mariner
Joined
Mar 22, 2005
Messages
22,783
Re: Monaco Project - QC

I have a 4 1/2 saw that I love, and the control is wonderful, so I get that. I understand the brown now too. Great plan. I'll buy a tube today and play a little. I may actually keep the "grooves" a little concave as I have read that some are done that way, it will help with any fairing irregularities, and they will make the deck a little safer for walking on i.e less slick . . .


Thanks for the help Mark

this helps with clean up after the spooning
Sorry, but this might be the most memorable piece from your post :redface: :D
 
Last edited:

12vMan

Lieutenant Commander
Joined
Jun 4, 2008
Messages
1,532
Re: Monaco Project - QC

Greeaat project QC.:)

I just wanted to add you may be able to pick up a set of dado blades for your saw, making it easier to make your cuts with a guide, without relying on eyeballing.

The only downside is dado blade sets will make a minimum of 1/4" wide dado, so if you need narrower than that you could go with the wobble dado, which uses a cam-type hub that the blade mounts against. However, this method won't give you the crisp, clean lines that stacked blades will and it's harder to maintain a straight line even against a guide.
 

Bob_VT

Moderator & Unofficial iBoats Historian
Staff member
Joined
May 19, 2001
Messages
26,030
Re: Monaco Project - QC

Update?????
 

QC

Supreme Mariner
Joined
Mar 22, 2005
Messages
22,783
Re: Monaco Project - QC

Lol . . . thanks for the embarassment motivator Bob :rolleyes:

Yeah, I actually have most of the deck planks down and epoxied. I have not cut any of the grooves yet, but have made some progress. I don't have my camera with me and I am travelng, but I took some the other night. I'll post when I get back home.
 

QC

Supreme Mariner
Joined
Mar 22, 2005
Messages
22,783
Re: Monaco Project - QC

Status update:

attachment.php


Deck planks, which shows one of the downsides of the redneck clamping method. I get paint transfer from the weights wherever there is any epoxy contact . . .

attachment.php


These short ones between the cockpits and the engine hatch were a pain as you need to keep them aligned. I can fix some imperfections when I cut the grooves, but not much . . . :eek: The correct method is to lay them straight across the unfinished engine hatches and then cut the hatches out. In my case the hatches were already completed and I felt that shimming the hatches to the exact height to insure even bonding would be near impossible so I am doing the hatches separately . . .

attachment.php


After some trimming.
 

Attachments

  • Deck planks 1.JPG
    Deck planks 1.JPG
    109.2 KB · Views: 0
  • Deck planks 2.JPG
    Deck planks 2.JPG
    110.7 KB · Views: 0
  • Deck planks 3.JPG
    Deck planks 3.JPG
    108 KB · Views: 0

QC

Supreme Mariner
Joined
Mar 22, 2005
Messages
22,783
Re: Monaco Project - QC

And on to the last of my "covering boards". I chose the finished transom as opposed to the planks extending the full length. One flippin' dang, problem!! I ran out of full width pieces :mad: I was really upset that I had to join these as I thought it would look mickey mouse.

attachment.php


But I am relieved that it actually came out OK.

attachment.php


I sprayed it down with water to give it the varnished look. Imperfections are the left over weight paint transfer which I will sand out and some goo from duct tape which secured the planks before I used them.

All that I have left with the decking is the planks between the rear cockpit and the transom covering boards (last pic) and the hatches. Hope to have the rear deck done today.

Oh, then the grooves, filler (white lines), sanding, epoxy plus varnish finish . . . sigh . . .
 

Attachments

  • Deck planks 4.JPG
    Deck planks 4.JPG
    103.6 KB · Views: 0
  • Deck planks 5.JPG
    Deck planks 5.JPG
    76.7 KB · Views: 0

fishrdan

Admiral
Joined
Jan 25, 2008
Messages
6,989
Re: Monaco Project - QC

Looking good!

one of the downsides of the redneck clamping method. I get paint transfer from the weights wherever there is any epoxy contact . . .

I'm a bit late here, but bagging the weights in Wal-Mart bags would have stopped the paint transfer, bag inside-out. Been there, done that...
 

Bondo

Moderator
Staff member
Joined
Apr 17, 2002
Messages
70,657
Re: Monaco Project - QC

Ayuh,... Lookin' Sweet QC,...
I typed a big long congratutory post yesterday, 'n Lost it to the V-bulliten software...

She's gonna be Pure Eye Candy at the dock when yer done,....;)

Keep up the Great work my friend,...
 

Tail_Gunner

Admiral
Joined
Jan 13, 2006
Messages
6,237
Re: Monaco Project - QC

That boat or project gives me shivers....Hats off QC it should be quite elegant when finished
 

Woodonglass

Supreme Mariner
Joined
Dec 29, 2009
Messages
25,924
Re: Monaco Project - QC

QC,

I'm building this boat in the fall, inspired by this buy from Glen-L. He used White ASH strips to separate his laminations. I will do the same. I believe with a straigt edge and a laminate router with a 1/8" straight bit you could do the same.

pic1061-1.jpg
 
Top