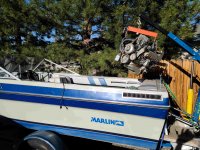
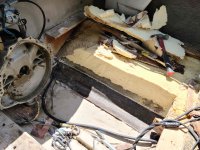
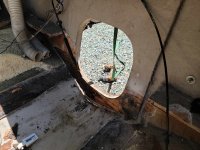
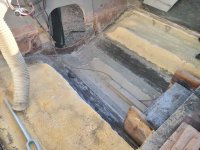
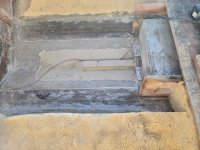
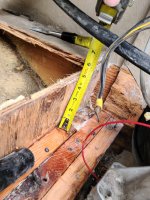
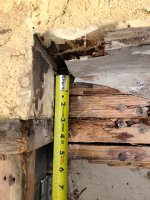
method of joining new wood to existing stringer

Joined
May 9, 2021
Messages
29
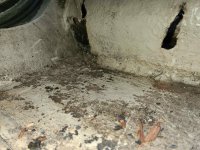
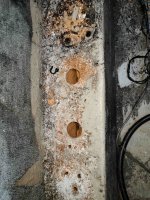
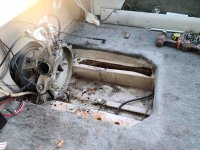
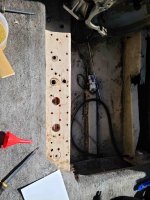
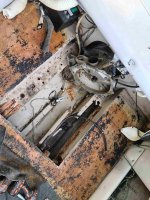
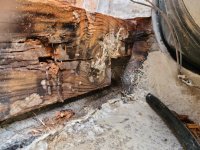
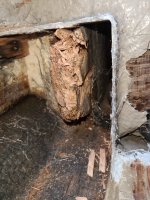
Hello all. I have another thread about the whole issue I'm going through right now but long story short the portside motor mount stringer area was poorly constructed and had a crack near bottom of bilge. Along with that there was water leaking into the wood through motor mount lag bolt holes. Wood rotted on portside requiring removal of over 2 ft of rotten wood. Starboard is good with some evidence of dry rot in the bad areas, but I will be using west marines solution to drill several holes and saturate the existing wood as it has not delaminated and it is structurally sound..

Removing all stringers and redoing with seacast isn't viable for this boat. It's a freshwater lake boat only and I don't have the money or time to do a complete rebuild.

I want to take off all fiberglass where the old stringers and mounts were and rebuild the stringer with wood using lag bolts through existing good wood and then buddy up other wood to that structural member. I will fill all spaces with either a structural putty or some kind of fiberglass slurry and then once cured glass over whole assembly.

I have a few main questions.

One, are stainless lag bolts over kill? I feel that several aligned in the old 2x6 with a new 2x6 is the best structural answer.

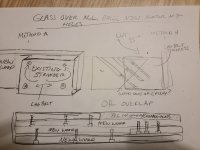
Two, I drew out some methods of how to do it. Should I cut at 45 and mount stringer in line ? Should I cut and 45 and buddy up with lag bolts?

Three, I have some dried out redwood from a fencing project that has been drying for over 7 months....is that sufficient? I'm doing research on what wood to use currently.

Four and lastly, is this repair safe? I feel that properly constructed and reglassed correctly it will be even better than what was in there before if I make the glass even thicker...the original stringers were nailed together so that says something!!


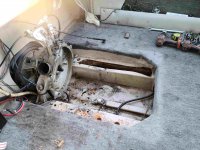
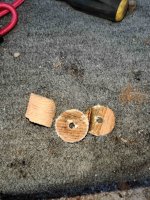
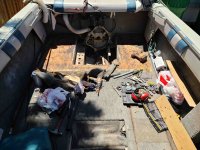
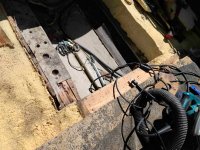
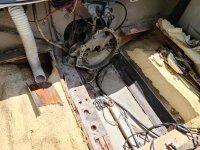
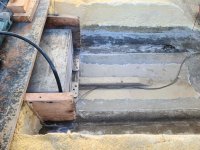
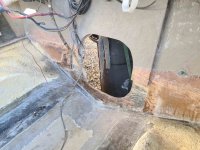
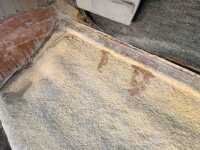
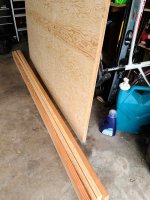
Here are some photos of the project and my theory of repair. Reading up on as much repair info as I can the past week has led me here.

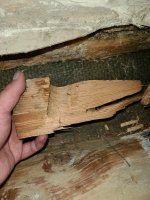
The photo of me holding the wood shows a section of good wood I removed that was next to main stringer to illustrate the integrity of what is left. 20210511_201250_compress56.jpg20210511_194255_compress43.jpg20210511_194554_compress24.jpg20210511_192145_compress87.jpg20210511_192512_compress65.jpg20210511_191620_compress83.jpg20210511_191627_compress46.jpg20210511_175436_compress63.jpg
 

Attachments

  • 20210511_192512_compress26.jpg
    20210511_192512_compress26.jpg
    1 MB · Views: 6

Emerger

Petty Officer 3rd Class
Joined
Oct 29, 2006
Messages
98
Hello all. I have another thread about the whole issue I'm going through right now but long story short the portside motor mount stringer area was poorly constructed and had a crack near bottom of bilge. Along with that there was water leaking into the wood through motor mount lag bolt holes. Wood rotted on portside requiring removal of over 2 ft of rotten wood. Starboard is good with some evidence of dry rot in the bad areas, but I will be using west marines solution to drill several holes and saturate the existing wood as it has not delaminated and it is structurally sound..

Removing all stringers and redoing with seacast isn't viable for this boat. It's a freshwater lake boat only and I don't have the money or time to do a complete rebuild.

I want to take off all fiberglass where the old stringers and mounts were and rebuild the stringer with wood using lag bolts through existing good wood and then buddy up other wood to that structural member. I will fill all spaces with either a structural putty or some kind of fiberglass slurry and then once cured glass over whole assembly.

I have a few main questions.

One, are stainless lag bolts over kill? I feel that several aligned in the old 2x6 with a new 2x6 is the best structural answer.

Two, I drew out some methods of how to do it. Should I cut at 45 and mount stringer in line ? Should I cut and 45 and buddy up with lag bolts?

Three, I have some dried out redwood from a fencing project that has been drying for over 7 months....is that sufficient? I'm doing research on what wood to use currently.

Four and lastly, is this repair safe? I feel that properly constructed and reglassed correctly it will be even better than what was in there before if I make the glass even thicker...the original stringers were nailed together so that says something!!


Here are some photos of the project and my theory of repair. Reading up on as much repair info as I can the past week has led me here.

The photo of me holding the wood shows a section of good wood I removed that was next to main stringer to illustrate the integrity of what is left. View attachment 339902View attachment 339910View attachment 339911View attachment 339914View attachment 339913View attachment 339907View attachment 339908View attachment 339912
What you are describing is called a scarf joint. There's a number of ways to make one, some simple, some complex. You can google it if you want. The lag bolts you have in mind are overkill. Creating the scarf joint and simply glassing over it with several layers of cloth is enough. You can make it stronger by adding plywood on both sides of the joint and glassing it in.
 
Joined
May 9, 2021
Messages
29
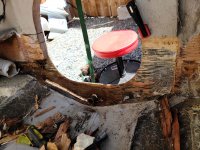
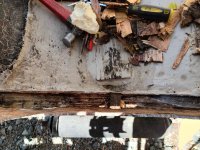
Well I decided/was forced to decide to do both rear stringer/motor mounts. After I started drilling the holes on the left and filling them with epoxy, I quickly learned that the bottom of the wood was rotted out as the epoxy would free flow through. I let it set and then cut back some glass to find the the left side was in much better condition but had a similar problem. In addition the floor support that is buddied up to it was pretty rotted, so I have decided to tear up the rear deck and redo all the wood and stringers with new wood and glass. Il do the front end sometime next year If I'm bored...but luckily the rot stops in the bilge area .

Photos of today's defeat. 20210512_160416_compress78.jpg20210512_160435_compress60.jpg20210512_184109_compress65.jpg
 

todhunter

Canoeist
Joined
Sep 15, 2020
Messages
1,316
I have a few main questions.

One, are stainless lag bolts over kill? I feel that several aligned in the old 2x6 with a new 2x6 is the best structural answer.

Two, I drew out some methods of how to do it. Should I cut at 45 and mount stringer in line ? Should I cut and 45 and buddy up with lag bolts?

Three, I have some dried out redwood from a fencing project that has been drying for over 7 months....is that sufficient? I'm doing research on what wood to use currently.

Four and lastly, is this repair safe? I feel that properly constructed and reglassed correctly it will be even better than what was in there before if I make the glass even thicker...the original stringers were nailed together so that says something!!
1 - I wouldn't do the lag bolts.

2 - I'm not a structural expert, but I was told you want a 12:1 scarf joint, ideally. 45-degrees is 1:1. Now, if you put enough glass over it, the wood just basically becomes a core to support the glass, and the glass carries the load. Not sure how much glass that would take, though. I think the easiest solution is to butt new wood against existing wood, add a "sister" board on both sides of the joint, and through-bolt it with SS hardware. Then glass over it.

3 - I can't speak to whether or not redwood is sufficient.

4 - It's safe if you do the joints correctly and/or use enough glass. As you noticed, the original construction wasn't the best...it was the same on my boat, and neither ended up at the bottom of the lake. I figure anything I repair that is as-good or better than the original construction will be good enough.
 

JASinIL2006

Vice Admiral
Joined
Feb 10, 2012
Messages
5,680
I'd want the wood to be structurally sound; unless your going the glass the heck out of it, the wood will provide the structural strength. (My foam-core stringers get their strength from the fiberglass, and that glass is 1/2" thick; that's a lot of laminating if you're going to rely on the glass to join the wood.)

I would go with a simple sister joint, where the boards meet end to end, and a you bolt a scab on either side of the joint. I'd thru-bolt it, not lag screw it. If you want, you can chamfer the ends of the scabs to make it easier to cover with glass. You can do all sorts of fancy lap joints or scarf joints, but since the structure is hidden, those methods don't gain you much.
 
Joined
May 9, 2021
Messages
29
Alright so I pulled the deck in the rear. Wood was in good condition which made it a pain to get off....after removing it I found that almost all wood around is in excellent condition. My plan to to remove the stringer on both sides as I have with one side already and then create the new motor mount stringers with a couple of through bolts and sister joints as described by you guys.

My question is about the foam. It is in great condition and not water logged. If I place the new plywood and epoxy, tab it in and then glass it then fill again with new foam, will that be OK? I assume it will bond fine and as long as it fills the gaps it should be structurally sound. Having a hard time finding details on the exact procedure I'm trying to execute.

Also, I'm doing research on how to put the new deck back in...any creative ways? The lip I left is sufficiently strong but I need some kind of support to join the two together I imagine... my best idea right now is to use 3lb foam and fill the foam area up to the top, use a board on the Seams on top to screw it down and let the foam dry , then once it's dry and hard remove the boards and glass over the top to join the two pieces of wood as a buttjoint using pb consistency filler with a structural additive in the gaps. 20210513_115422_compress54.jpg20210513_142044_compress23.jpg 20210513_142042_compress66.jpg20210513_142036_compress74.jpg
 
Last edited:

JASinIL2006

Vice Admiral
Joined
Feb 10, 2012
Messages
5,680
I'm not sure leaving the lip saves you any work, and it might actually make the job harder. Normally, you'd cut/grind the lip away, run the new deck board up to within a 1/2" or so of the hull, and then tab the deck to the hull with 1708.

In your case, you'll have to put cleats of some sort under the existing lip to support the new deck section, hope that the new deck is exactly the same level as the lip, and then you'll still have to fiberglass everything together so it's strong and watertight. That seems like a lot more work to me.
 

todhunter

Canoeist
Joined
Sep 15, 2020
Messages
1,316
I'm not sure leaving the lip saves you any work, and it might actually make the job harder. Normally, you'd cut/grind the lip away, run the new deck board up to within a 1/2" or so of the hull, and then tab the deck to the hull with 1708.

In your case, you'll have to put cleats of some sort under the existing lip to support the new deck section, hope that the new deck is exactly the same level as the lip, and then you'll still have to fiberglass everything together so it's strong and watertight. That seems like a lot more work to me.
Agreed. I'd get rid of the lip and run the new floor out to the hull.
 
Joined
May 9, 2021
Messages
29
I'm not sure leaving the lip saves you any work, and it might actually make the job harder. Normally, you'd cut/grind the lip away, run the new deck board up to within a 1/2" or so of the hull, and then tab the deck to the hull with 1708.

In your case, you'll have to put cleats of some sort under the existing lip to support the new deck section, hope that the new deck is exactly the same level as the lip, and then you'll still have to fiberglass everything together so it's strong and watertight. That seems like a lot more work to me.
Alright lip is coming out. First time working on a boat ever so I appreciate the help. The bottom 4 inches of the transom had rot so I cut out the bottom 8 inches to good wood. Bare fiberglass on the bottom 8. Il update with pics later. Planning on cutting out plywood to fit, laminating the two boards together and then laminating/glasing it to existing glass. Il use clamps and another pair of boards to spread the load while it cures. I noticed that the area on the inside if the transom seal wasn't glassed, just coated with epoxy then gel coat or maybe even just gel coat. Any reason why they did this?? I was going to glass the inner edge as well..seems like a place water could absorb into the transom.

Photos of the work so far. 20210514_123752_compress16.jpg20210514_143329_compress96.jpg20210514_143344_compress91.jpg
 

KJM

Lieutenant
Joined
Jul 31, 2016
Messages
1,266
You are very lucky, the rot is usually much worse! They didn't use glass inside the transom to save money at the expense of quality. i had to cut out a section of 2 of my stringers to install the new transom and I just inserted a length of coosa foam board into place to the same thickness (1 inch) meeting the cut face of the old stringer at a straight up and down 90 degree to the bottom of the boat. Used thickened epoxy to glue in place and then tabbed well with 18/08 glass. No need for lag bolts or any screws etc, the glass is where the strength is.
 
Joined
May 9, 2021
Messages
29
They didn't use glass because they didnt build the boat to last. Adding glass will be a superior repair.
You are very lucky, the rot is usually much worse! They didn't use glass inside the transom to save money at the expense of quality. i had to cut out a section of 2 of my stringers to install the new transom and I just inserted a length of coosa foam board into place to the same thickness (1 inch) meeting the cut face of the old stringer at a straight up and down 90 degree to the bottom of the boat. Used thickened epoxy to glue in place and then tabbed well with 18/08 glass. No need for lag bolts or any screws etc, the glass is where the strength is.

Awesome. Yeah I looked into that board, if my stringer wasn't an active stringer and running the whole length of the boat with that 2x8 I might use foam, but im going to use wood for it for now. I'm still trying to decide how I want to do the engine mounts...as far as the transom I figured it was shoddy workmanship but this being my first boat and first boat project I wondered if I was missing some key reason! Looks like the reason is money!

Because of my stringer and the recommendation of an 8 to 1 or 12 to 1 scarf( that I can't fit) il use some through bolts to secure it firmly then tab in place to hull. I'm tempted to tab and Glass the main stringer first, then I can secure the motor mount/support stringers to that and wrap the whole thing..then the structure has additional protection against Rot which save me or some future guy or gal from having to rip apart the whole thing like I did..

Pictures coming soon of where I left her....going to take the weekend off to have a beer and some BBQ..!
 
Joined
May 9, 2021
Messages
29
Alright. A nice weekend with plenty of drinks and food. Back to work!

Today I used the grinder and oscillating tool to trim the rest if the lip for the floor and ground out the rest of the fiberglass tabbing leftover from the previous stringers. I used a flap wheel to finish and grind off the paint to give myself a 5 inch section of bare fiberglass for the new tabbing and glass.

I also removed the transom drain and bilge pump mount (full of water) .

I trimmed the existing stringers straight and took out the broken cross brace between the stringers.

I think tomorrow it's time to get to the lumber store to buy some 2x10 2x6 and plywood to start fabricating the new stringers and transom !

20210518_182555_compress50.jpg20210518_182600_compress39.jpg20210518_182616_compress16.jpg20210518_182621_compress78.jpg20210518_182633_compress16.jpg

Photos.
 

JASinIL2006

Vice Admiral
Joined
Feb 10, 2012
Messages
5,680
Assuming you're planning to sister some boards to those existing stringers (to connect to the new sections of stringers), I would want more space so your sister boards overlap more with the existing stringers. I'd want at least a couple of feet of overlap - it looks like you'd have, at best, 6" of overlap the way things are. That will not make for a very strong joint. I'd be shooting a sister board that is at least 4x the height of the stringers on either side of the joint.
 
Joined
May 9, 2021
Messages
29
Assuming you're planning to sister some boards to those existing stringers (to connect to the new sections of stringers), I would want more space so your sister boards overlap more with the existing stringers. I'd want at least a couple of feet of overlap - it looks like you'd have, at best, 6" of overlap the way things are. That will not make for a very strong joint. I'd be shooting a sister board that is at least 4x the height of the stringers on either side of the joint.
It's a bit odd, this construction. The 2x10 full length stops and continues as a about 2x4.5 inches where the wood is cut currently. The original manufacturer basically cut out an L shape into the stringer and sent that 2x5 ish dimension to the transom. 3 other 2x4 ish size buddy's were then attached to this stringer and then a single 3/4 x 8 plywood board was fastened on the outboard of this buildup.

With the dimensions being 2x4.5 I figured roughly double the length (9 inches) attached, epoxied and through bolted would be more than enough.

I'm also thinking of creating a scarf joint for the stringer to further improve strength....need to do more research on shear strength of joints and adhesives and see if I can calculate the required strength for that joint.

Let me find some original photos20210513_170601_compress70.jpg20210513_172008_compress99.jpg20210513_163303_compress49.jpg
 
Last edited:
Joined
May 9, 2021
Messages
29
After looking at the boat and deciding what the best method is, I am going to go with a sister joint as discussed-but with structural fiberglass reinforcement using 1708 and epoxy. Epoxy mating surfaces with structural epoxy colloidal silica and utilize stainless fasteners to tighten joint as it cures. The joint will be then tabbed in and wrapped with 5 layers of 18 oz 1708 . All hard 90s will be filleted prior to glassing to ensure an air pocket free layup. The calculated thickness of this fiberglass and the shear/compressive strength of the epoxy will create the strength needed for that joint at the expense of glass, epoxy and labor.

The joint will also be butted up against new material (2x4) , fastened to new sister joint and fastened through use of pocket holes and epoxy along the grain ends. After the whole motor mount area is built and checked for the correct dimensions, I will tab the whole remaining structure into the hull and transom with 1708 and west systems 105. I will utilize a minimum of 4 layers to ensure that the fiberglass acts more as a structural member than before. I believe that the minimum thickness of the layup of 1708 will be over 1/8 of an inch which is double that of what was in place before (cracked after wood rotted out).

I may also still utilize the through bolts, but after confirming some of the questions I had about fiberglass/epoxy structural construction and strength with an experienced fabricator, I believe that it would be overkill to utilize that much glass and HD hardware such as through bolts.

I will make sure all of the stringer/motormount areas are spaced with small pieces of foam and then filled with a pb filler to ensure there are no possible "hard spots" on the hull from the new construction.

After all is done it will be filled with foam in the voids that exist. 1 Gallon of 2 stage 4 lb foam should work.

For the tabbing I have decided to utilize the larger on bottom smaller on top method as seen attached on the left..I am confident after all of the reading the past few weeks that the method on the left is superior.

I also got lucky and found a supplier local to me offering 3/4 inch marine plywood for 85 a sheet, and 2x6 western red cedar (dry, unfortunately not kiln dried).

I have to wait for the glass and more materials to come in, but im getting closer...!


tabbing.jpg
 

JASinIL2006

Vice Admiral
Joined
Feb 10, 2012
Messages
5,680
I thought 1708 was just for polyester. I thought epoxy did not benefit from the CSM stiched to 1708.
 
Joined
May 9, 2021
Messages
29
I thought 1708 was just for polyester. I thought epoxy did not benefit from the CSM stiched to 1708.

I thought so too...then after bouncing around online on various free books YouTube builds and forum posts, I found that the only real disadvantage of using it is excess resin absorption. It provides great strength and laminates to the surface more easily (apparently , haven't worked with it yet). It also allows for a thicker build up by using less layers as the mat is already included in the 1708.

I will use 1700 as well, both are obviously strong biaxial cloths-but I haven't seen any data showing that the 1708 will be structurally inferior unless you don't layer as much 08 as you would 1700.

I might play with the cloths with some wood before hand to verify the binding properties and thicknesses..il update with photos as always.

The 1708 ordered (and all I have seen) uses mat woven into the back side that does not require a poly resin for the dissolving of the binding agent.

Let me know if you or anyone else finds something so I can change my method before it's too late!
 
Last edited:
Joined
May 9, 2021
Messages
29
Picked up some kiln dried 2x6 fir and 3/4 marine grade plywood. I'm going to have to place the deck in using two pieces so im brainstorming how to make that happen. The wood is so much better than anything you can get at home depot...costs more too!

Little bowing in both marine sheets from sitting on a forklift too long. Going to try spraying the convex side with water and letting it dry in the sun ..heard that might work. 20210520_150154_compress43.jpg
 
Top