Mercury 650 Rotted Trigger Wiring

merc850

Commander
Joined
Jul 7, 2010
Messages
2,046
That's pretty low, should be 120+ maybe you can get another gage to recheck it; the pistons have a blade shape that comes very close to the sparkplug hole and can release the presure from the gage, watch the gage as you crank it over, and there should be 2 wires coming from the stator under flywheel and a red one coming off the rectifier.
 

joepcdr

Seaman
Joined
Aug 24, 2013
Messages
68
That's pretty low, should be 120+ maybe you can get another gage to recheck it; the pistons have a blade shape that comes very close to the sparkplug hole and can release the presure from the gage, watch the gage as you crank it over, and there should be 2 wires coming from the stator under flywheel and a red one coming off the rectifier.

I'm going to go out and test again later on. There is a possibility that I might not of had my gauge turning in solid so it might have been loosing pressure. My gauge has got a manual pressure release so I'm not sure how the pistons would release the pressure from the gauge.

Now my question is how important of a role does that mercury switch play? The wiring to that it down to the nub as well. If it's not important I'm not going to worry about it a whole lot at the moment.
 

joepcdr

Seaman
Joined
Aug 24, 2013
Messages
68
That's pretty low, should be 120+ maybe you can get another gage to recheck it; the pistons have a blade shape that comes very close to the sparkplug hole and can release the presure from the gage, watch the gage as you crank it over, and there should be 2 wires coming from the stator under flywheel and a red one coming off the rectifier.


The oil makes the difference. When I was first doing my testing I was just using some fogging oil since the motor had been sitting for awhile I figured it would be the best thing to do. That was giving me my readings I first reported. I just squirted some two cycle in each cylinder and let it work it through before I redid my compression test. This is now giving me 130lbs on all three cylinders. So I think I can safely say compression shouldn't be of an issue. The stator wires are the only two wires that survived from being rotted.
 

merc850

Commander
Joined
Jul 7, 2010
Messages
2,046
You can leave out the mercury switch or replace it, it momentarily shuts ignition off if lower unit hits something and flies out of the water. 130# sounds good!
 

joepcdr

Seaman
Joined
Aug 24, 2013
Messages
68
You can leave out the mercury switch or replace it, it momentarily shuts ignition off if lower unit hits something and flies out of the water. 130# sounds good!


Good deal! I was sort of thinking since it's going to take me a few days to finish the wiring. I might go get some carb cleaner and just start spraying things down and letting it soak sort of speak. Allowing time for any gum/gunk build up to dissolve while I'm working on the wiring.
 

merc850

Commander
Joined
Jul 7, 2010
Messages
2,046
I use Mercury's PowerTune it cleans anything and won't harm plastics,rubber etc and you can use it to clean the combustion chambers.
 

joepcdr

Seaman
Joined
Aug 24, 2013
Messages
68
Well I'm a bit disappointed this morning. Last night I finely got around to reassembling the distributor. Not sure what's going on at the moment. But when I put the cap back on top of the pulley and tighten it down everything starts to bind up. It almost feels like I don't have something install right. But I'm not sure what as I put everything back in the order for which I removed it. I'm going to have to pull up the graphic just in case something fell on the floor that I didn't notice.


I just pulled up the diagram and I guess somebody else has been in this thing at one time as well in its live. Looks to be a spacer missing and I seem to have a spacer in the wrong spot. I don't get it because I reassembled it in the order for which I laid out the parts as I was removing them. Oh well it happens. LOL
 

joepcdr

Seaman
Joined
Aug 24, 2013
Messages
68
Well I got the distributor put back together yesterday and guess what I got spark. My rewire work on the trigger worked!.
 

joepcdr

Seaman
Joined
Aug 24, 2013
Messages
68
Now If I can figure out how to put the whole thing back into time I might be in business. I started another thread on timing this darn thing.
 

merc850

Commander
Joined
Jul 7, 2010
Messages
2,046
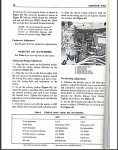
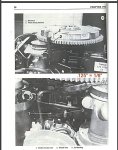
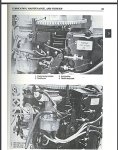
Yep it's sparking; Also look in the faceplate for the plastic pointer - I'm posting the timing instructions you'll have to use a pen in the 1st cylinder and turn the flywheel until it reaches TDC then you align the small arrow on the dist. pulley to the timing mark on the flywheel. Untitled-1.jpg
Untitled-2.jpg
Untitled-3.jpg
 

joepcdr

Seaman
Joined
Aug 24, 2013
Messages
68
I'll have to look to see if I can find that plastic pointer. I don't recall seeing it when I was taking things apart. But that doesn't mean it's not there. Also I don't have that handy dandy sticker on the side of my flywheel anymore. But looking at some pics others posted. There is a little divet or something that looks like a rivet should have been there. I've noticed it common on all picks I've looked at. If I'm seeing things correctly I looks like my alignment should just be a smidgen to the left of that.


Yeah I just looked inside the faceplate it looks like the timing stick is long gone. Now I did find this one ebay http://www.ebay.com/itm/New-OEM-Mer...ash=item2f0014398a:g:tT4AAOSwuLZY1JtX&vxp=mtr

If its the right one for the price I just as well get it. Because this probably won't be the last time the motor will need timed.
 

merc850

Commander
Joined
Jul 7, 2010
Messages
2,046
Ask seller but it looks right to me; there was nothing rivited to the flywheel my guess is that it's the timing mark for TDC, can you take a clear pic and post it?
 

joepcdr

Seaman
Joined
Aug 24, 2013
Messages
68
Ask seller but it looks right to me; there was nothing rivited to the flywheel my guess is that it's the timing mark for TDC, can you take a clear pic and post it?


I'll sneak out tomorrow afternoon and get one when I get off work.
 

joepcdr

Seaman
Joined
Aug 24, 2013
Messages
68
No Title

Ask seller but it looks right to me; there was nothing rivited to the flywheel my guess is that it's the timing mark for TDC, can you take a clear pic and post it?

I asked and I bought. So we'll see how that pans out. Now oddly enough I may not need it. I went and took a picture of the flywheel to post. I happen to notice a semi straight line at the center divit if you want to call it that. I turned the flywheel so that the top piston was a TDC and from a visual stand point without having the distributor back on the motor yet. It looks to almost line up to where it needs to. It's kind of hard to see in the picture. I miss took it as dirt myself when I first saw it.
 

Attachments

  • photo261925.jpg
    photo261925.jpg
    106 KB · Views: 0

joepcdr

Seaman
Joined
Aug 24, 2013
Messages
68
She RUNS!!!!!!!! That mark in the flywheel I was questioning turned out what I needed to line up with the timing stick. Once I did that and put in some fresh fuel after cranking on her for a bit she fired right up. I learned in my make shift fuel supply that I'm using for temporary I have to keep squeezing the bulb to keep fuel in the line. But hey she runs!! Actually she runs quite well. Once I got her running, each time I shut her off she fired right back up. I now feel comfortable enough to spend more time on the whole project. She does need a new impeller for the water pump and while I'm at it if I can get it I'm going to go ahead and replace the thermostat. I'm glad I took the time to work on replacing the wires in the trigger myself. Saved myself a whole lot of money!
 

stripes1966

Cadet
Joined
Sep 13, 2015
Messages
14
Merc 850 could you please chime in on a question regarding the basic flywheel setup procedure. I have a 1973 650 that I am working on as well. I have read a number of different posts on how to set up initial timing. I do not have a plastic pointer it's long gone. To clarify, when everything is lined up correctly, #1 piston is at TDC, and the hidden distributor pulley arrow is pointing directly at 0 degrees i.e. TDC on the flywheel decal? I have read other posts instructing to point the hidden distributor arrow at the crankshaft center line at TDC. Could you please clarify which (if either) is correct? I had mine out yesterday and it is surging and stalling out dead at WOT but fires right up and idles fine. Flywheel was off when I bought the motor, I think I might be one belt tooth off, or maybe even more than one. I gotta be close, but no point in getting my timing light out yet if it's way off from the start. I shifted it one tooth on the water yesterday and it helped but I don't want to melt a piston. The way I have it set up now, at TDC that arrow points right at the crank centerline, and it runs with surges but dies at WOT.

And Joe, CONGRATS on repairing that distributor. That rocks. That took thought and effort patience and skill, all of which are needed as these motors become harder to find parts for. I tried to get my distributor apart and broke the rotor in the process, game over. I lucked up and got a whole parts motor for $100 and was giddy about it cause' I finally can get mine running. Take care of that distributor they are $$$$ for sure.
 

joepcdr

Seaman
Joined
Aug 24, 2013
Messages
68
Sorry guys I've been a way for a while. My work has kept me away and keeping me from what I enjoy doing the most. Anyway in terms of timing you need to have that little timing stick. Mine was missing on my motor and found a place online that I ordered it from for like $5. Now I don't know if your 850 is the same as the 650. But the timing marks on my 650 ended up actually being on top of the flywheel itself. From way it sounds your just off maybe a couple of degrees.
 

Wongsol

Recruit
Joined
Aug 15, 2017
Messages
2
My first post as my 74 650 is giving me all sorts of grief.

Congrats on the repair. You saved hundreds!

I have two questions.

1 - how do you bench test this trigger.
2 - can someone point me to instructions on how to disassemble the distributor?

I've bench tested the coil and switch box with the same procedure as the OP. All is good except for when I attach the distributor and turn it for spark. Nothing.
I purchased the motor not running. Compression is 120+. Had the lower end off and put new impeller on. Checked the shift dog operation.

Any help would be appreciated for this newb.

Thanks.
 
Top